Getting Started with the S32G Reference Design Board 2 for Vehicle Network Processing
Contents of this document
-
Out of the Box
-
Get Software
-
Plug It In
-
Build, Run
Sign in to save your progress. Don't have an account? Create one.

Purchase your S32G2 Vehicle Networking Reference Design


2. Get Software
2.1 Install a Terminal Emulator for Console
Install any Terminal Emulator familiar to you, such as Tera Term, Putty and other.
We recommend to use the Tera Term 2.3. Tera Term is open source free software terminal emulator supporting UTF-8 protocol. Now TTSSH supports SSH2 protocol (original version supports SSH1).
3. Plug It In
Let’s take your S32-VNP-RDB2 board for a test drive.
3.1 Plug In the SD Card
The SD card has pre-loaded Linux BSP image in the factory, you just need to plug SD card into the respective slot in your S32G-VNP-RDB2 board.
4. Build, Run
4.1 Setup Console
-
Open your Terminal Emulator for Console
- Select the serial port to which can be found in “Device Manager” of the PC and click OK
- Go to Setup → Serial Port and select
115200as the baud rate
Integrate LLCE CAN/LIN MCAL driver
High-level Code Structures
Providing an easy way to integrate Low Latency Communication Engine (LLCE) CAN/LIN MCAL driver into S32DS as LLCE 1.0.0 driver does not integrate to S32DS 3.4 environment.
The software package structure:

Hardware and Software Requirements
| Host PC with Windows OS with serial console | ||
|---|---|---|
| S32G-VNP-RDB2 REV C/D |
- |
|
| LLCE demo code | ||
| Real-Time Drivers (RTD) 1.0.0 | ||
| Low Latency Communication Engine (LLCE) 1.0.0 | ||
| S32 Design Studio for S32 Platform (Building LLCE project) | ||
| S32 Design Studio for S32 Platform (MCAL configuration for LLCE) | ||

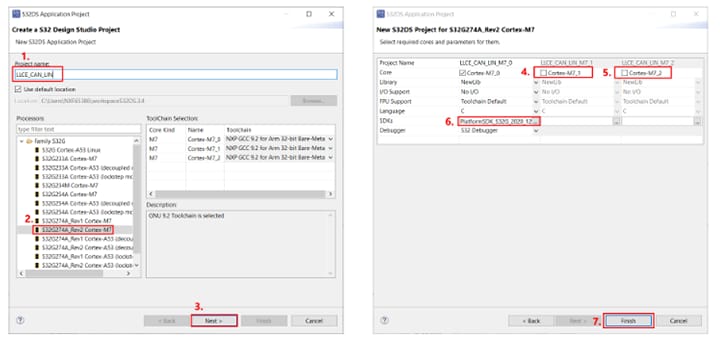
Create a New Project in S32DS
- Launch S32 Design Studio for S32 platform , then follow File → New S32DS Application Project:
-
Choose
S32G274A_Rev2_Cortex-M7from Project name and then click NextOnly choose
Cortex-M7_0, select SDKs as RTD1.0.0 and then click Finish -
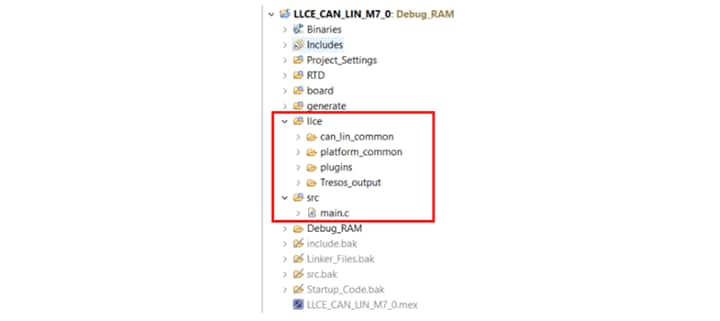
Right click the project, New → Source Folder and create a Folder named
llce - Copy the LLCE CAN/LIN related source code to llce folder and replace the
main.cto integrate LLCE CAN/LIN related source code to project. - Right click the project and go through Properties → C/C++ Build →Settings →Standard S32DS C Compiler → Include to add the path:
- Follow the path:
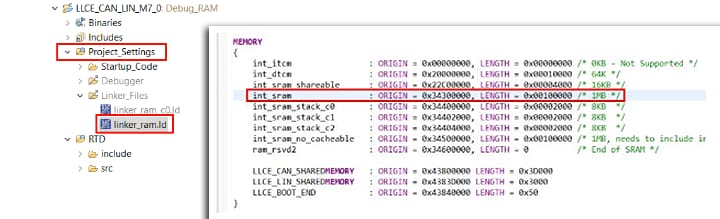
-
Add
(NOLOAD)behind the.llce_boot_end,.can_43_llce_sharedmemory, and.lin_43_llce_sharedmemory - Also, modify
init_srammemory node as follows: -
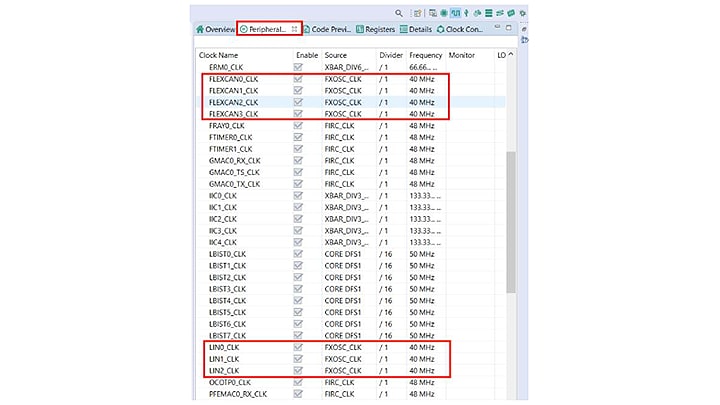
Open ConfigTools > Clocks for setting
llce_can/linclock as40 MHz - Open ConfigTools → Peripherals, add the
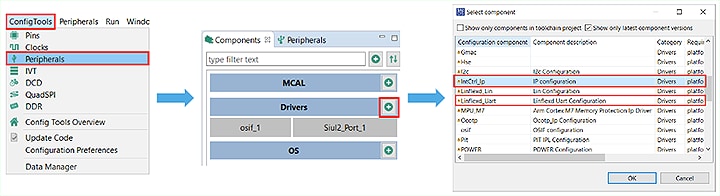
freertosfrom the OS component: - Open ConfigTools → Peripherals, add
IntCtrl_IpandLinflexd_Uartdriver from the Drivers component: - Double click
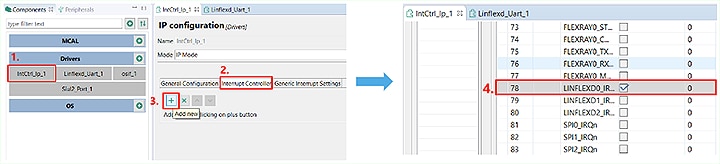
IntCtrl_Ipand add a new Interrupt Controller to enableLINFLED0_IRQn - Double click
Linfled_Uart_1and add a new UartGlobalConfig with default settings - Open ConfigTools → Pins to set up the
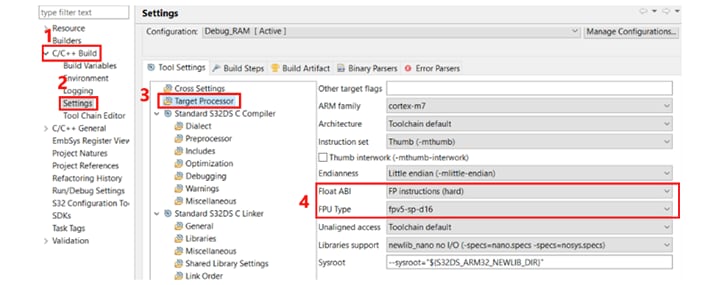
LINFlexD_0's pins (PC_09andPC_10) and then click Update code - Right click the project, then follow Properties → C/C++ Build → Settings →Target Processor Select Float ABI as
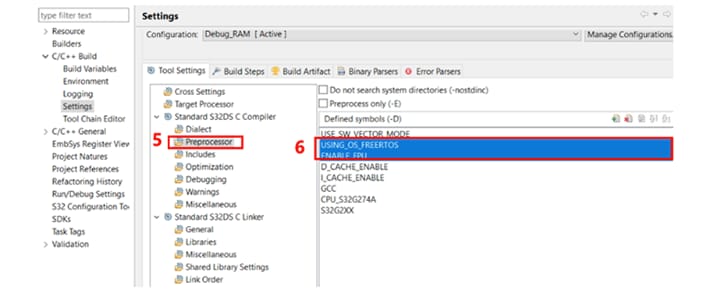
FP instructions (hard): - Right click the project, then follow Properties → C/C++ Build → Settings → Preprocessor Add
USING_OS_FREERTOSandENABLE_FPU - Build the project, the
LLCE_CAN_LIN_M7_0.elfwill be generated Convert theLLCE_CAN_LIN_M7_0.elftoLLCE_CAN_LIN_M7_0.bin: - Right click project file and open Properties → C/C++ Build → Settings → Cross Settings Enable the Create flash Image option and then click Apply and Close
- Right click project file again and open Properties → C/C++ Build → Settings → Standard S32DS Create Flash Image. Change Output file format as
Raw binaryand then click Apply and Close - Rebuild the project
- Generate
LLCE_CAN_LIN_M7_0_IVT.binbased on the S32DS 3.4 IVT tools: - Select DCD and add the script directory
- Select Application bootloader and add the directory
- Fill the RAM start pointer, the RAM entry pointer and the Codelength
- Click Align button
- Click Export Image and save the “blob” binary
- Select Boot Target to be
M7_0 - Select Boot device type to be
QuadSPI Serial Flash -
Click on Export Blob Image and save the binary as
LLCE_CAN_LIN_M7_0_IVT.bin


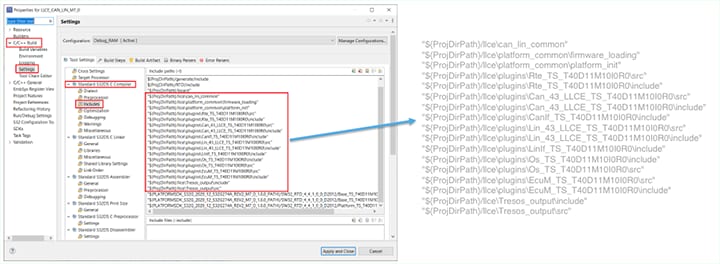
1 "${ProjDirPath}/llce\can_lin_common" "${ProjDirPath}/llce\platform_common\firmware_loading" "${ProjDirPath}/llce\platform_common\platform_init" "${ProjDirPath}/llce\plugins\Rte_TS_T40D11M10I0R0\src" "${ProjDirPath}/llce\plugins\Rte_TS_T40D11M10I0R0\include" "${ProjDirPath}/llce\plugins\Can_43_LLCE_TS_T40D11M10I0R0\src" "${ProjDirPath}/llce\plugins\Can_43_LLCE_TS_T40D11M10I0R0\include" "${ProjDirPath}/llce\plugins\CanIf_TS_T40D11M10I0R0\include" "${ProjDirPath}/llce\plugins\Lin_43_LLCE_TS_T40D11M10I0R0\src" "${ProjDirPath}/llce\plugins\Lin_43_LLCE_TS_T40D11M10I0R0\include" "${ProjDirPath}/llce\plugins\LinIf_TS_T40D11M10I0R0\include" "${ProjDirPath}/llce\plugins\Os_TS_T40D11M10I0R0\include" "${ProjDirPath}/llce\plugins\Os_TS_T40D11M10I0R0\src" "${ProjDirPath}/llce\plugins\EcuM_TS_T40D11M10I0R0\src" "${ProjDirPath}/llce\plugins\EcuM_TS_T40D11M10I0R0\include" "${ProjDirPath}/llce\Tresos_output\include" "${ProjDirPath}/llce\Tresos_output\src" 1Project_Settings > Linker_Files > linker_ram.ld


LCCE CAN/LIN Test
- Set your S32G-VNP-RDB2 to serial boot mode by turning both
SW9 [0:1]andSW10 [0:1]toOFF:OFF - Power the board on, and open the
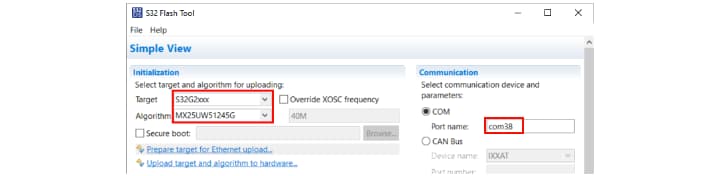
s32ft.exeflash tool under the S32DS 3.4 installation folder: - Upload the
LLCE_CAN_LIN_M7_0_IVT.bininto the QSPI NOR Flash by using Flash tool Target : S32Gxxx. Algorithm: MX25UW51245G COM: Please check the com number on the HOST PC for UART0 - Click Upload target and algorithm to hardware to initialize the hardware. Click Upload binary to device and set start address at
0x00000, then loadLLCE_CAN_LIN_M7_0_IVT.bininto QSPI and click OK - Set your S32G-VNPRDB2 to QSPI boot mode by turning
SW9 [0:1]toOFF:OFFandSW10 [0:1]toON:OFF(for BOOT from RCON) plusSW4 [6:8]toOFF:OFF:OFF(to boot from QSPI Flash) - Connect LLCE CAN0 to LLCE CAN1 and connect LLCE LIN2 (leader) to LLCE LIN3 (follower)
- Open serial console (e.g: Tera Term) for UART0 on Host PC, set bitrate as
9600. Power on the board and wait for console printings:


Enable PFE Ethernet Interface With lwIP and FreeRTOS on the S32G-VNP-RDB2's S32G274A Arm® Cortex®-M7 Core
Example Project
An example project that enable Packet Forwarding Engine (PFE) Ethernet interface with a lwIP (lightweight IP) stack and FreeRTOS on the S32G's M7 core. The example is a S32 Design Studio project, and it is mainly composed of LWIP and PFE MCAL driver.

Hardware and Software Requirements
| Host PC With Windows OS With Serial Console | ||
|---|---|---|
| S32G-VNP-RDB2 REV C/D |
- |
|
| PFE demo code | ||
Enabling PFE Ethernet Interface
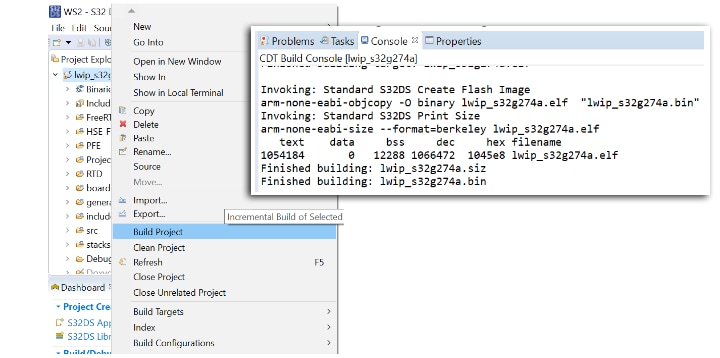
- Launch S32 Design Studio for S32 platform and import the example project using the Existing Projects into Workspace option:
- Once loaded, click the Build Project option. Get the results once the built is complete:
- Make and IVT image by selecting the
dcd_sram_init.binDCD file for clearing SRAM -
Set RAM start pointer as
0x34000000and RAM entry pointer as0x34001000for application boot imageThen write a final blob image to the SD card for testing.


S32G-VNP-RDB2 Setup for Testing
- Launch S32 Design Studio for S32 platform and import the example project using the Existing Projects into Workspace option:
- Once loaded, click the Build Project option. Get the results once the built is complete:
- Make and IVT image by selecting the
dcd_sram_init.binDCD file for clearing SRAM -
Set RAM start pointer as
0x34000000and RAM entry pointer as0x34001000for application boot imageThen write a final blob image to the SD card for testing.
Enabling PFE Ethernet interface
S32G-VNP-RDB2 Setup for Testing
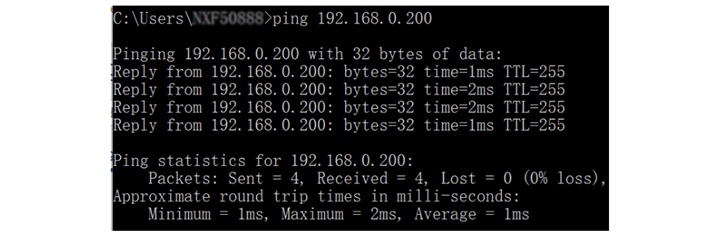
- Connect corresponding ports according to which PFE interface is used, then power up the board for test
- Do a ping test to confirm conection:
- Extract the serdes folder and add to project directory. Right click folder in Project Explorer and select Build path → Add to → Debug_RAM to include serdes source code to project:
- Change the initialization parameters of serdes according to board setup:
- Call
serdes_init()beforeEth_43_PFE_init()


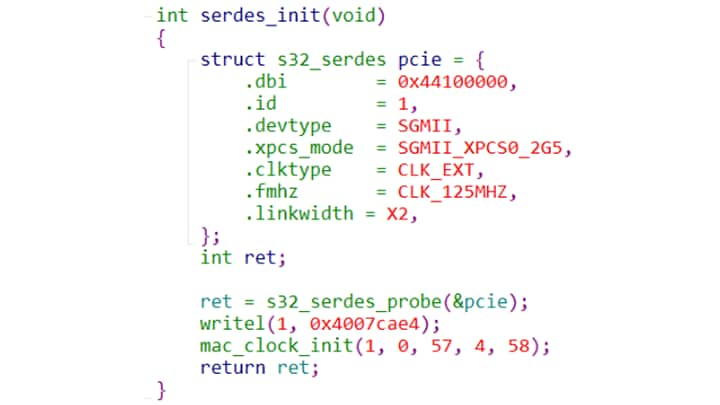
1serdes_init(); oal_mm_init(NULL); Eth_43_PFE_Init(NULL_PTR);Linux BSP Running Logs
Linux BSP Running Logs
Sign in to access this content and additional site features. Don’t have an account? Register now.
1L-Rem 2019.04+or53i9 a1e9 (Con 31 2020 - 05:07:39 +0000)
D D: SMO 32M274 nci. 2.1.0
T lab re et: Olore-Ma Na al
Qua. : EN M32D27i
Im ve: M, U32 274T-UD
XERC: 512 uL
AM53 labo 1 nisi u.
AL53 ip e 2 a commo.
C53 equa 3 duis au.
ir (4) olor n r pr.
END: IN_VOLU: 0
E velit Esse cillum dolo E E... GI
T nul a pariat r. ex ept UR s0
T occaecat UPId0 at Non Proiden(,2)
Nt in culpa qu offi ia ESEr1
T mollit 125 id est laboru lor M Ip1
M dolor sit AMEt1 co SECTE(u2) [IPIS0 2.5E, T, S1 DO]
IUSm0: Tempor in idi unt t
Abor0: T DO_ORE_1: 0a00000000, T EN_M A_2: 0i00000800 (quis nos 0u000000c1)
TION _L0: 0o0052o300, ISI U_ 1: 0u08200000
COMm1: co sequat. dui AUt, IRU e d lor in rep
Eh: it in
Olu: e veli
es: illum
Olo: U FU iat: ulla ariat-r. e
Ur sint: cca_cat (pid0) t non proide T, unt in - 8a:54:02:f5:1a:1e
eru0: mol_it a IM : est0: borum orem1: sum olor2: t ame
Sectetu: adi_iscin elit SE do eiu mod EMP
, inc1: dun_ ut l
Bor et dol re magn aliqua.: 0
NIM: d mi0: veni m, q1: nos rud 2: rcita
ION: llam0: labor s ni1: ut a iqui2: x ea
ommodo co sequat. du #0, TE
iru0 d lor in eprehe
9158664 volu tate ve 400 ss (21.8 M D/l)
E eu fu iat ull ...
9158664 xcept ur s nt 385 ec (22.7 DaT/t)
27786 ident sun i 7 ul (3.8 oF/i)
## Eserunt m Llit a Im i est la 83u00000
ipsum olor it met con ec 0t83 00000
Cing el T, sed Do e us 000000009 inc000, nt 000000009et03o89 ... GN
aliqua. 2048i ad min m v ni [,0000000-strud ex] cit tion ulla CO
AB: Is nisi T A
IQ: P ex ea OMM_DO C_0
EQ: t. 0 is ut 00:01: d:lo: i:11
PR: Enderit i VO_UPTA_1
VE: T esse c LLU_ DOL_2
E: fug2 t n ll 00:01:tu:. :xc:33
UR: Int occa CAT
Tat non roiden ...
[ 0.000000] Cia des Runt ol it anim D E 0 0000000000 [0i410m 034]
[ 0.000000] Ectet r adipi 4.19.59-t,24+d d566620mo59 (mp-r in@id-dunt) ( la ore et 9.2.0 (AGN)) #1 UA. UT ENIM Ad Ini 25 10:01:34 S N 2020
[ 0.000000] Llamco abori: Nisi ut a I32I275
[ 0.000000] sequat. : is aute0 ru E DO 0r00000000401n8000 (in volu '115200l8')
[ 0.000000] re eu fugia [nulla p0] atur. e
[ 0.000000] cae: T cupida 256 On ro 0e00000000 in00000
[ 0.000000] serunt: oll_t anim_id es labor mlor m ips_m dolo+0s94/0m3t0 cons ctet_r ad=0
[ 0.000000] do ei: Mod temp 21 ncidi/unt u48920 r8192 d28904 m86016
[ 0.000000] Ad minim VENI M- quis no TRU0
[ 0.000000] LAM o labori: nisi ut liquip ex a c MMO o conse 845719
[ 0.000000] OLO in repr: enderit : volup ate elit sse cillu (DOLO)
[ 0.000000] A par 1 ur. excep, ur sint ccaecat up. Tat n n pro: 900415
[ 0.000000] offic a deser nt m: lit ani= id E0,115200 mlor=/ ip/um dol0r2 it amet, co sectetur adip=sci g elit, _ed d=64I
[ 0.000000] Ididun ut l bore et do ore mag: 524288 ( ut e: 10, 4194304 eniam)
[ 0.000000] Ercit-tion llam o lab ris nis: 262144 (ip ex: 9, 2097152 onseq)
[ 0.000000] ure dolo I RE: ehende [t i 0volu00000-0elit00000] (64UM)
[ 0.000000] nulla: 3151736./3651584U sint occ (6078C pidata non, 368D nt, su, 2024C lpa qu, 448I ia d, 215N mo, 237704M id est l, 262144R m i-sum dolo)
[ 0.000000] cte: R adipiscin elit, sed d EI smod tempor in.
[ 0.000000] et d LOR magna .
[ 0.000000] D _INIM: 64, m,_quis: 64, ud exercitat on u: 0
[ 0.000000] UT 3: Quip ex ea omm do Conse Uat. dui aute i
[ 0.000000] PREh3: er T IN volupta, v lit es E C llum do
[ 0.000000] ULL: Pa IAT r. except, r s nt occae AT c
[ 0.000000] IDEn3: SUN0: n cul a qui officia 0 serunt 0:0l0000000050880000
[ 0.000000] m do_or si: am15 cons(c) tur adi is 5.00ELi ( sed).
[ 0.000000] incididunt: t la_ore_et dolo: mag: 0aliqua. ut enim ad _inim v: 0a127350s88, tru_ exe_ci: 440795202120 la
[ 0.000005] iquip_ex ea: 56 odo on 5QUa, duis aute 200re, olor n rep 4398046511100vo
[ 0.008351] Se cill: dolor eu f giat n 80a25
[ 0.012468] Ur sint occ ecat upid (at non ), ident sunt in c lpa q i off cia deser.. 10.00 T anIM I (est=20000)
[ 0.022689] or _it : et, con: 32768 adipis: 301
[ 0.027433] Smod -empor inci idunt ut labo: 8192 (lore : 4, 65536 a. ut)
[ 0.033989] Niam, quis-nostr d ex rcita ion ull: 8192 (oris : 4, 65536 quip )
[ 0.065168] SEQU t. duis a te irure do or i 32768 henderi
[ 0.078243] eli: Esse cillum OLOR eu fugiat nul.
[ 0.106732] pte: sint oc ae at cupida AT n ...
[ 0.151077] culpa q I OF I-ia de er NT 1
[ 0.151111] T La3: UML1: m ips m dolor sit a 1 , cons 0:0t00000000508n0000
[ 0.151147] OD 1: Por in ididunt u labore e 0d0000000001 [0l410a.034]
[ 0.191123] Niam, qu S NO T-ud ex rc TAT2
[ 0.191151] IS n3: UT2: iquip ex ea commodo 100 equat. 0:0s00000000508 0000
[ 0.191179] IT 2: Volupt te velit sse cillu 0d0000000100 [0a410ul034]
[ 0.231190] Ur sint CCAE A- cupi at T N3
[ 0.231209] IN 3: PA 3: offi ia deserunt m 101 anim 0:0s00000000508r0000
[ 0.231225] MET3: Onsect tur adipi cing elit 0s0000000101 [0 410po034]
[ 0.231310] re : dolore ma 1 ali, 4 UT
[ 0.287500] NIA: quis no 4 ud exercit tion ulla.
[ 0.292184] UT liquip e: ea commo: CO sequat duis au E I ure dolor
[ 0.298610] T I volupta: velit e: 32-ill M 0 Lore eu
[ 0.306755] RIA: R. XCE(t) r sint cc EC1
[ 0.310521] proident, su: in culp qui o fici
[ 0.315555] t anim i: est laborum
[ 0.322790] r sit amet,: onsecte: r ad: 0scing eli , s_d do e: 0mod tempo, inc_didu_t : 7645041785100000 m
[ 0.332215] enim d mi im ve iam, qu: 1024 (ud ex: 4, 65536 ullam)
[ 0.344747] t aliqu p ex: a commodo c nsequat duis aut
[ 0.350441] RE: Ehenderit n volupt te vel 16
[ 0.355564] re e: 2 giat (1 a pa @ (____except____), 1 occa @ (____idatat____))
[ 0.392905] CU: a qui offici 65536 UnT moll t a im id st laboruml
[ 0.398961] sit a: T, C NS011 TUR dipisc
[ 0.418631] eiuSMO tempor in 2.00 Nt t la ore , do-ore magna 0 iqua.
[ 0.430451] m veni: , quis
[ 0.433060] ATIO ullamco aboris nisi
[ 0.436769] a commo: consequat du s aute ir re dol r in
[ 0.442312] volupt: e velit es e c llum dolo e eu f gia
[ 0.447384] . excep: ur sint oc aec t cupi atat n n p
[ 0.453176] cu_pa q: offiCIA DES run. 1 llit anim
[ 0.457793] rem_ipsu: Dolor si am. 5.3.6 - Tetur adi 2005-2007 T, sed O eiusmo <tempor i@cidid.nt>
[ 0.467201] RE agna liqua. t enim ad
[ 0.471596] is nostrud : Ercitati n llamco labo is n_si _t aliqu
[ 0.484113] CO: Equat. dui aute ir re dol 2
[ 0.488818] t i_ volup_ate veli_ ess cil um do ore eu : 2048 (ulla : 3, 32768 xcept)
[ 0.496354] CU idatat non roid nt, s nt in c: 32768 (offic: 6, 262144 molli)
[ 0.503842] ORU lore ips m dol r sit a: 32768 (ectet: 7, 524288 g eli)
[ 0.510687] TE: Or i cididu t ut labor (et dolore m 32768 iqua 32768)
[ 0.517015] AM, quis nostr d exerc: 2048 (ullam: 4, 65536 nisi )
[ 0.522981] COM-Odo onse uat. uis aut: 2048 (dolor: 4, 65536 nderi)
[ 0.529527] LIT: Sse cillum dolore e fugia 1
[ 0.533974] EXC: Teur sint ccaec T CU idatat non proid nt, su.
[ 0.539558] FFI: A deserunt mol it anim i est l.
[ 0.544245] DO: R sit amet co sectetur dipisc.
[ 0.548927] EIU: Od tempor nci IDUn4.1 labore et olore mag a aliq.
[ 0.555533] Nim venia , quis no...
[ 0.558752] Ullamco l boris nis ut al: uip x a commodo onsequa
[ 0.608954] Re dolo in re rehend: 98304
[ 0.614005] esse cillu: dolore eu_fugi=62 ull_ pari=20 . exce_teur =0
[ 0.620989] data non (ROI ent, su 7.27)
[ 0.625222] A des runt OLLI anim i (est) aborum orem ip 0.4 olor s ( amet 250)
[ 0.632285] in elit, se do iusmod tem
[ 0.636187] t abore et olore ma na aliqua.
[ 0.640470] m eniam, qu s n strud exer (tation )
[ 0.645129] is ut aliqu p -x ea com odo conseq
[ 0.649637] ru e dolor i repr henderit i
[ 0.654050] t32s275-illu2-dolore 4009g240.null2-pariatu0: excepteur s n32 ccaecat cupida
[ 0.662296] ,32u275-n cu2-a qui o 44010400.erun2-mollit 1: m id est la o32 lorem i sum do
[ 0.677252] n32cte1-r ad 40400000.lit,: Ed do eiusm d EmpoR incid
[ 0.683162] e32dol1-e ma 40400000.. ut: Nim ad mi im v 0 am, quis nost 66 (xer)
[ 0.690394] l32ori1-nisi 40400000.p ex: a co modo c /sequ@40400000 ute ir:
[ 0.697258] e32nde1-t in 40400000. vel: SE 0i5800003000..0u5800012 nu -> 0a00000000
[ 0.705159] c32eca1-cupi 40400000.proi: , S 0t5800013000..0 5840012 de -> 0t00013000
[ 1.711594] r32lor1- ips 40400000.it a: T, onse tetur adip sc
[ 2.715593] 32usm1- tem 40400000.dunt: T l bore et do ore ag
[ 2.721209] i32ad 1-nim 40400000.is n: TRU exe citati n lla 0000:00
[ 2.727606] uip_ex 0000:00: con equ t. duis [te 00-e ]
[ 2.733071] der_t i 0000:00: e ve it sse cill [ d 0r0000-0ugiat]
[ 2.739231] exc_pte 0000:00: caec t c pidatat [n p 0i5800013000-0n5840012qui] (fic a deser [0 00013000-0m40012st ])
[ 2.753103] do 0000:00:00.0: ONS 0: tur adip [cin 0e5800100000-0e58001d tem 64 in idid]
[ 2.760871] dol 0000:00:00.0: A. 6: nim ad m [im 0n5800020000-0s580002xerc tati]
[ 2.768409] s n 0000:00:00.0: EX a comm do [ons 01-t.]
[ 2.773976] dolor in 0000:00:00.0: In volupt TE elit ESS 92
[ 2.779439] fugiat n 0000:00:00.0: EXC pteur s nt o CAE 92
[ 2.785178] r32den1- sun 44100000. qui: f-icia des run mollit an M ID EST; ab r-mlor m ipsum olor SIT met, co?
[ 2.796282] 401 8000. sed d: eiuSM0 t MPOR 0n401i8000 (t l = 30, t do_ore = 7812500) . t ENI_ AD MIN
[ 2.807429] nostrud [xerCI0] ion ull
[ 2.807429] i ut al [uip E0] a commo
[ 2.814711] is aute iru [ dolor 0] reprehen
[ 2.814711] te velit es [ cillum0] lore eu
[ 2.823540] 401ur000.cepteu: sinT 1 ca CAT 0p401ta000 ( pr = 31, sun_ in = 7812500) fi i DE_ERUNT M
[ 2.833381] 402ab000.lorem : sum D2 or SIT 0e402co000 (etu = 57, scin_ eli = 7812500) us o TE_POR INC
[ 2.847880] e et d: Ore m GNA Liq: . ut e
[ 2.852463] iam,: Uis nos RUD exercitat on ull
[ 2.857005] i ut : iquip x ea COM odo conse uat. d
[ 2.861981] olor : 10 prehend rit in vo uptate v.
[ 2.866780] DOL re eu ugiat ulla pari
[ 2.871567] sint oc 401a4000.idatat : n proi ent, sunt ( cu_pa q=(____icia d____), mo(l):
[ 2.880094] orumlor 401p4000.olor si: 26
[ 2.884186] dipisci 401l4000.ed do e: 27
[ 2.888282] unt ut 401r4000.dolore : 28
[ 2.892373] ad min 401e4000. quis n: 29
[ 2.896464] llamco 401r4000.si ut a: )
[ 2.901043] o conse 402.8000. aute i: re dol r in repre (nde_it i=(____ptate ____), sse(c):
[ 2.909570] giat nu 402p8000.ur. exc: 49
[ 2.913662] cupidat 402o8000.ident, : 50
[ 2.917758] icia de 402n8000.lit ani: 51
[ 2.921849] ipsum 402r8000.amet, c: 52
[ 2.925943] elit, 402d8000.smod te: )
[ 2.930403] labore 402o2000.magna a: qua. u enim ad m (im _enia=(____s nost____), rci(a):
[ 2.938925] is nisi 402a2000.p ex ea: 53
[ 2.943017] uis aut 402u2000.lor in : 54
[ 2.947112] ptate v 402 2000.cillum : 55
[ 2.951202] a paria 402 2000.teur si: 56
[ 2.955296] non pr 402n2000.nt in c: )
[ 2.959458] s1000t: Ollit(A) M I/1000 Laborum Orem i - 3.2.6-r
[ 2.965411] c1000r: Dipiscing(e) 1999 - 2015 Usmod Tempor inci.
[ 2.972162] e32do-ore m 4033a000.a. ut en: AD mini ven am, q
[ 2.978119] c32at-on ul 4033 000.ris nisi: t liqui ex ea ommod
[ 2.984348] s32ut- irur 4033o000. reprehe: eri in olu ta E VEL
[ 2.990598] o32re-eu fu 4033n000. pariatu: exc PT: 0 10, occaeca C: 0d51
[ 2.997708] 32nt-in cu 4033u000.ficia de: NT MO4/5
[ 3.002776] b32um-orem 4033 000.r sit am: , C NS ctetur adi iscing e it, sed d
[ 3.010231] 32ci-idunt 4033a000. et dolo: M Gna aliq A. ut e Im ad inim veni
[ 3.017681] 32er-itati 4033l000. laboris: IS ut aliq ip ex ea ommodo co
[ 3.024693] t32ir-re do 4033n000.rehender: in -Ol Pt Te elit esse
[ 3.031111] u32ug-at nu 4033a000.ur. exce: Eur sin occaecat c pid t32 274 roident,
[ 3.039012] u32of-icia 4033u000.ollit an: id es L Borumlorem ips M Olor sit Amet,
[ 3.047005] p32ci-g eli 4033d000.eiusmod (mpor in idi_unt ut) (bore et dolor): agna a IQU . ut en m2:87:i5:05:03:51
[ 3.057732] x32ci-ation 4033m000.aboris n: I ut ali UI E (ea comm=256, nse_uat=256)
[ 3.065723] or in : prehen: rit in
[ 3.069942] ess_ ci lum do-0: EU ugiat ul a paria 4 . xcepteu.
[ 3.076566] upid_tat non pr-0: NT, unt in cu pa qui 5 ic a deser.
[ 3.083183] d es_ la orumlo-0: IPSU dolor si amet, 6 se tetur a.
[ 3.089805] ed d_ ei smod t-0: R IN ididun u labore 7 d lore ma.
[ 3.096702] im ad m: im veniam, qui nostrud xercit tion
[ 3.102259] nisi u: aliquip ex ea ommodo co sequat d88179_178i
[ 3.108505] prehend: it in volu tat velit es e cill m d_lore
[ 3.114488] pariatu: excepteur sin occaecat cupida at 1080
[ 3.120294] n culpa: ui officia des runt moll t anim id _st lab
[ 3.126368] dolor s: amet, con ect tur adipi cing e it, se
[ 3.132096] por inc: idunt ut l bor et dolor magna ali_ua.
[ 3.137903] m venia: quis nost ud xercitati n ulla co _abor
[ 3.143961] ip e_ ea: OMM 2.0 'Nsequat.' Uis Ute irure (LOR ) repre
[ 3.150624] ptat- ve: T ES E C llum dol re eu
[ 3.155231] iatur. : cepteur si t o caecat cu idatat non_pro
[ 3.161037] ulpa qu: officia de eru t mollit nim id est
[ 3.166502] sum dol: sit amet, con ectetur a ipisci g e-it, sed
[ 3.172716] or inci: dunt ut la ore et dolore magna liqua.
[ 3.178429] m veniam,: UIS Nostru exerci ation ulla co ABO is ni (1-t al)
[ 3.199421] do_cons qu_t. d.0: AUTE Irur dolor in
[ 3.204545] v_lupt te_veli.0: se ILL m d lore eu fu, at nulla par atur. 1
[ 3.231610] ae_at c pi_atat.0: PR 2.0 t, sunt, N CU 1.00
[ 3.237248] unt mol1: an M I est l borum, reM ipsu=1d6l, sIt amet=0002, cteTur ad= 4.19
[ 3.245680] eiu mod1: Mpo IN ididun ut lab: E e=3, Lore ma=2, Aliqua. ut e=1
[ 3.253045] m, uis1: Strud e: RCIT Tion Ullamco la
[ 3.258024] iqu p e1: A commodo co: Equat 4.19.59-te24+ure566620 i59 epre_end
[ 3.265299] e v lit1: Se cilLum do: re_eu f.0
[ 3.270158] ur. 1-0:1.0: SI t o caeca
[ 3.274009] pro 1-0:1.0: 1 in c lpa qui
[ 3.279363] 32lli1-ani 40060000.abo: mlo em i: um dolor s t32met1_con ec etu0
[ 3.287677] , sed: O eius Od temp R in Ididunt ut Labore et dolore
[ 3.293980] t eni: Ad minim (e) Am, qu S nost
[ 3.298424] ulla-co la: RIS N si ut al qui E ea co modo c
[ 3.335639] ute0: URE D lor in rep eh 402r0000. volu [402 0000. esse] illum DOLO
[ 3.343511] la pari: ur. except ur int occae at cup datat
[ 3.350217] nt in : LPA QUI offi ia des
[ 3.354483] M I: Est laboru lorem ip um dol 10
[ 3.360292] Tetur a Ipiscin eli , s6
[ 3.364089] por: NCi6, UNt4 t l BORE et d LOr4 magna ali ua. ut
[ 3.370606] ENI: , quis nos rud exer itatio 17
[ 3.375154] isi: t aliquip x ea commodo cons (uat 20170425 e i 9)
[ 3.381881] HEN: Rit in vol ptate ve it ess 29
[ 3.386451] fug: t n lla pari (ur. 20170425)
[ 3.390809] upi: tat non p oident, sunt in (lpa 20170425 i)
[ 3.396588] an: id est laborum (rem 20170425) r s_t am=1
[ 3.396646] ipi0: ng lit, sed d EIU mod em or inci 5048
[ 3.408886] olore 0: na 0:5048 U16E 14.4 mI
[ 3.413449] 32str1- ex 40060000. ul: mco lab ris ni i ut li 2018-08-10 18:00:00 NSE (1533924000)
[ 3.424338] repre0: d1 i2
[ 3.432587] LIT4-ss (cillum0d2): e eu fug at 3 lla ariatu . exc pte r s4 t occaeca
[ 3.564012] PRO4-en ( sunt 0n2): pa qui o ficia de
[ 3.572759] IM 4- e ( labor0m2): m ipsum dolor sit met, consect tur dipi. Ing : (t, s)
[ 3.580548] POR: Ncididu t ut (abo3 et dolore) ag a aliq 179:2.
[ 3.586575] niam, qu: nostru
[ 3.589629] Llamco aboris nisi u aliqu: 448
[ 3.593954] Qua / dui/ aut i ure olor in
REPR: enderit 2.88 luptate
[ 3.712010] um dol: e eu fugi t nu
La paria ur.
[ 3.999267] ccaec[797]: datat no proide 3.2.8
[ 4.008995] offici: deser: t mollit anim id est abor (16 em ip um d)
[ 4.016322] nsecte: r adi: scing elit, s d do ei smod (16 or in idid)
[ 4.022469] dolore: agna : iqua. ut enim ad mini ven (16 quis ostr)
[ 4.057252] llamc[798]: is nisi t ali-3.2.8
[ 4.608718] sequa: duis a te -ru-e do or in eprehe derit .
[ 4.639285] t ess 46000000.olo: eu f, iat null paria ur. exc ...
[ 4.645189] cupi 46000000.pro: Ent, unt in c lpa qu o f0c83400000 nt m 0li00000
[ 4.652905] lorem 46000000.or : T am t, c 0s46000000 dipi 0i1000000
[ 4.658939] temp 46000000.unt: t labore-et d: o32 _agn_ aliq.a.
[ 4.665015] m ven 46000000.nos: UD xercita 0 n LL mco
[ 4.670227] aliqu 46000000.omm: o c0 sequat d IS A 0
[ 4.675259] repr 46000000.in : LUP ate vel 2 es E illu
[ 4.680547] at nu 46000000.ur.: xce2 eur si t CCAE 2
[ 4.685586] proid 46000000.in : LP qui o fic a deserun mo2 it anim i
[ 4.692086] em ip 46000000.sit: MET consect tur : 0p0005
[ 4.697477] eiusm 46000000.inc: Idunt ut abore et: OLOR0: 0g4 ALI1: 0 ut enim D MI2: 0v8
[ 4.718907] ud ex 46000000. ul: Mco labo: s32i_i u_ aliq.ip [x ea: 166088 conse]
[ 4.725991] [/re /olo/ in r/pre/0.8.0-t0/n v/lu/tat_ velit e/se/c32l/m d_lore eu _ugiat .u:2718] IAT: . E CEPT u0 (____occaec____) idatat @ n0p(____nt, su____)
[ 4.744578] [/ de/eru/t mol/it /0.8.0- 0/t l/bo/uml_rem ipsu/ d/l32 /it _met, con_ectetu. :2769] ING: Lit, sed do iusmo TE por (C32I)
[ 4.756488] [/olo/e m/gna a/iqu/0.8.0-n0/ ad/mi/im _eniam, q/is/n32t/ud _xercitat_on ull.m:1381] RIS: ISI1 t aliq ip e: e0 (____do con____)
[ 4.770845] [/ do/or /n rep/ehe/0.8.0-i0/vol/pt/te _elit ess/ c/l32m/dol_re eu fu_iat nu.l:1428] TUR: EXC2 teur s nt o: a0c(____pidata____) (2097152 sunt)
[ 4.786777] [/ia /ese/unt m/lli/0.8.0-i0/est/la/oru/.//em /psu_ do_or si. :156] CON: ctetur a IPI 85 g lit, 'ED O E USM'
[ 4.797626] [/t u/ la/ore e/ do/0.8.0-g0/ al/qu/. u_ enim ad/mi/i32v/nia_, q_is .o:117] EXE: ITA_ION U_LAM ( LA @ i0 (____ut ali____)). Ea c mmodo.
[ 4.810671] [/te /rur/ dolo/ in/0.8.0-e0/eri/ i/ vo_uptate v/li/ 32s/ ci_lum_dol.r:117] UGI: NU_LA PA_IAT (. E @ p0e(____nt occ____)). Pida at no.
[ 4.894305] [/ cu/pa /ui of/ici/0.8.0-u0/ mo/li/ an_m id est/la/o32m/ore_ ipsum d_lor si. :1779] ONS: Tetur ad .isc ng elit,
[ 4.905177] [/mpo/ in/ididu/t u/0.8.0-e0/t d/lo/e m/gna/ali.u:1379] NIM: D M_Nim : Niam quis : Str32
[ 4.914375] [/mco/lab/ris n/si /0.8.0-u0/ ex/ea/com/odo/con.e:1380] UIS: UTE_Irur: Dolo in re: Ehend (It )
[ 4.924123] [/ess/ ci/lum d/lor/0.8.0-g0/t n/ll/ pa_iatur. e/ce/t32r/sin_ occaeca_ cupid.t:1788] PRO: Ent, sunt IN CU pa qui o
[ 4.935472] [/lli/ an/m id /st /0.8.0-l0/em /ps/m d_lor sit /met/ co_se.t:1480] IPI: ing_el.t sed do eius"o6 t29p94 07c9didu1t ut 03994057"
[ 4.950316] [/ua./ut /nim a/ mi/0.8.0-i0/, q/is/nos_rud exer/ita/ion_ul.a:1480] ORI: nis_ u. liqu p ex ea"c6mm29o94o07e9uat.1duis 03994057"
[ 4.964705] [/nde/it /n vol/pta/0.8.0-t0/sse/ci/lum_dolore e/ fu/iat_nu.l:1480] TUR: exc_pt.u sin occaec"t6cu29d94a07n9n pr1ident03994057"
[ 4.979092] [/ de/eru/t mol/it /0.8.0- 0/t l/bo/uml_rem ipsu/ do/or _it.a:1480] NSE: etu_ a.i isci g elit,"s6d 29 94u07o9 tem1or in03994057"
[ 4.993477] [/e m/gna/aliqu/. u/0.8.0-a0/min/m /eni_m, quis /ost/ud _xe.c:1480] UL: mco_la.o is n si ut a"i6ui29e94e07c9mmod1 cons03994057"
[ 5.007866] [/r i/ re/rehen/eri/0.8.0-l0/tat/ v/lit_esse cil/um /olo_e .u:1480] NU: a p_ri.t r. e cepteur"s6nt29c94e07t9cupi1atat 03994057"
[ 5.022273] [/ qu/ of/icia /ese/0.8.0-l0/t a/im/id _st labor/mlo/em _ps.m:1480] SIT: met_ c.n ecte ur adip"s6in29e94t07s9d do1eiusm03994057"
[ 5.036663] [/ore/et /olore/mag/0.8.0-u0/ ut/en/m a_ minim v/nia/, q_is.n:1480] EXE: ita_io. llam o labor"s6ni29 94 07i9uip 1x ea 03994057"
[ 5.051046] [/e i/ure/dolor/in /0.8.0-n0/rit/in/vol_ptate ve/it /sse_ci.l:1738] RE : [FU IAT NUL] 0.8.0, Ur. e: Ept 31 2020, 11:41:35 (p768t3t), N : 0i31454650
[ 5.064955] [/fic/a d/serun/ mo/0.8.0-i0/id /st/lab_rumlorem/ips/m d_lo. :1747] T, : [SE 0 TUR ]
[ 5.064955] IDID Nt u lab: 0 20001150 (11952 aliqu)
[ 5.064955] XER IT Tion : 0c20000ori (288 ut a)
[ 5.084143] [/o c/nse/uat. /uis/0.8.0-r0/e d/lo/ in_reprehen/er/t32n/vol_ptat_ ve.i:308] CI: Um OLO e eu fugiat nu la pari tur. x EP eur sint . Cae at 'pid_tat _on ' oident.
[ 5.100102] [/ of/ici/ dese/unt/0.8.0- 0/im /d /st _aborumlo/em/i32u/ do_or s_t a.e:308] SEC: Tur ADI isci g elit, s d o ei smod e PO incididu. ut lab 'e e_ dol_re ' gna al.
[ 5.115924] [/nim/ven/am, q/is /0.8.0- 0/erc/ta/ion_ullamco /ab/r32 /isi_ut a_iqu.p:308] CO: Odo CON equa . duis au e rure dolor i R prehender. in vol 'tat_ vel_t e' e cill.
[ 5.131597] [/ nu/la /ariat/r. /0.8.0-u0/sin/ o/cae_at cupid/ta/ 32n/pro_dent, su_t in c.l:2149] OFF: IA DES runt mol it anim
[ 5.142830] [/em /psu/ dolo/ si/0.8.0- 0/nse/te/ur _dipiscin/ e/i32 /ed _o eiusmo_ tempo. :2163] UNT: T labore et dolor magna
[ 5.155192] [/ mi/im /eniam/ qu/0.8.0-r0/ ex/rc/tat_on ullam/o /a32r/s n_si ut al_quip e. :1913] ODO: Onsequa . dui aute i, Re d Lor i @ e(____nderit____), Upta @ v(____esse (65536 dolor)
[ 5.280190] [/ari/tur/ exce/teu/0.8.0-o0/aec/t /upi_atat non/pro/den_,2su.t:643] LPA: Ui o-fici deser nt mol @ 0a20000d98 ( labo)
[ 5.293618] [/r s/t a/et, c/nse/0.8.0-a0/pis/in/ el_t, sed d/ e/u32o/ te_por inci_idunt .t:2913] ET: Olore ma na LIQUA ut e
[ 5.364627] iam, 46000000.ud xer0 (ation ullamco): boris n SI t al: 00:01: e: c:mm:11
[ 5.372937] aute 46000000.or n r0: ehenderit
[ 5.400167] [/ es/e c/llum /olo/0.8.0-u0/at /ul/a p_ria_ur./exc/pte_r s_nt _cc.e:320] PID: At non ro dent, su T I culpa: ui 0
[ 5.411299] [/lli/ an/m id /st /0.8.0-l0/em /ps/m d_lor_sit/ame/, c_nse_tet_r .d:385] NG : IT, sed do eiu0 od 0 mpor incid
[ 5.422440] et do 46000000. al qua0: T enim a MI im ven am,0 uis nostr (____rcitat____)
[ 5.430444] isi u 46000000.ex a c2 (odo consequat): uis aut IR re d: 00:01:re:re:en:33
[ 5.438896] velit 46000000.um olo2: eu fugiat
[ 5.468519] [/cep/eur/sint /cca/0.8.0-p0/ata/ n/n p_oid_nt,/sun/ in_cul_a q_i .f:320] DES: Unt mol it anim id ST aborum: rem2
[ 5.479651] [/et,/con/ectet/r a/0.8.0-n0/eli/, /ed _o e_usm/d t/mpo_ in_idi_un. :385] ORE: T D lore m gna2 li 1 . ut enim
[ 5.490788] quis 46000000.xer ita2: N ullamc LA oris n si 2 al quip (____commod____)
[ 5.498865] e irur: DOLor In repre ENDE: t in v
[ 5.503428] sse _ill M Dol Re eu fu IAT .ull2: ARIA ur. ex ep eur sin 1 cc ecat cu.
[ 5.511055] ent,_sun IN c Lpa qui FFIC.a d2: RUNT mollit an m id es 2 ab rumlore.
[ 5.579136] amet, ONS CTE ur adi: [cing elit, sed ]
[ 5.677591] in1105dunt ut 1.0: E et do ORE1105N AL qua. u
[ 5.682940] ven1105 qui no1.0: exercit tion u la co laboris: isi ut a
[ 5.689435] mod1105nseq at.1.0: AU1105R RE Olor i r preh Nderit In
[ 5.712578] ES4- c (lum do0o2): u -ugiat n. La p: (atur)
Exc Pte 28 01:21:01 CAT 2020
[ 5.995835] nt, sun_ in : 3 a qui off cia deseru
[ 5.995844] d est : bo: mlorem ipsum olor si ame (512 secte ur a)
PISC: G elit, ed do ei: 5
D tempor in ididunt ut labore ... olor: mag'a aliq a. t enim ad min m v0/iam,
Quis nos rud exe/citat: n ul
Amco lab ris ni i ut a iquip ex a comm[ 6.197407] duis a: e ir: e dolor in re rehende it i (4 lupta e ve)
[ 6.203438] olore : fug: t nulla paria ur. exc pteu (4 nt oc aeca)
.
[ 6.211508] ident,: unt n cu pa q
[ 6.214604] unt mo: 1 anim i est la(o) mlorem ips m olor sit ame
, consec Etur AD Piscin elit sed d: eius
od t.
Ncid Dunt T L 1.0 32 274ore /gna/aliQU0
n32 274mini veni:
Design Resources
Support
Training
- Automating the Development of AI-based DL Vehicle Health Management (VHM) Solutions on the S32G
- Transitioning to Safe and Secure Zonal Architectures with the S32G
- Designing Secure Automotive Gateway Solutions Using Time-Sensitive Network (TSN) Protocol on the S32G
- Developing In-Vehicle Cloud Service Applications Using the AWS Connected Mobility Solution and the S32G
- Advanced In-Vehicle Cloud Service Applications Using the AWS Connected Mobility Solution
- Orchestrating Automotive OTA Software Updates and Data Management Using Airbiquity OTAmatic® on the S32G
- Enabling Connected Intelligent Vehicles with The Fusion Project Machine Learning-Based Data Lifecycle
On this page
- 1.1
Get to Know the S32-VNP-RDB2 Reference Design Board for Vehicle Network Processing
- 1.2
Get to Know the Complete Board Kit
- High-level Code Structures
- Hardware and Software Requirements
- S32G-VNP-RDB2 Connection
- Create a New Project in S32DS
- LCCE CAN/LIN Test