Getting Started with the MIMXRT1176-ADP
Contents of this document
-
Out of the Box
-
Get Software
-
Configure Hardware
Sign in to save your progress. Don't have an account? Create one.

Purchase your i.MX RT1170 Automotive Development Platform
1. Out of the Box
i.MX RT1170 Automotive Development Platform (ADP) targets to offer a solid foundation to quickly enable designs in the automotive market, including Infotainment, In-vehicle experience, Two wheeler Digital Connected Cluster, HUD, Standalone small Cluster, HMI, entry-level DMS, voice command, etc. This page will guide you through the process of setting up and using the MIMXRT1176-ADP board.
1.1 Kit Contents and Packing List
The MIMXRT1176-ADP kit contents include:
- Assembled and tested board with 10.3"" LVDS LCD Panel
1.2 Static Handling Requirements
This device is sensitive to ElectroStatic Discharge (ESD). Therefore care should be taken during transport and handling. Use a ground strap or touch the PC case or other grounded source before unpacking or handling the hardware.
1.3 Minimum System Requirements
- Computer with Windows 10 and 11
- One USB port (either 3.0 or 2.0 or 1.1 compatible)
- One MIMXRT1176-ADP board with the associated firmware / GUI software
- Micro-USB cable for data connection between PC and the MIMXRT1176-ADP board (if not included in the package)
- 12V DC adapter to power the MIMXRT1176-ADP board (if not included in the package)
2. Get Software
2.1 Choose Development Path
MIMXRT1176-ADP Board Support Package (BSP) + Integrated Development Environment (IDE)
- True debug support via JTAG (Only support IAR)
- High software flexibility
- Full set of peripheral drivers with source
- Application examples and project files
2.2 Install Toolchain
NXP offers a complimentary toolchain called MCUXpresso IDE. Please download MCUXpresso v11.9.0 or above.
Need help choosing? Learn how to install VS Code for your host PC with the following tutorial.
Want to use a different toolchain?
No problem! The MCUXpresso SDK includes support for other tools such as IAR , Keil and command-line GCC .
Learn how to install VS Code for your host PC with the following tutorial.
Want to use a different toolchain?
No problem! The MCUXpresso SDK includes support for other tools such as IAR , Keil and command-line GCC .

3. Configure Hardware
3.1 Setup
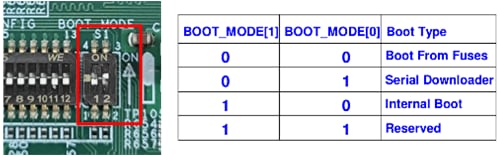
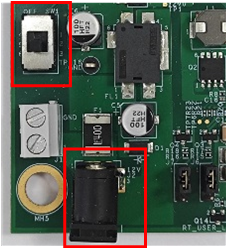
The device has four boot modes (one is reserved for NXP use). The boot mode is selected based on the binary value
stored in the internal BOOT_MODE register. Switch S1 is used to select the boot mode on the
MIMXRT1176-ADP.
- To boot from the SPI flash, make sure
S1is set to10before running - To boot from the serial downloader, make sure
S1is set to01before running
Connect 12 V DC power to J2 on the MIMXRT1176-ADP and turn on the power switch SW1 to boot.
3.2 Build, Run and Debug Demo with IAR EWARM
Build an Example Application
The following steps guide you through opening the hello_world_gpu example application.- The IAR example workspace files can be located using the following path:
<install_dir>/IAR/The path of hello_world_gpu demo is located in:
<install_dir>/IAR/hello_world_gpu - Select the desired build target from the drop-down
For this example, select the "Flexspi_Nor_Sdram_Debug" target
- Click the "Make" button to build the demo application, highlighted in red below
- The build completes without errors


Run an Example Application
To download and run the application, perform these steps: (Only IAR supports online downloading and debugging via JTAG currently)
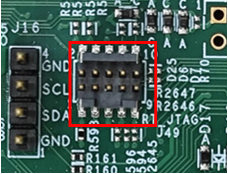
- Connect
J49on the development platform to your PC via MCU-Link Pro debug probe or Segger J-Link debug probe - Set
S1to01and power on, to boot from the serial downloader - Click the "Download and Debug" button to download the application to the target
- The application is then downloaded to the target and automatically runs to the main() function
- Run the code by clicking the "Go" button to start the application
- Connect
J34on the development platform to your PC via USB cable. Open the terminal application on the PC, such as PuTTY or Teraterm, and connect to the debug COM port. Configure the terminal with these settings: - 115,200 baud rate
- No parity
- 8 data bits
- 1 stop bit
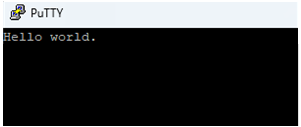
- The hello_world_gpu application is now running, a rotating tiger shows on the LCD panel if LCD panel's installed, and the information is displayed on the terminal. If this is not true, check your terminal settings and connections
- Set
S1back to10and power on to boot from the SPI flash for running offline


3.3 Build and Run Demo with MCUXpresso IDE and NXP-MCU Boot Utility
Build an Example Application
- The MCUXpresso example workspace files can be located using the following path
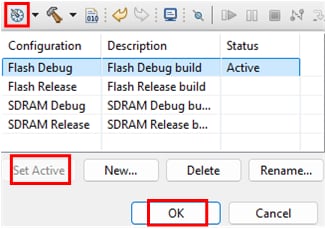
<install_dir>/MCUXpresso/ - Select the desired build target. For this example, set the "Flash Debug" target to active
- Click the "Build" button to build the demo application, highlighted in red below
- The build completes without errors

The build completes without errors
Download and Run an Example Application, use NXP-MCUBootUtility to download image to MIMXRT1176-ADP, perform these steps:
- Connect
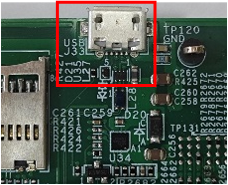
J33on the development platform to your PC via micro-USB - Set
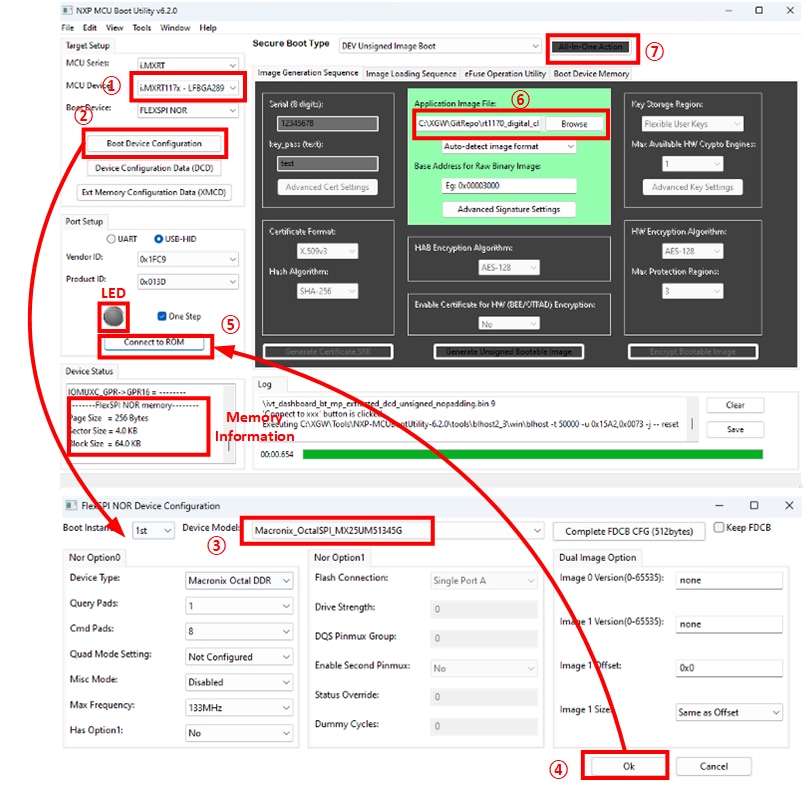
S1to01and power on, to boot from the serial downloader - Open NXP-MCUBootUtility v6.2.0 ,do these steps:
- Select the MCU Device (i.MXRT117x-LFBGA289), and the Device Model in the Boot Device Configuration subwindow (Macronix OctalSPI MX25UM51345G), as shown in steps 1 to 4 in figure below
- Click the Connect to ROM button in step 5
- Wait for the LED to turn blue and memory information to be displayed on the Device Status window
- Select the image file in step 6
- Click "All-In-One Action" in step 7 and wait for the bottom progress bar to finish
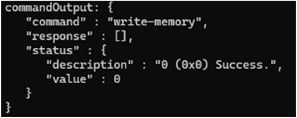
- If the writing is successful, the following content is displayed in the terminal
- Set
S1back to10and power on to boot from the SPI flash for running offline - Connect J34 on the development platform to your PC via USB cable. Open the terminal application on the PC, such as PuTTY or Teraterm, and connect to the debug COM port. Configure the terminal with these settings:
- 115200 baud rate
- No parity
- 8 data bits
- 1 stop bit
- The hello_world_gpu application is now running, a rotating tiger shows on the LCD panel if LCD panel's installed, and the information is displayed on the terminal. If this is not true, check your terminal settings and connections