Getting Started with the IoT-Prototyping Kit
Contents of this document
-
Plug It In
-
Get Software
-
Build, Run
-
Create
-
Learn
Sign in to save your progress. Don't have an account? Create one.

Purchase your NXP® Rapid IoT Prototyping Kit
1. Plug It In
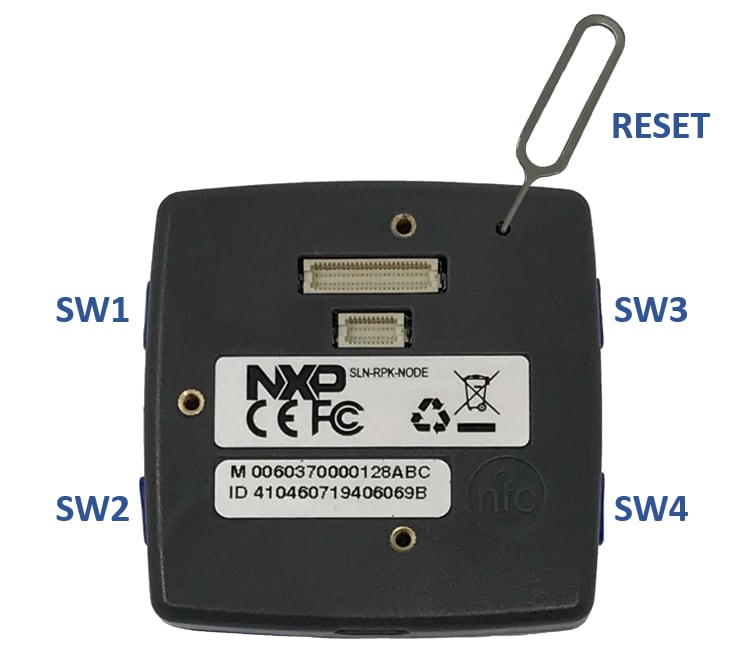
1.1 Get Familiar with Rapid IoT Prototyping Kit
Let's take your Rapid IoT Prototyping Kit for a test drive. You have the choice of watching the sequence in a short video or following the detailed actions listed below.

1.2 Unboxing
Here is an overview of the Rapid IoT box.

- Begin by opening the box and reviewing the kit content. The Rapid IoT unit comes with a printed Quick Start Guide, a SIM tool, and a micro-USB cable
- The printed Quick Start Guide provides useful information like the location and the numbering of the Touch or Push buttons as well as the menu architecture of the Factory application


1.3 Power On
Begin by charging the battery of your Rapid IoT. Connect one end of the micro-USB cable to your computer USB port (or to any USB charger) and the other end to the micro-USB connector of your Rapid IoT board.

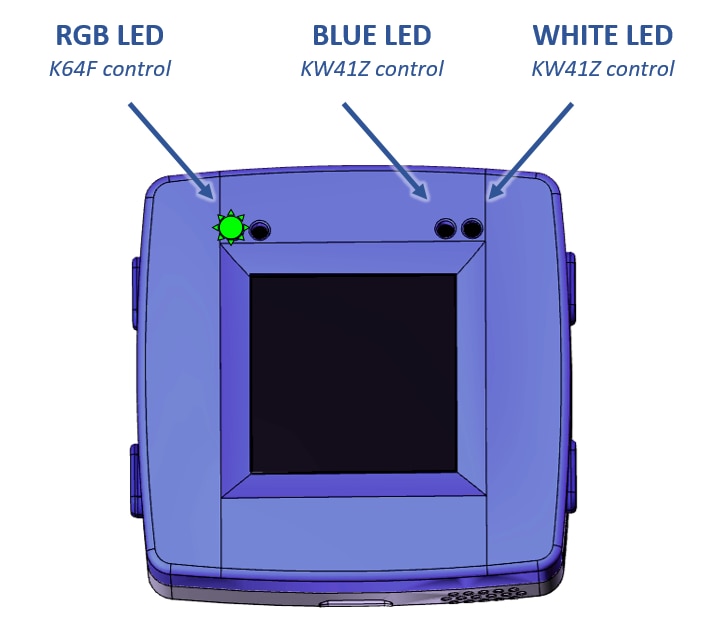
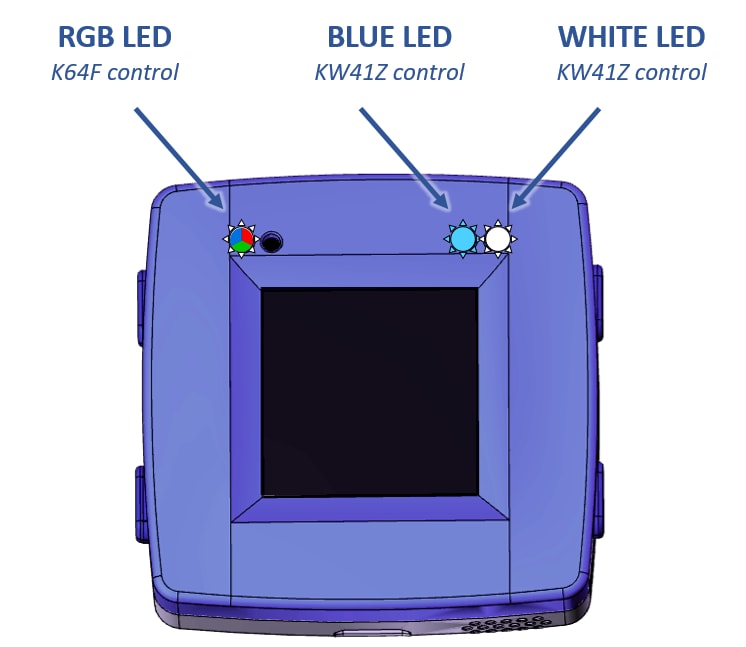
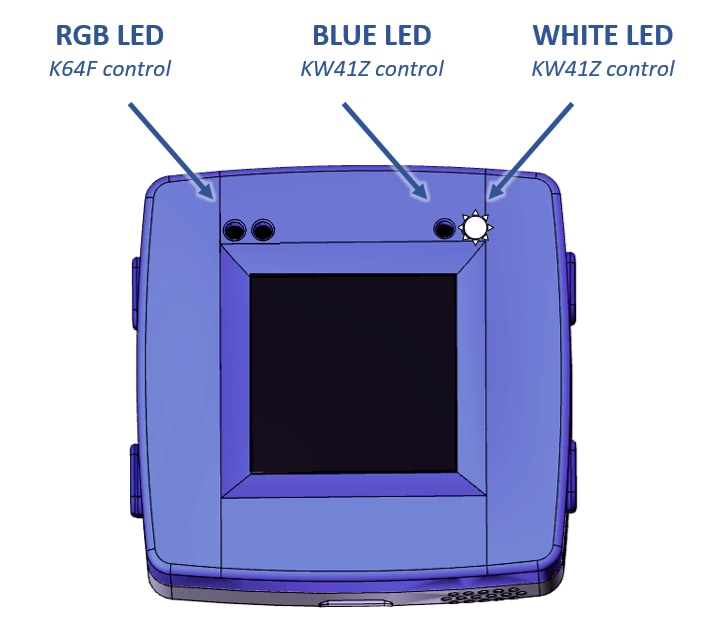
The RGB and White/Blue LED’s on the top front will blink for few seconds to confirm that the preprogrammed Bootloaders loaded successfully (more details in the dedicated chapter).

While the factory application is loading the NXP and the Atmosphere logos will be displayed.

Then the Welcome menu with the Rapid IoT logo and the clock will show up on your Rapid IoT screen.

With the help of the printed Quick Start Guide, you can navigate through the different screens with the Touch electrodes, and change the options with the Push buttons.
The factory application divides into four main categories: Application, Settings, Info, and Sensors.
From the Application section, you can access mini-Apps that leverage the sensors onboard in different use-cases such as a thermostat, barometer, air-quality, motion or fall detection, or color-light controller.

From the Settings section, you can change the Wireless mode (Bluetooth or Thread), enable/disable the internal access to the NFC-tag or the Sensor-tag (Sensor data pushed through wireless), turn on/off the buzzer or the screen backlight, or restart your Rapid IoT board.

From the Info section, you can verify the version of the firmware programmed in your board or scan the QR code to quickly download the Android or iOS Phone App to monitor/control your Rapid IoT over Bluetooth.

From the Sensors section, you can enable/disable each sensor onboard to create your custom monitoring profile and extend your Rapid IoT battery lifetime.

By default, the application is configured to stream all the sensor data (Sensor tag) over Bluetooth radio to an Android or iOS Phone/Tablet. Thanks to the dedicated phone App the sensor data will be automatically pushed through WiFi or Cellular connectivity to the Cloud.
1.4 Connection to the Phone
- Go to the Google or the Apple App store to download and install the NXP Rapid IoT phone App for Android or iOS
- Then launch the Rapid IoT phone App from your phone/tablet.
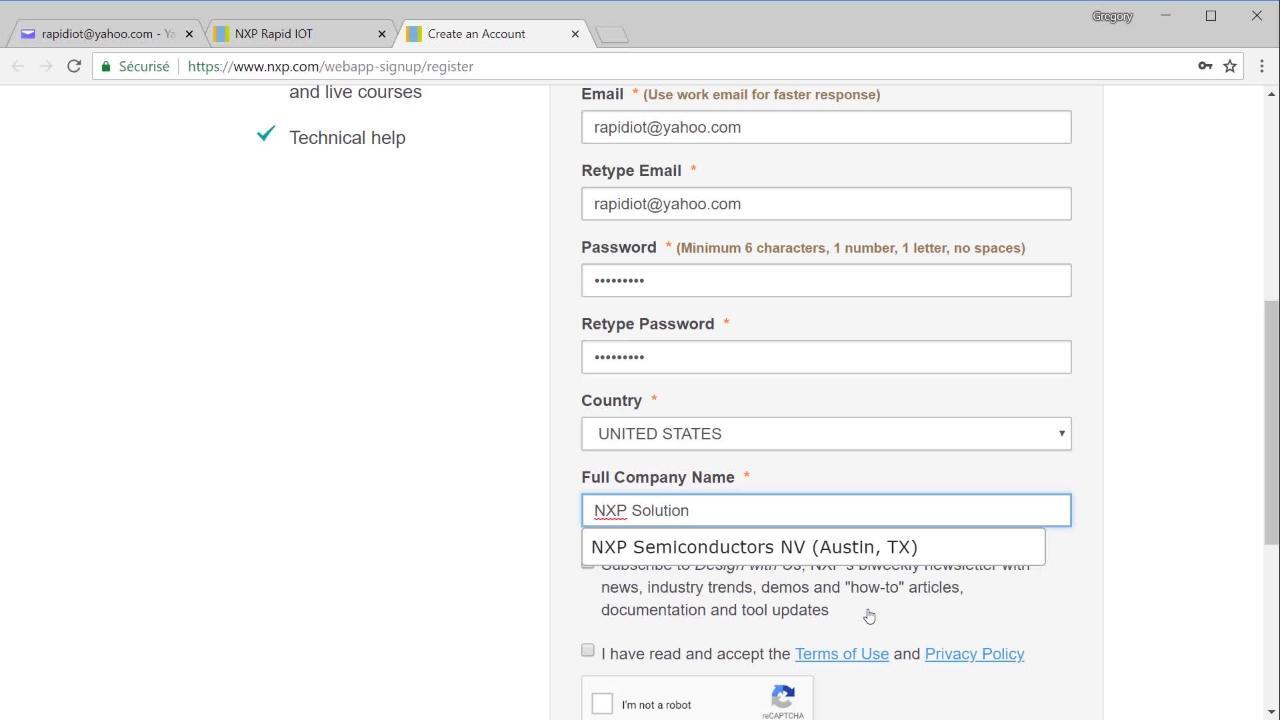
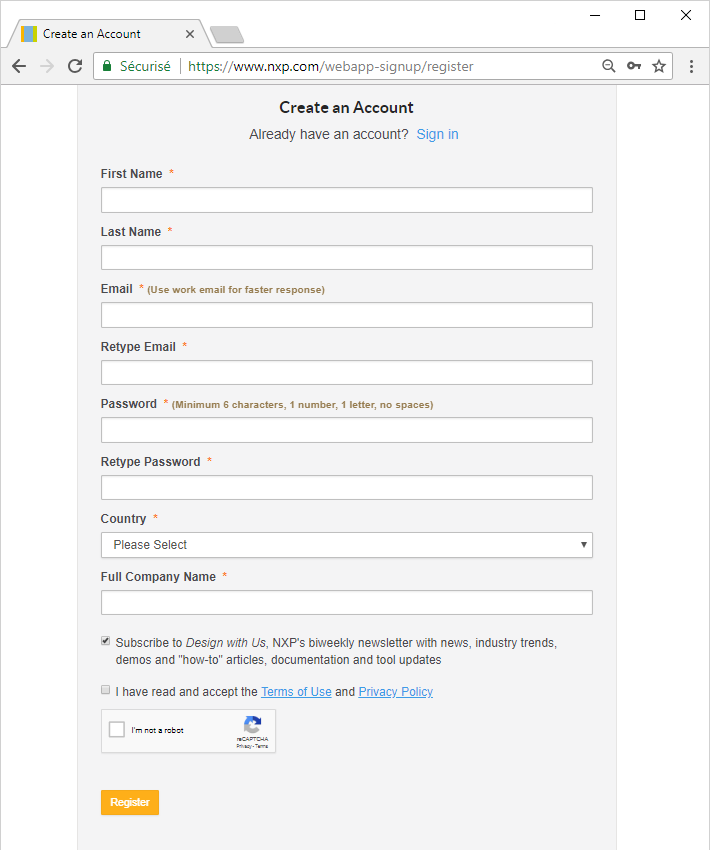
- Enter the requested information (First/Last Name, Email, Password, Country and Company Name).
Check the box to confirm that you have read and accept the Term of Use and Privacy Policy and the box to confirm that you are not a Robot - Finalize your registration by pressing the Register button
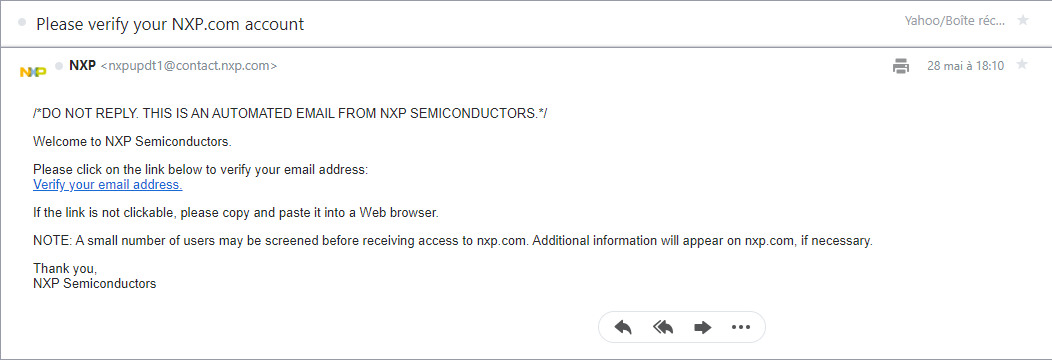
- Visit the mailbox used during the registration and open the email sent by: nxpupdt1@contact.nxp.com
- Click on the enclosed link to verify your email
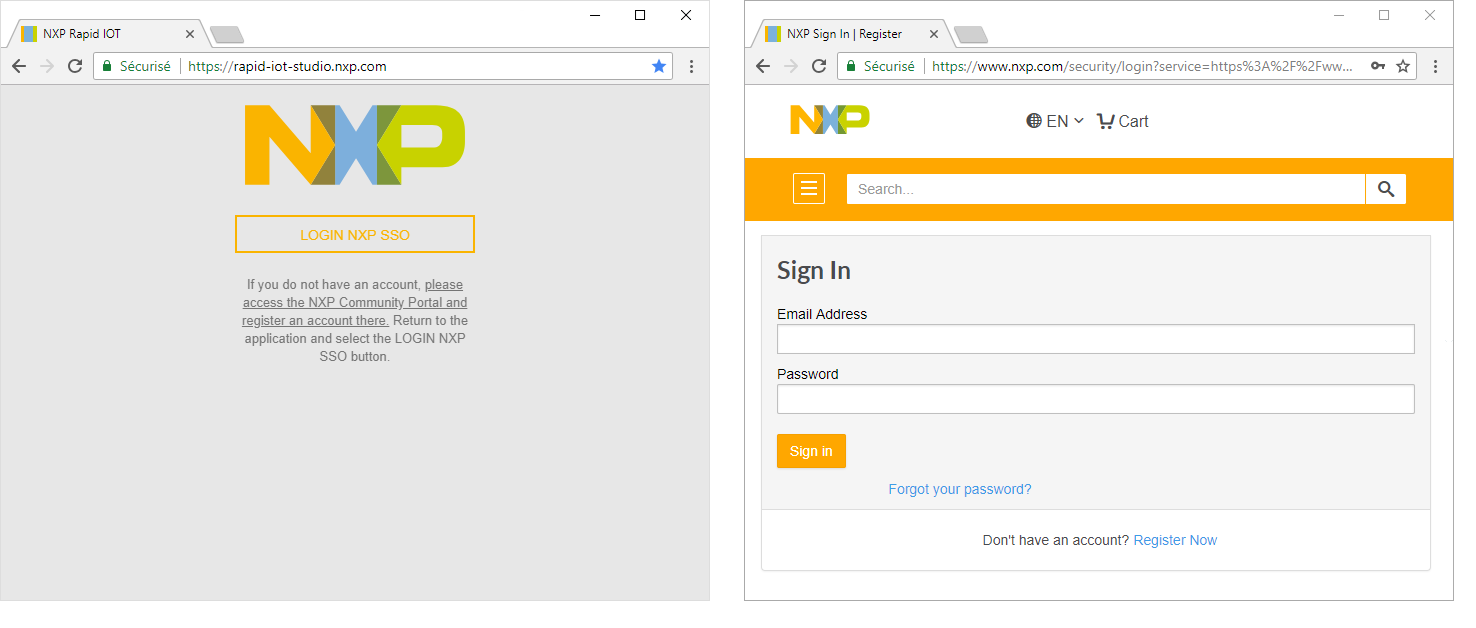
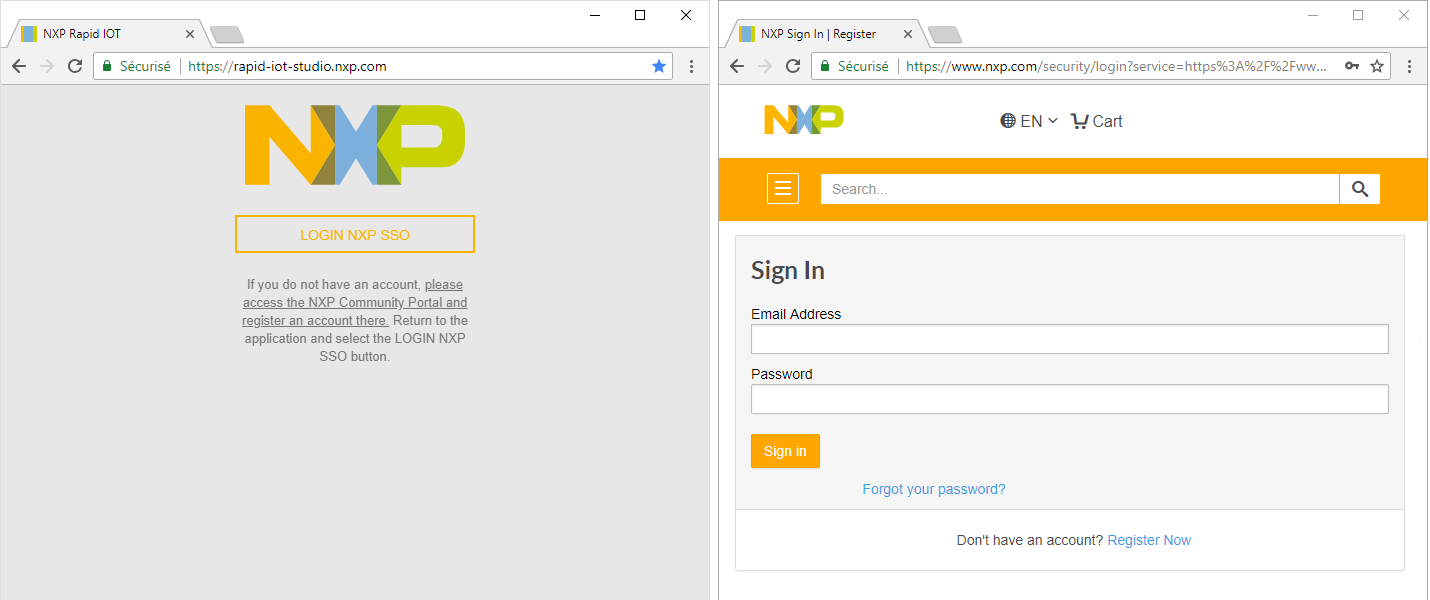
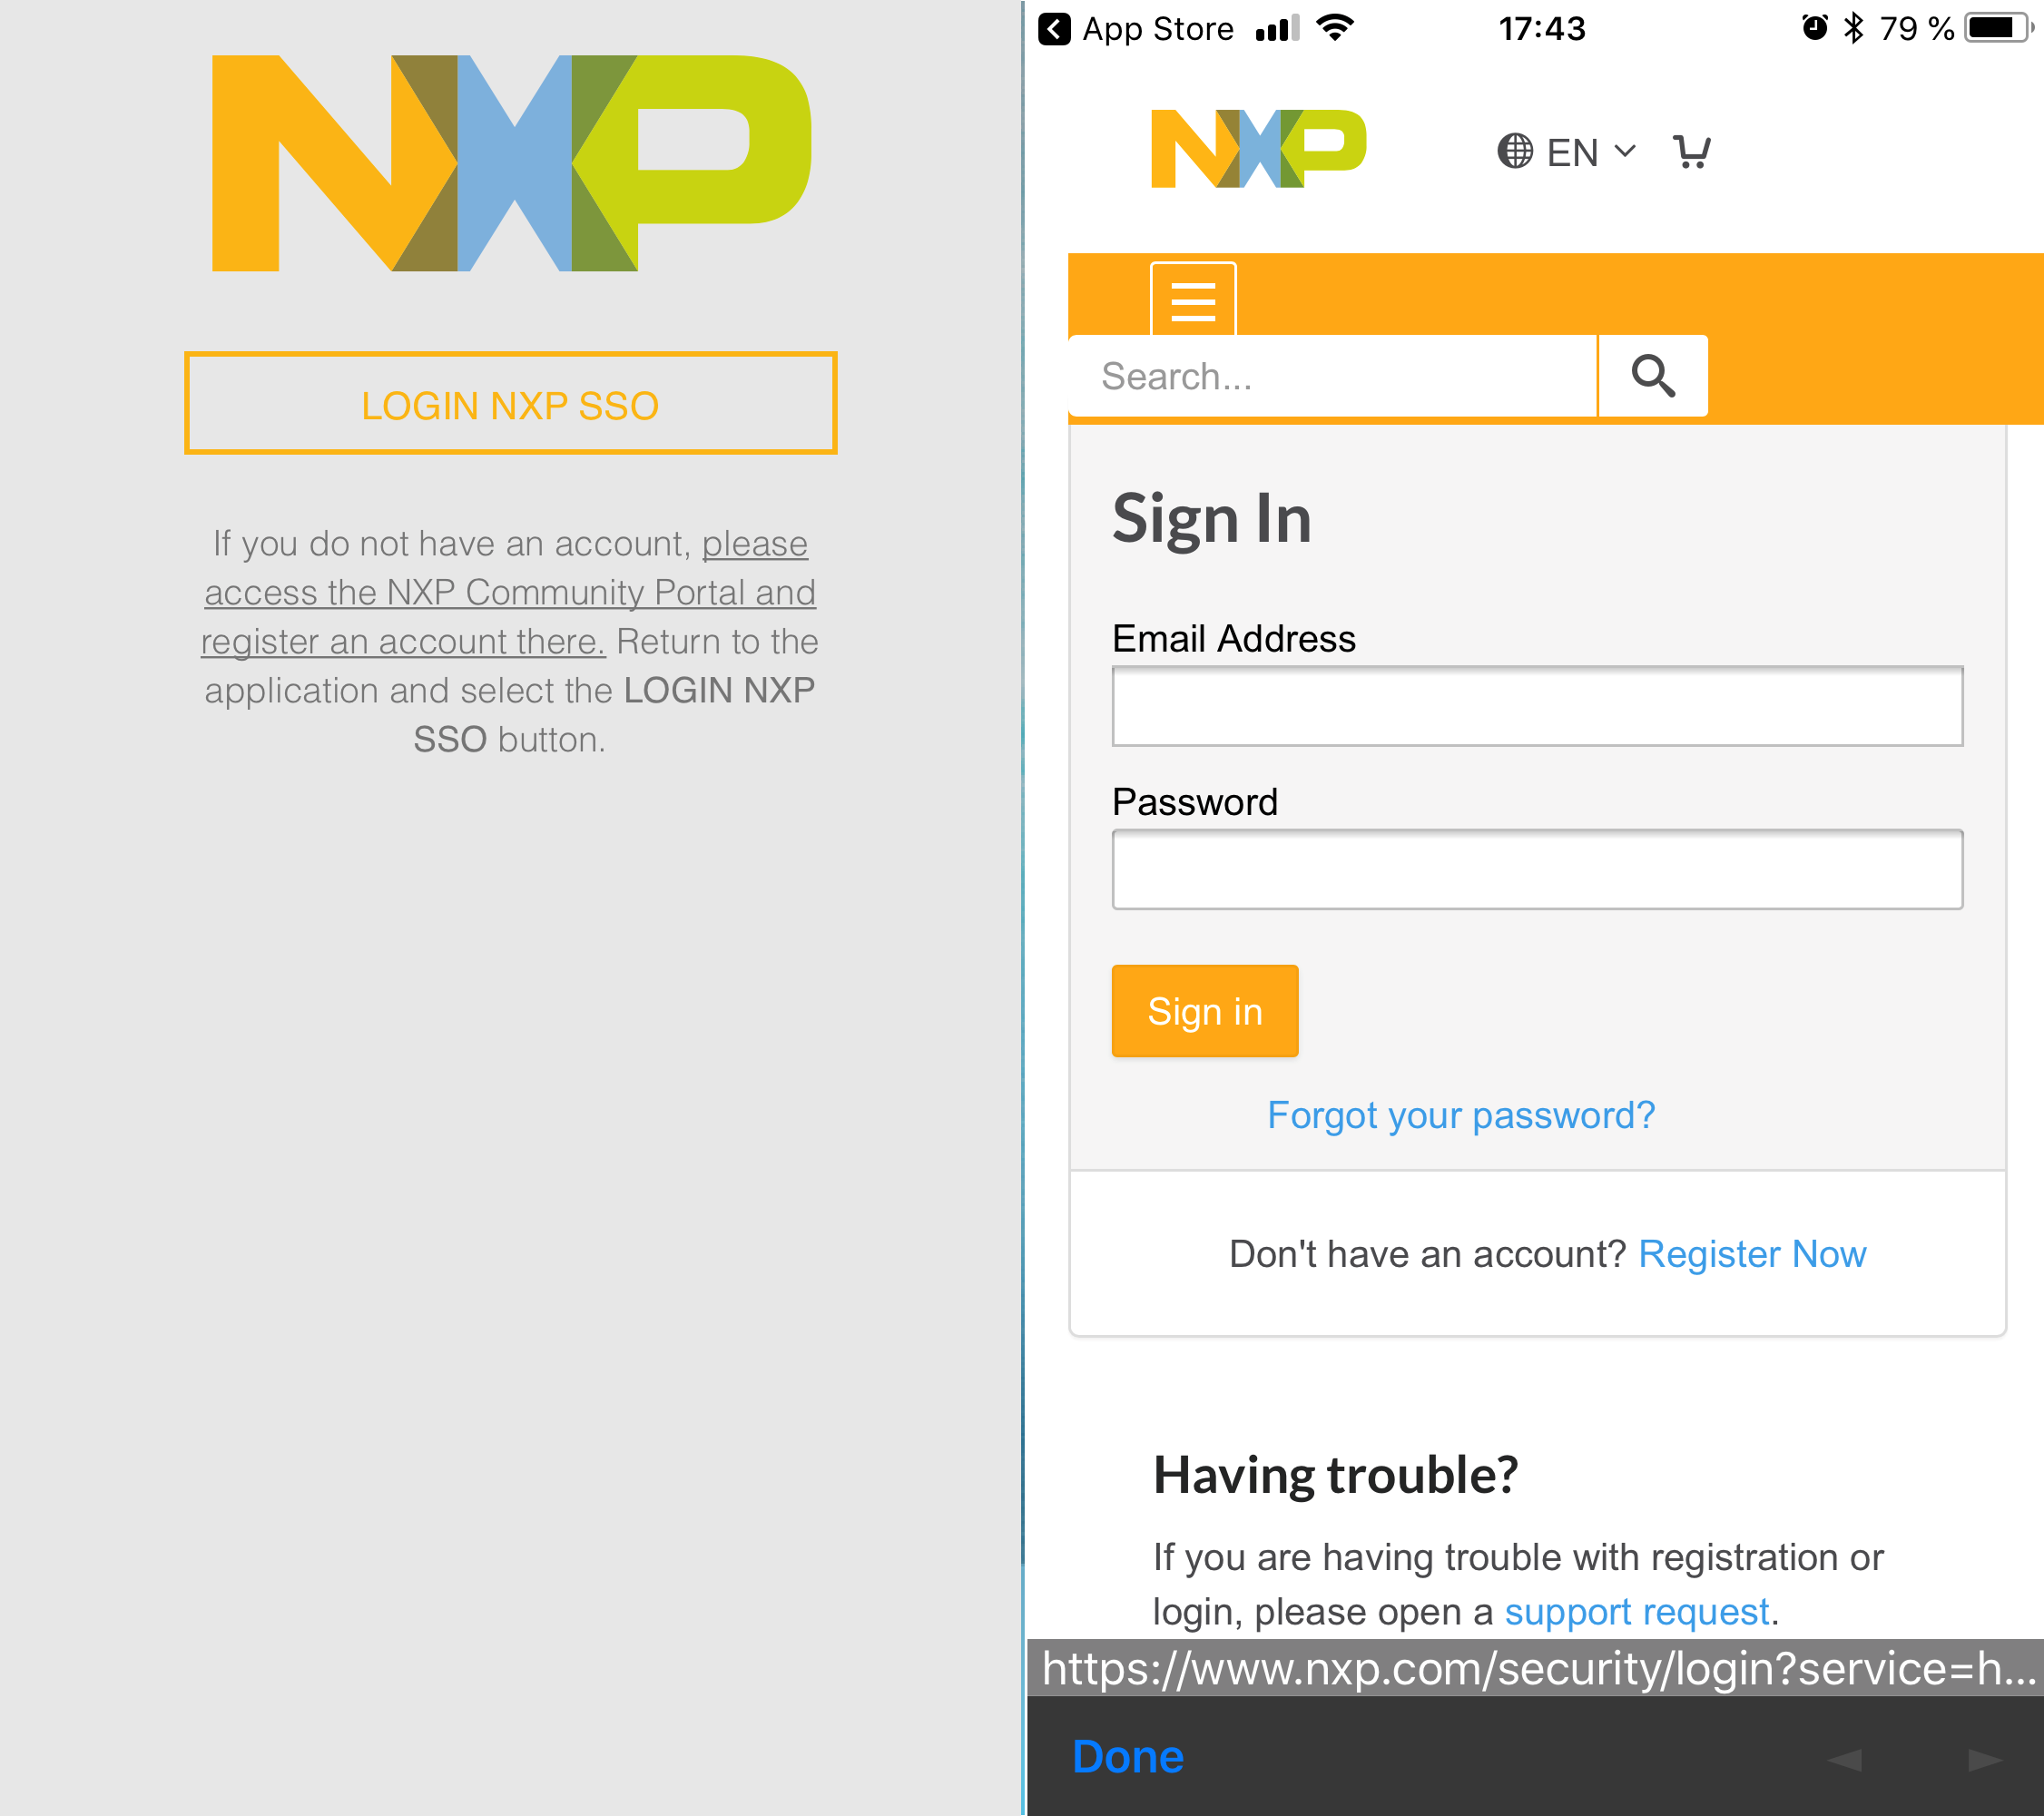
- You are now ready to login with your NXP account.
Press the button LOGIN NXP SSO.
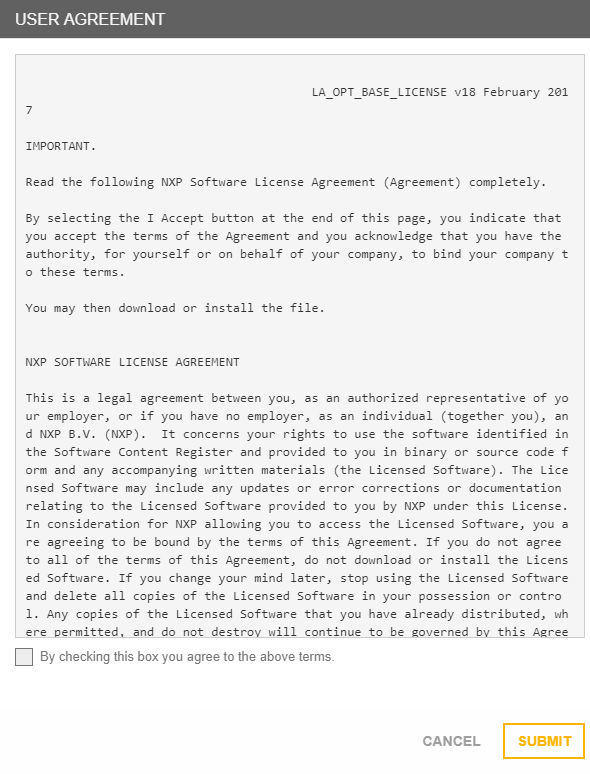
Enter you Email Address and Password and press Sign In - At the first connection to the Rapid IoT phone App with your SSO account a window with the User Agreement will
appear.
Check the box Accept Term of Use and Privacy Policy and press SUBMIT - The phone App will automatically launch the Dashboard view
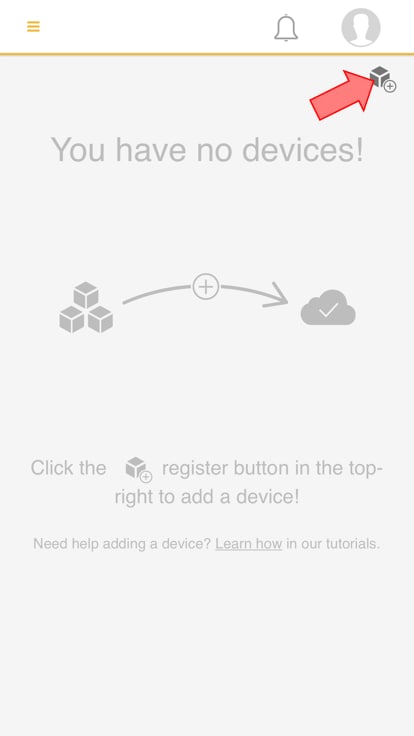
- Select the icon located in the top right corner to scan the Bluetooth devices in the range
- Select your Rapid IoT board and press PROVISION


You will need a free NXP account to connect to the Rapid IoT phone App.
If you already have an account press LOGIN NXP SSO and you will be automatically redirected to the NXP Sign In
page.
If you don’t have an account yet simply select the link please access the NXP Community Portal and register an
account there or the link Register Now from the NXP Sign In page.


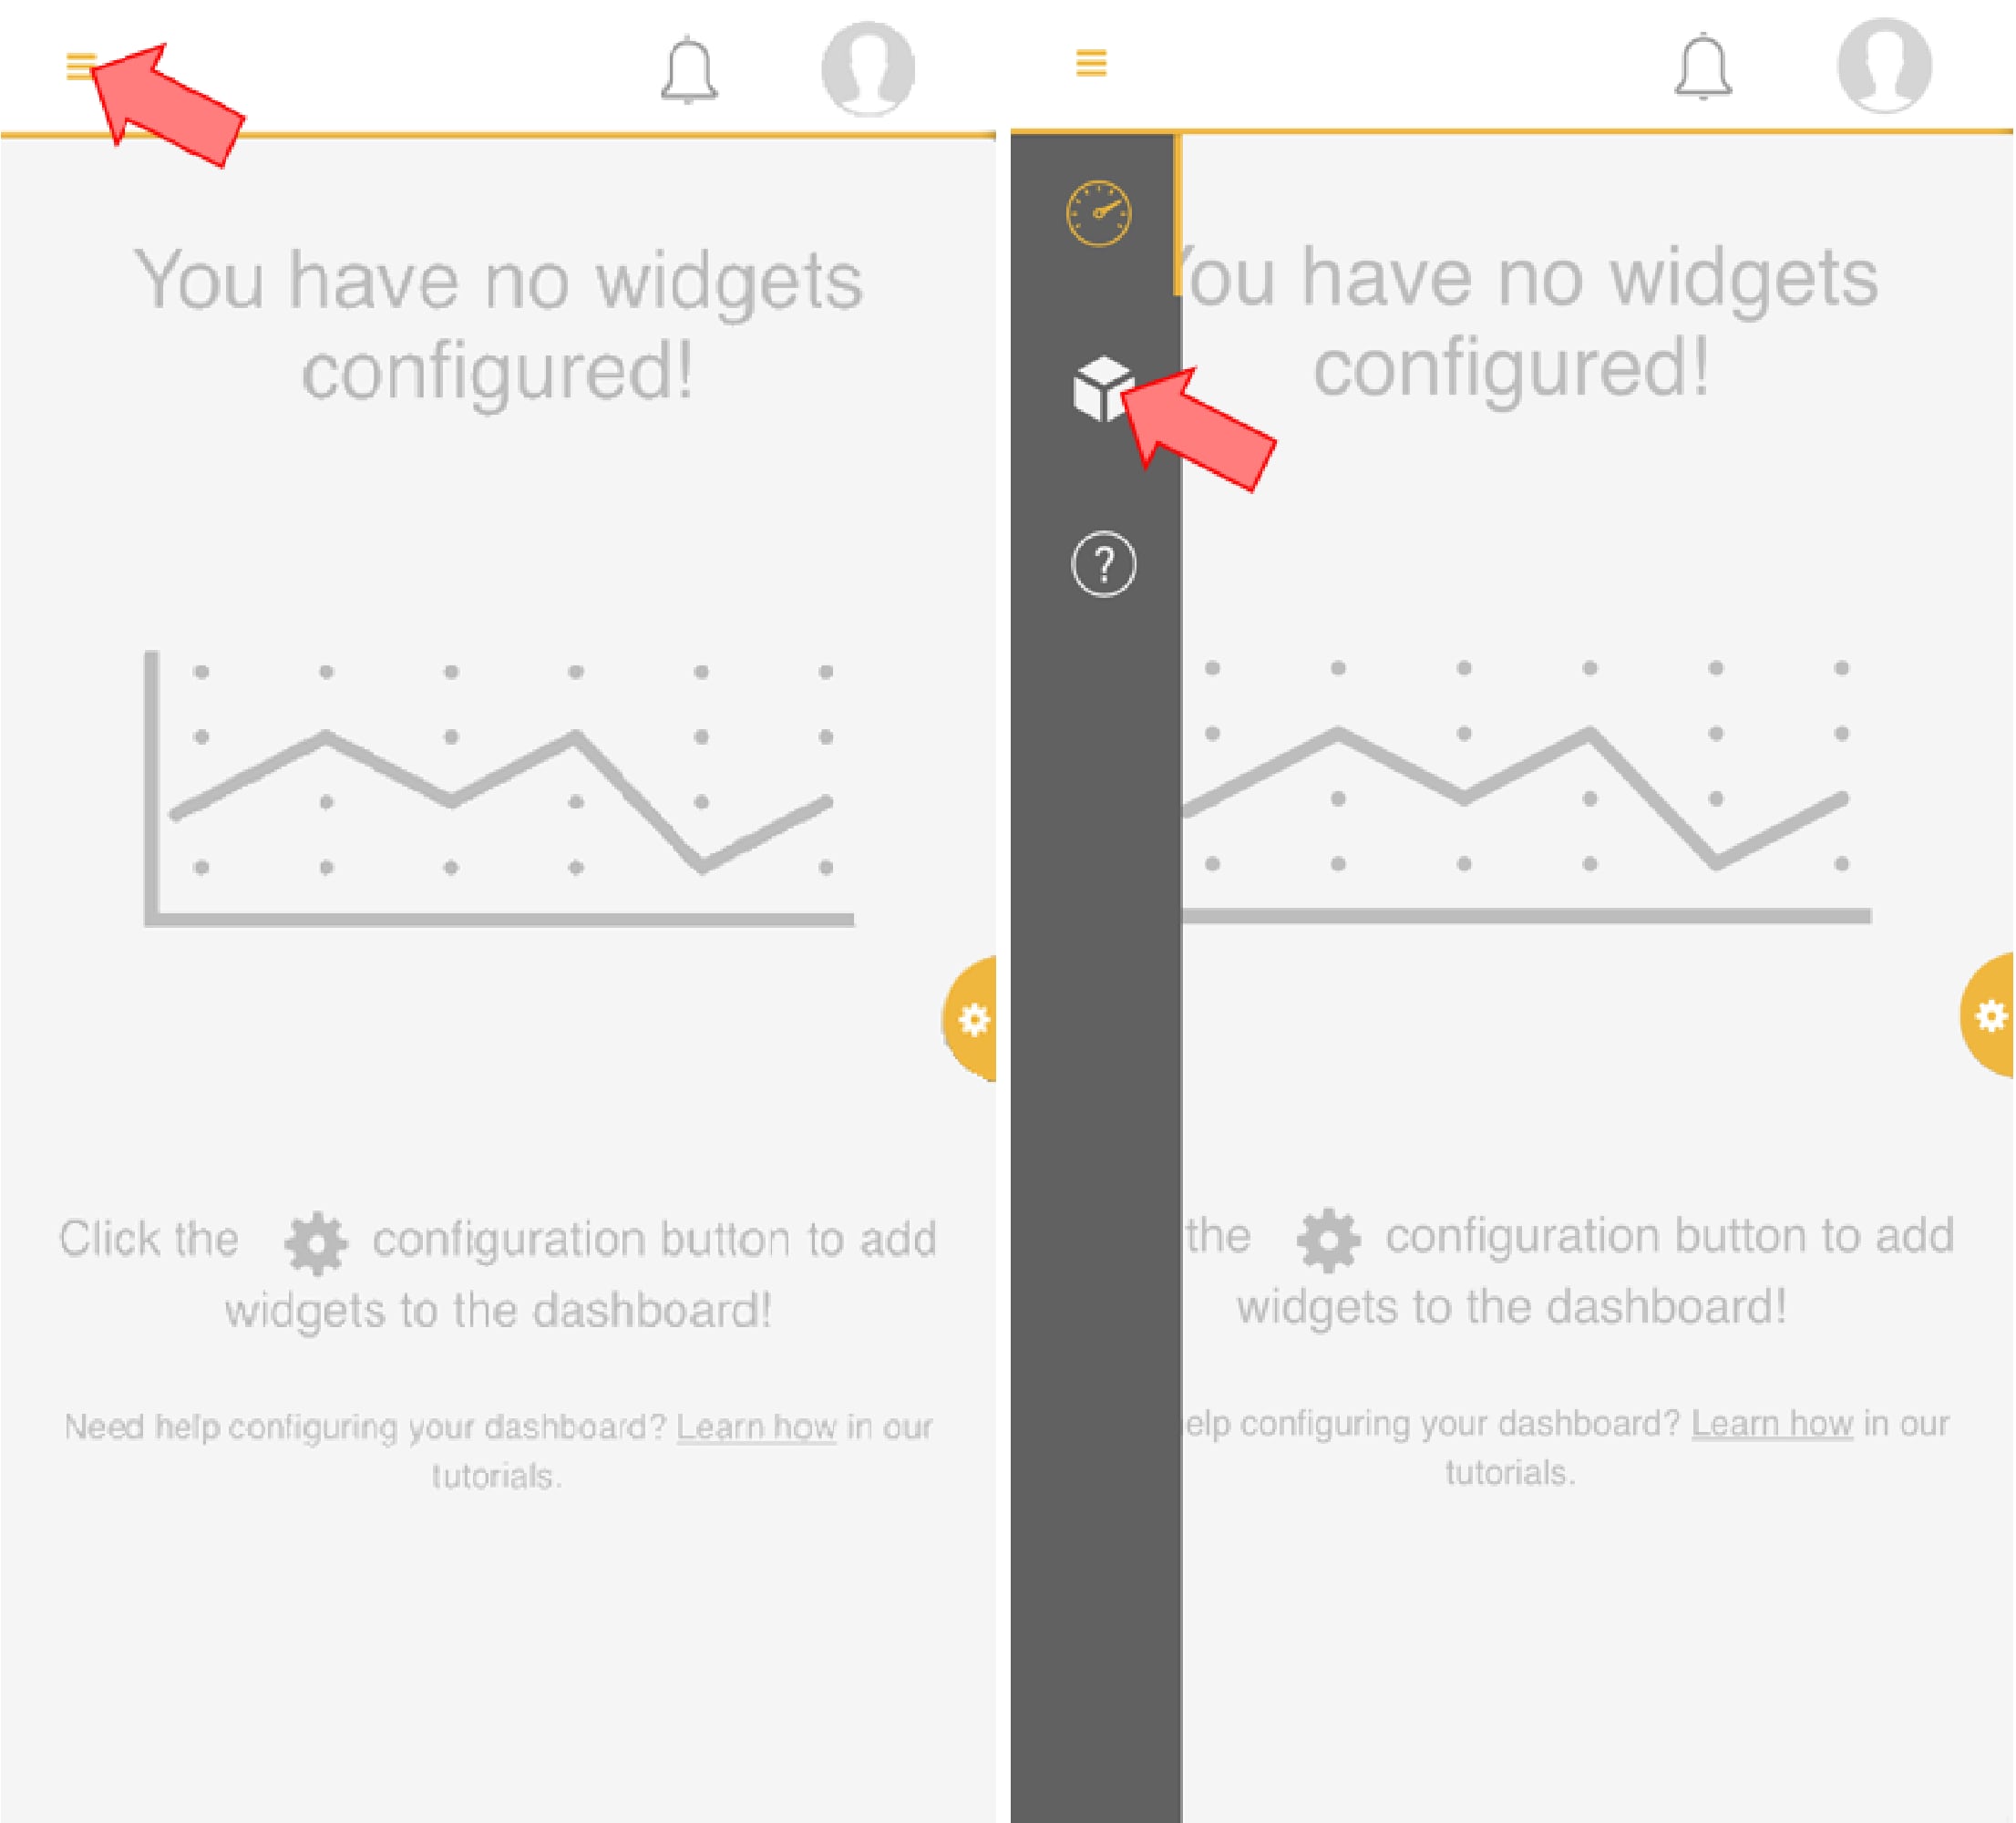
Open the left panel by selecting the icon located in the top left corner.
Select the
Device view to pair your equipment with your Rapid IoT board.


Each Rapid IoT board has a unique MAC address printed on a sticker at the back of the casing.
The phone App
indicates the list of the Bluetooth devices detected with the type of Application programmed in their memory as
well as the last four Hexadecimal numbers of their MAC address.

The phone App will automatically launch the phone App interface for the Out of the Box Demo.
It takes approx.
5s
for the first sensor value to appear on the phone App.
Control the color of the RGB LED remotely by selecting
one
of the
options in the phone App.

Congratulations you now successfully monitor and control your Rapid IoT with the phone App over Bluetooth.
1.5 Cloud Monitoring
We will now monitor your Rapid IoT board from the Cloud.
To visualize your Rapid IoT data remotely, you need another Android/iOS terminal with the phone App installed - or you can simply use the web browser of your computer.
The instruction below will apply for a computer access.
- Open your web browser and visit the dedicated Rapid IoT Studio portal at:
http://rapid-iot-studio.nxp.com - Login with the same NXP account used to connect to the phone App.
The Dashboard view will open automatically - Open the right panel by selecting the icon located in the right edge
- Choose the option Data Graph to display from the Cloud the sensor value in a graphic
- A blank graphic will now be added to your Dashboard. Select the icon Configure located in the top right corner to setup your graphic
- First give a name to your graphic (ex. Sensors) and press Next
- Select the Rapid IoT application connected to the Cloud over Bluetooth via the phone App (ex. Out Of the Box Demo) and press Next
- Select the X-Axis data for your graphic (ex. _timestamp) and press Next
- Now select the Y-Axis data or Sensors that you want to display (multiple selection is allowed) and press Submit
- The graphic named Sensors in your Dashboard will now display and update automatically the value of the selected sensors from the Cloud


Congratulations you now successfully monitor your Rapid IoT from the Cloud.
2. Get Software
Choose a Developmet Path
2.1 Rapid IoT Studio
- Easy to use Graphical User Interface based programming
- Robust Library with numerous hardware and software IoT building blocks
- Simultaneous creation of embedded, mobile app and web app code
Install Rapid IoT Studio
Registration
Visit the dedicated Rapid IoT Studio portal: http://rapid-iot-studio.nxp.com
You will need a free NXP account to access Rapid IoT Studio.
If you already have an account press LOGIN NXP SSO and you will be automatically redirected to the NXP Sign In page (NXP employees use your NXP WIB).
If you don’t have an account yet simply select the link please access the NXP Community Portal and register an account there or the link Register Now from the NXP Sign In page.
Enter the requested information (First/Last Name, Email, Password, Country and
Company
Name).
Check the box to confirm that you have read and accept the Term of Use and Privacy
Policy
and the
box to confirm
that you are not a Robot.
Finalize your registration by pressing the button
Register.
Visit the mailbox used during the registration and open the email sent by: nxpupdt1@contact.nxp.com
Click on the enclosed link to verify your email.
Connection
You are now ready to login with your NXP account.
Press the button LOGIN NXP
SSO.
Enter
you Email Address and Password and press Sign
In.
At the first connection to the Rapid IoT phone App with your SSO account a window with the User
Agreement
will
appear.
Check the box Accept Term of Use and Privacy Policy and press
SUBMIT.
Congratulations, you are now officially connected to Rapid IoT Studio.
2.2 MCUXpresso Software Development Kit (SDK) + Integrated Development Environment (IDE)
- True debug support via SWD and JTAG
- High software flexibility
- Full set of peripheral drivers with source
- Application examples and project files

Install MCUXpresso IDE
MCUXpresso IDE brings developers a simple Eclipse-based development environment for NXP’s microcontrollers based on Arm Cortex-M cores. It offers advanced editing, compiling and debugging features with the addition of MCU-specific debugging views, code trace and profiling, multicore debugging, and integrated configuration tools. Its debug connections support every NXP evaluation boards including the Docking station of the Rapid IoT Prototyping tool with open-source and commercial debug probes from Arm®, P&E Micro® and SEGGER®
To download for free NXP MCUXpresso IDE go online at: MCUXpresso Suite of Software and Tools
Select from the PRODUCTS tab MCUXpresso IDE.
Go to DOWNLOADS tab and select the LATEST VERSION of the tool.
You will
be
asked to sign-in/up with a free NXP user-account.
When MCUXpresso installer download completes, double click on the executable, follow the install instruction and keep the default options.
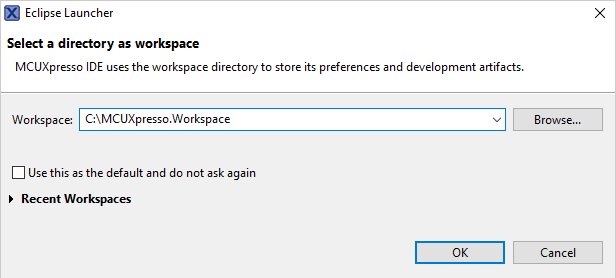
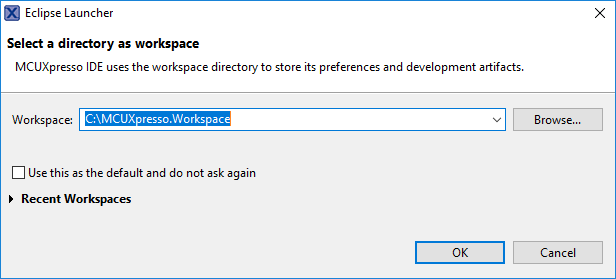
Launch MCUXpresso IDE and define the Workspace location (default C:\MCUXpresso.Workspace) and press OK.
Congratulation you successfully installed the free NXP MCUXpresso IDE on your computer
Install MCUXpresso Software Development Kit (SDK)
MCUXpresso SDK is a comprehensive software enablement package designed to simplify and accelerate application development with NXP’s microcontrollers based on Arm Cortex-M cores. The MCUXpresso SDK includes production-grade software with integrated RTOS (optional), integrated stacks and middleware, reference software, and more. It is available in custom downloads based on user selections of MCU, evaluation board, and optional software components.
To download for free Rapid IoT SDK package go online at: www.nxp.com/rapid-iot
Select from the PRODUCTS tab Rapid IoT prototyping kit.
Go to SOFTWARE and TOOLS tab and select the latest version of the Rapid IoT SDK package.
You
will be
asked to
sign-in/up with a free NXP user-account.
When the download of the compressed file completes,
extract it
in
your MCUXpresso
Workspace on your computer HDD.

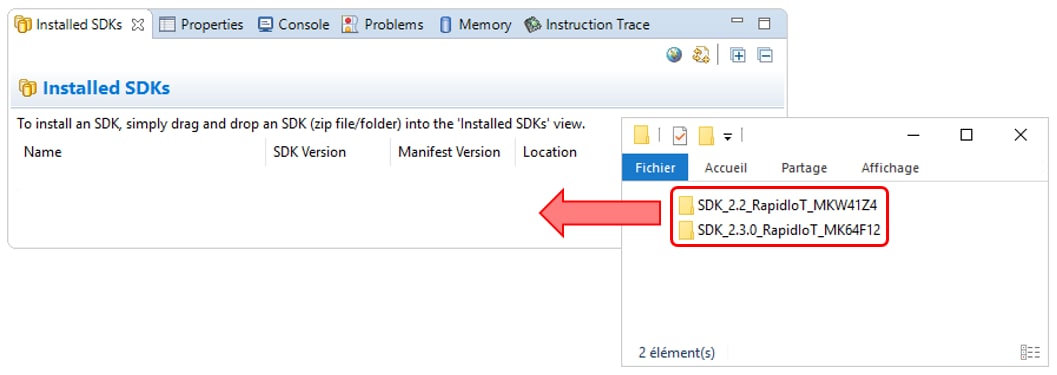
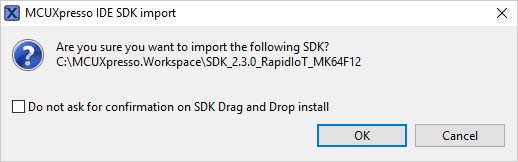
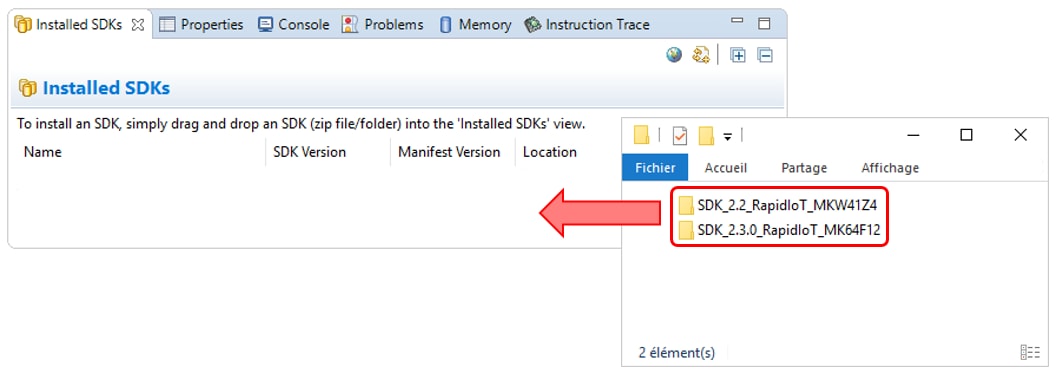
Before building the Rapid IoT SDK example projects, the target SDKs need to be imported into MCUXpresso IDE by drag and dropping each target SDK into the “Installed SDKs” window from MCUXpresso IDE.
For each package a confirmation window will pop-up, select OK to validate.
3. Build, Run
3.1 Choose a Development Path
Rapid IoT
Open an Atmosphere Studio Example for Rapid IoT
We will now open, build and program
The Dashboard view will open automatically.
- Open the left panel by selecting the icon located in the left edge
- Select the option
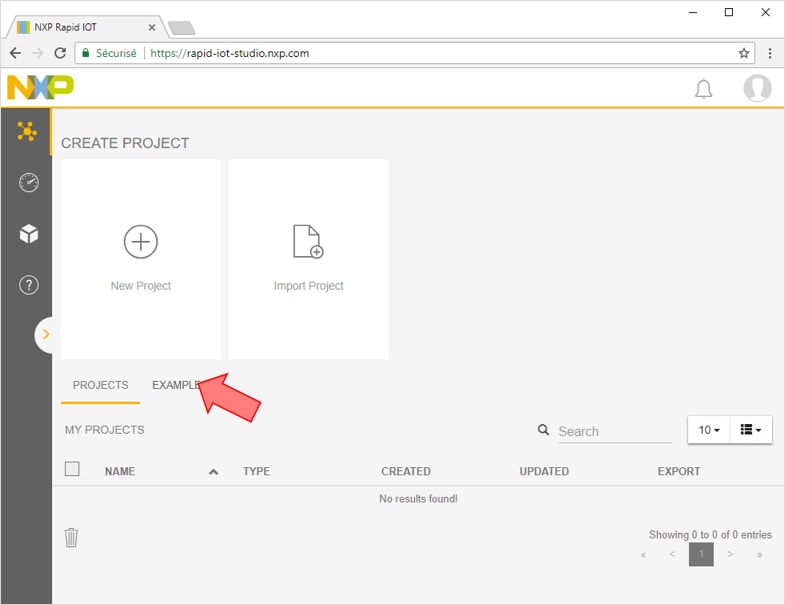
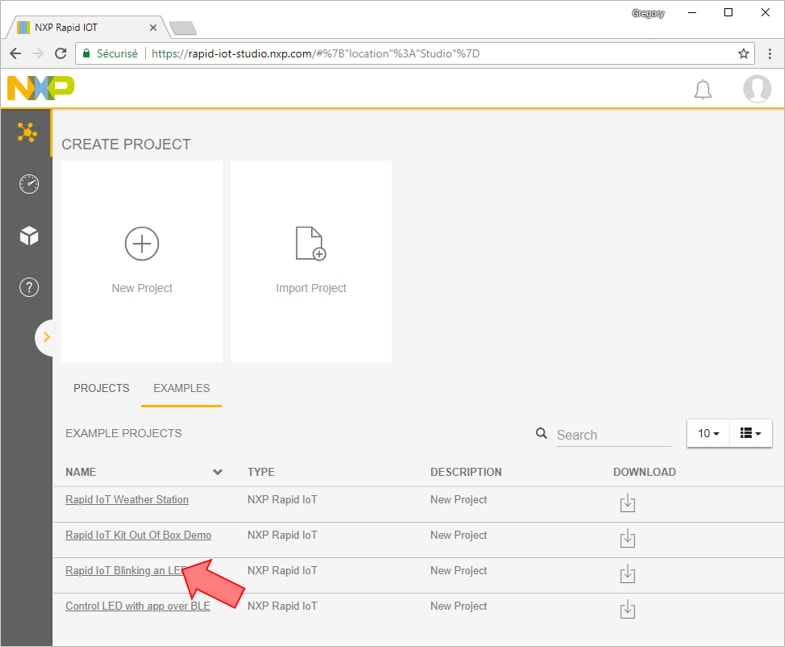
Studio to launch the online programming interface - Select the option EXAMPLES to display the project examples available online
- Select the icon Save from the toolbar located in the top right corner to save your modifications
- Select the icon Compile from the toolbar located in the top right corner to compile your project
- Select the icon ProgramFirmware from the Embedded View toolbar to build your project.
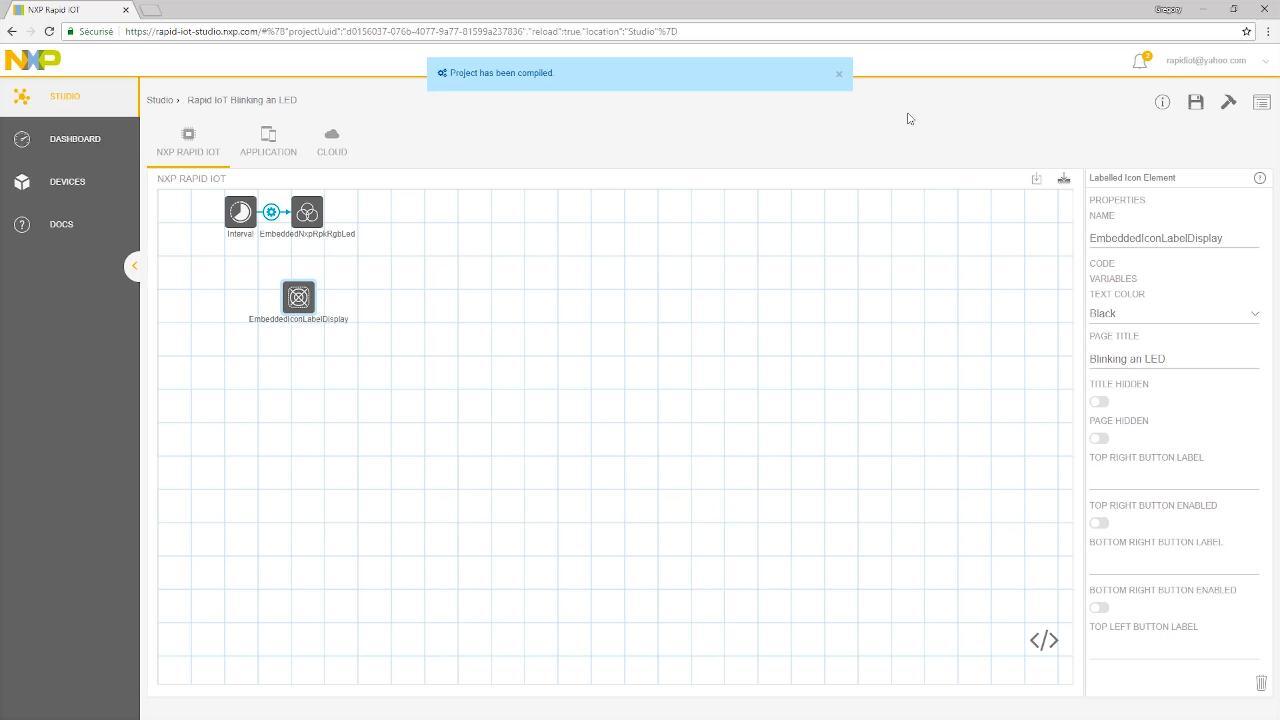
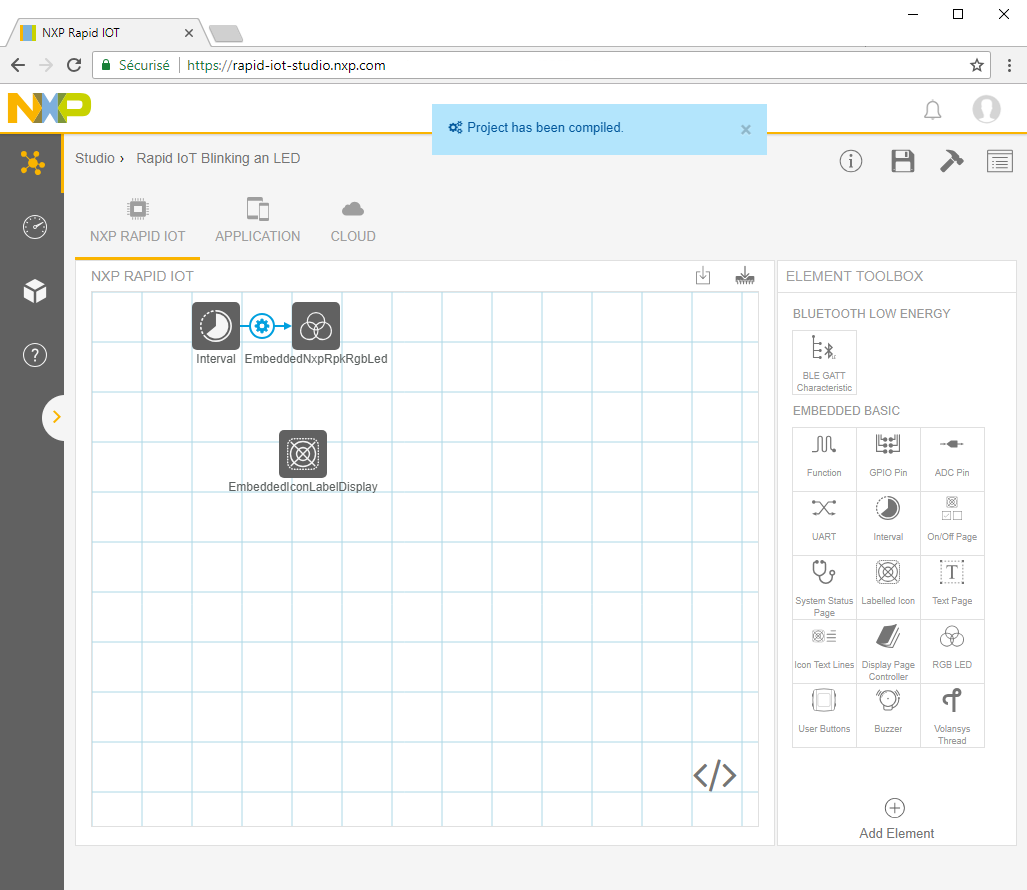
Let’s begin by opening a simple blinky example.
Select Rapid IoT Blinking an
LED from the
project example list
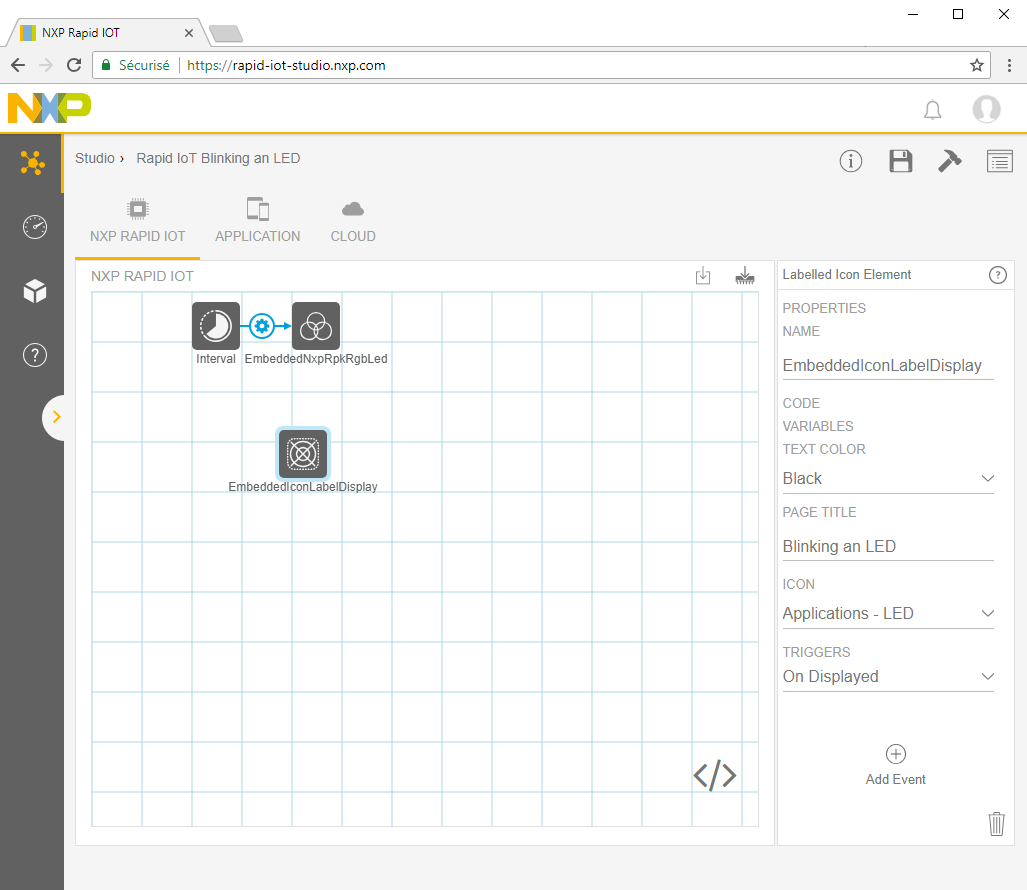
The Embedded view will automatically open.

The project Blinking an LED requires few Elements: one interval, one RGB LED and one Display.
You can review the parameters of each Element by selecting them from the workspace.
For
example the
Interval Element emulates a timer configured with a period of 1,000
millisecond
The Interval Element
is connected to the RGB LED that it toggles Red.
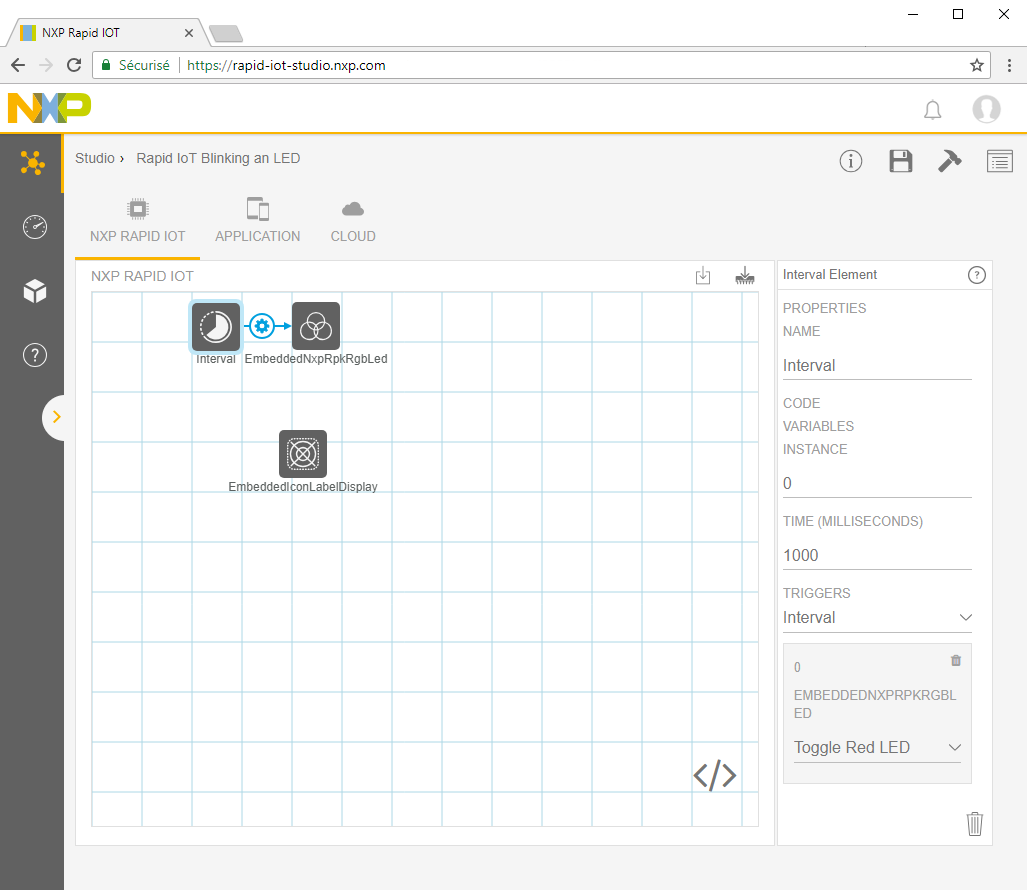
The Element EmbeddedIconLabelDisplay will display on the Rapid IoT screen an LED icon subtitled with the text Blinking an LED.

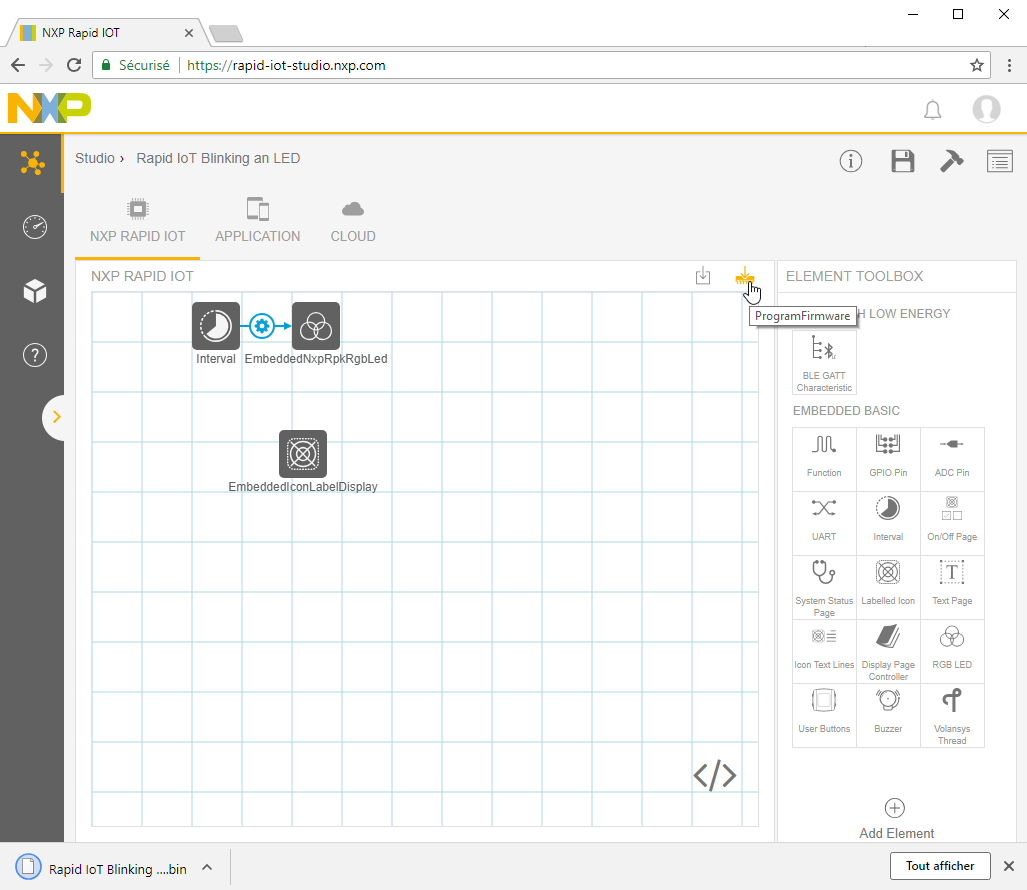
Before launching any Build or Programming, please make sure to save first your project.
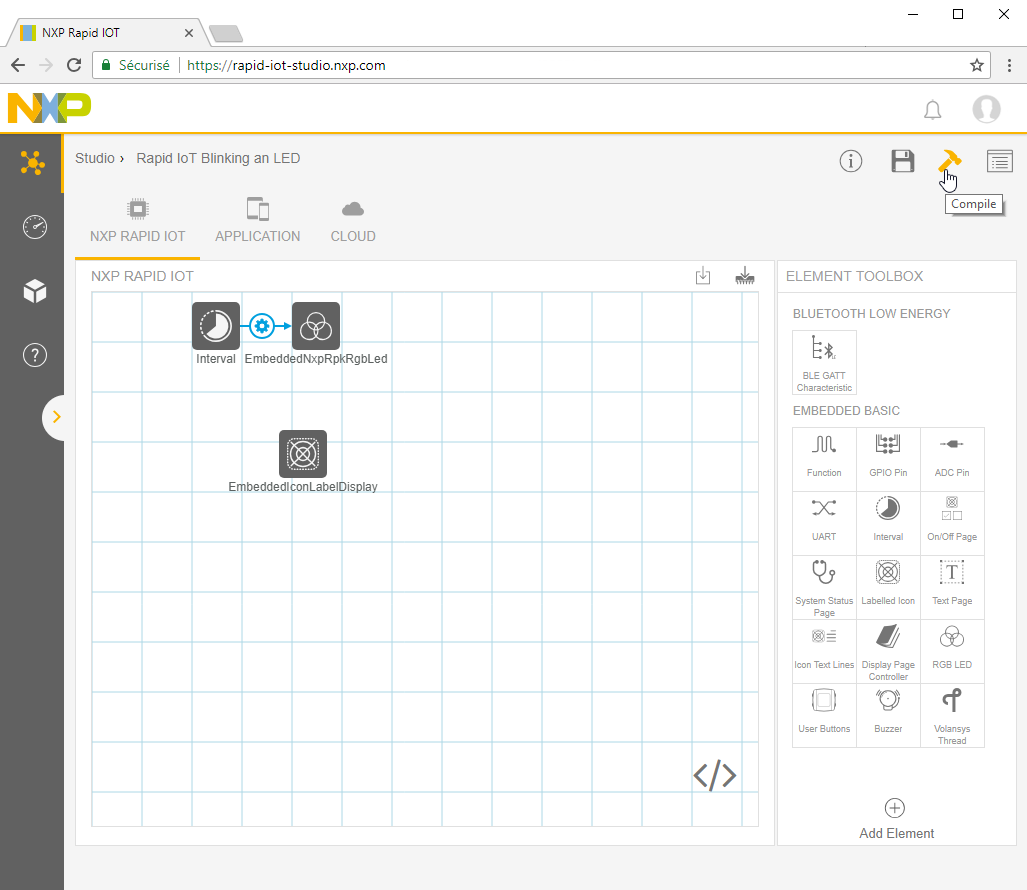
The workspace top orange bar will fill-in to indicate the progression of the
compilation.
The
first time a
project takes approx. 30 seconds to compile.
A blue popup window will indicate when the
compilation ended
up successfully.
The file Rapid IoT Blinking an LED firmware.bin will be automatically downloaded by your web browser
SLN-RPK-NODE Application and Wireless MCUs are pre-programmed in factory with a Bootloader to easily update their application through the onboard USB connector. To reprogram K64F internal flash with the new Rapid IoT Blinking an LED application, simply follow those steps:
- Connect one end of the provided USB cable to the computer and the other end to the micro USB type-B connector of the SLN-RPK-NODE
- Keep SW3 button pressed while pushing shortly SW5/Reset button
- Wait 1-2s for RGB LED to blink Green then release SW3 button
RGB LED will blink green and your computer will detect a new Mass Storage drive and automatically install the appropriate drivers - From your computer file explorer, drag-n-drop or copy-paste into the Mass Storage drive the file Rapid IoT Blinking an LED firmware.bin generated by Atmosphere Studio available from your download folder
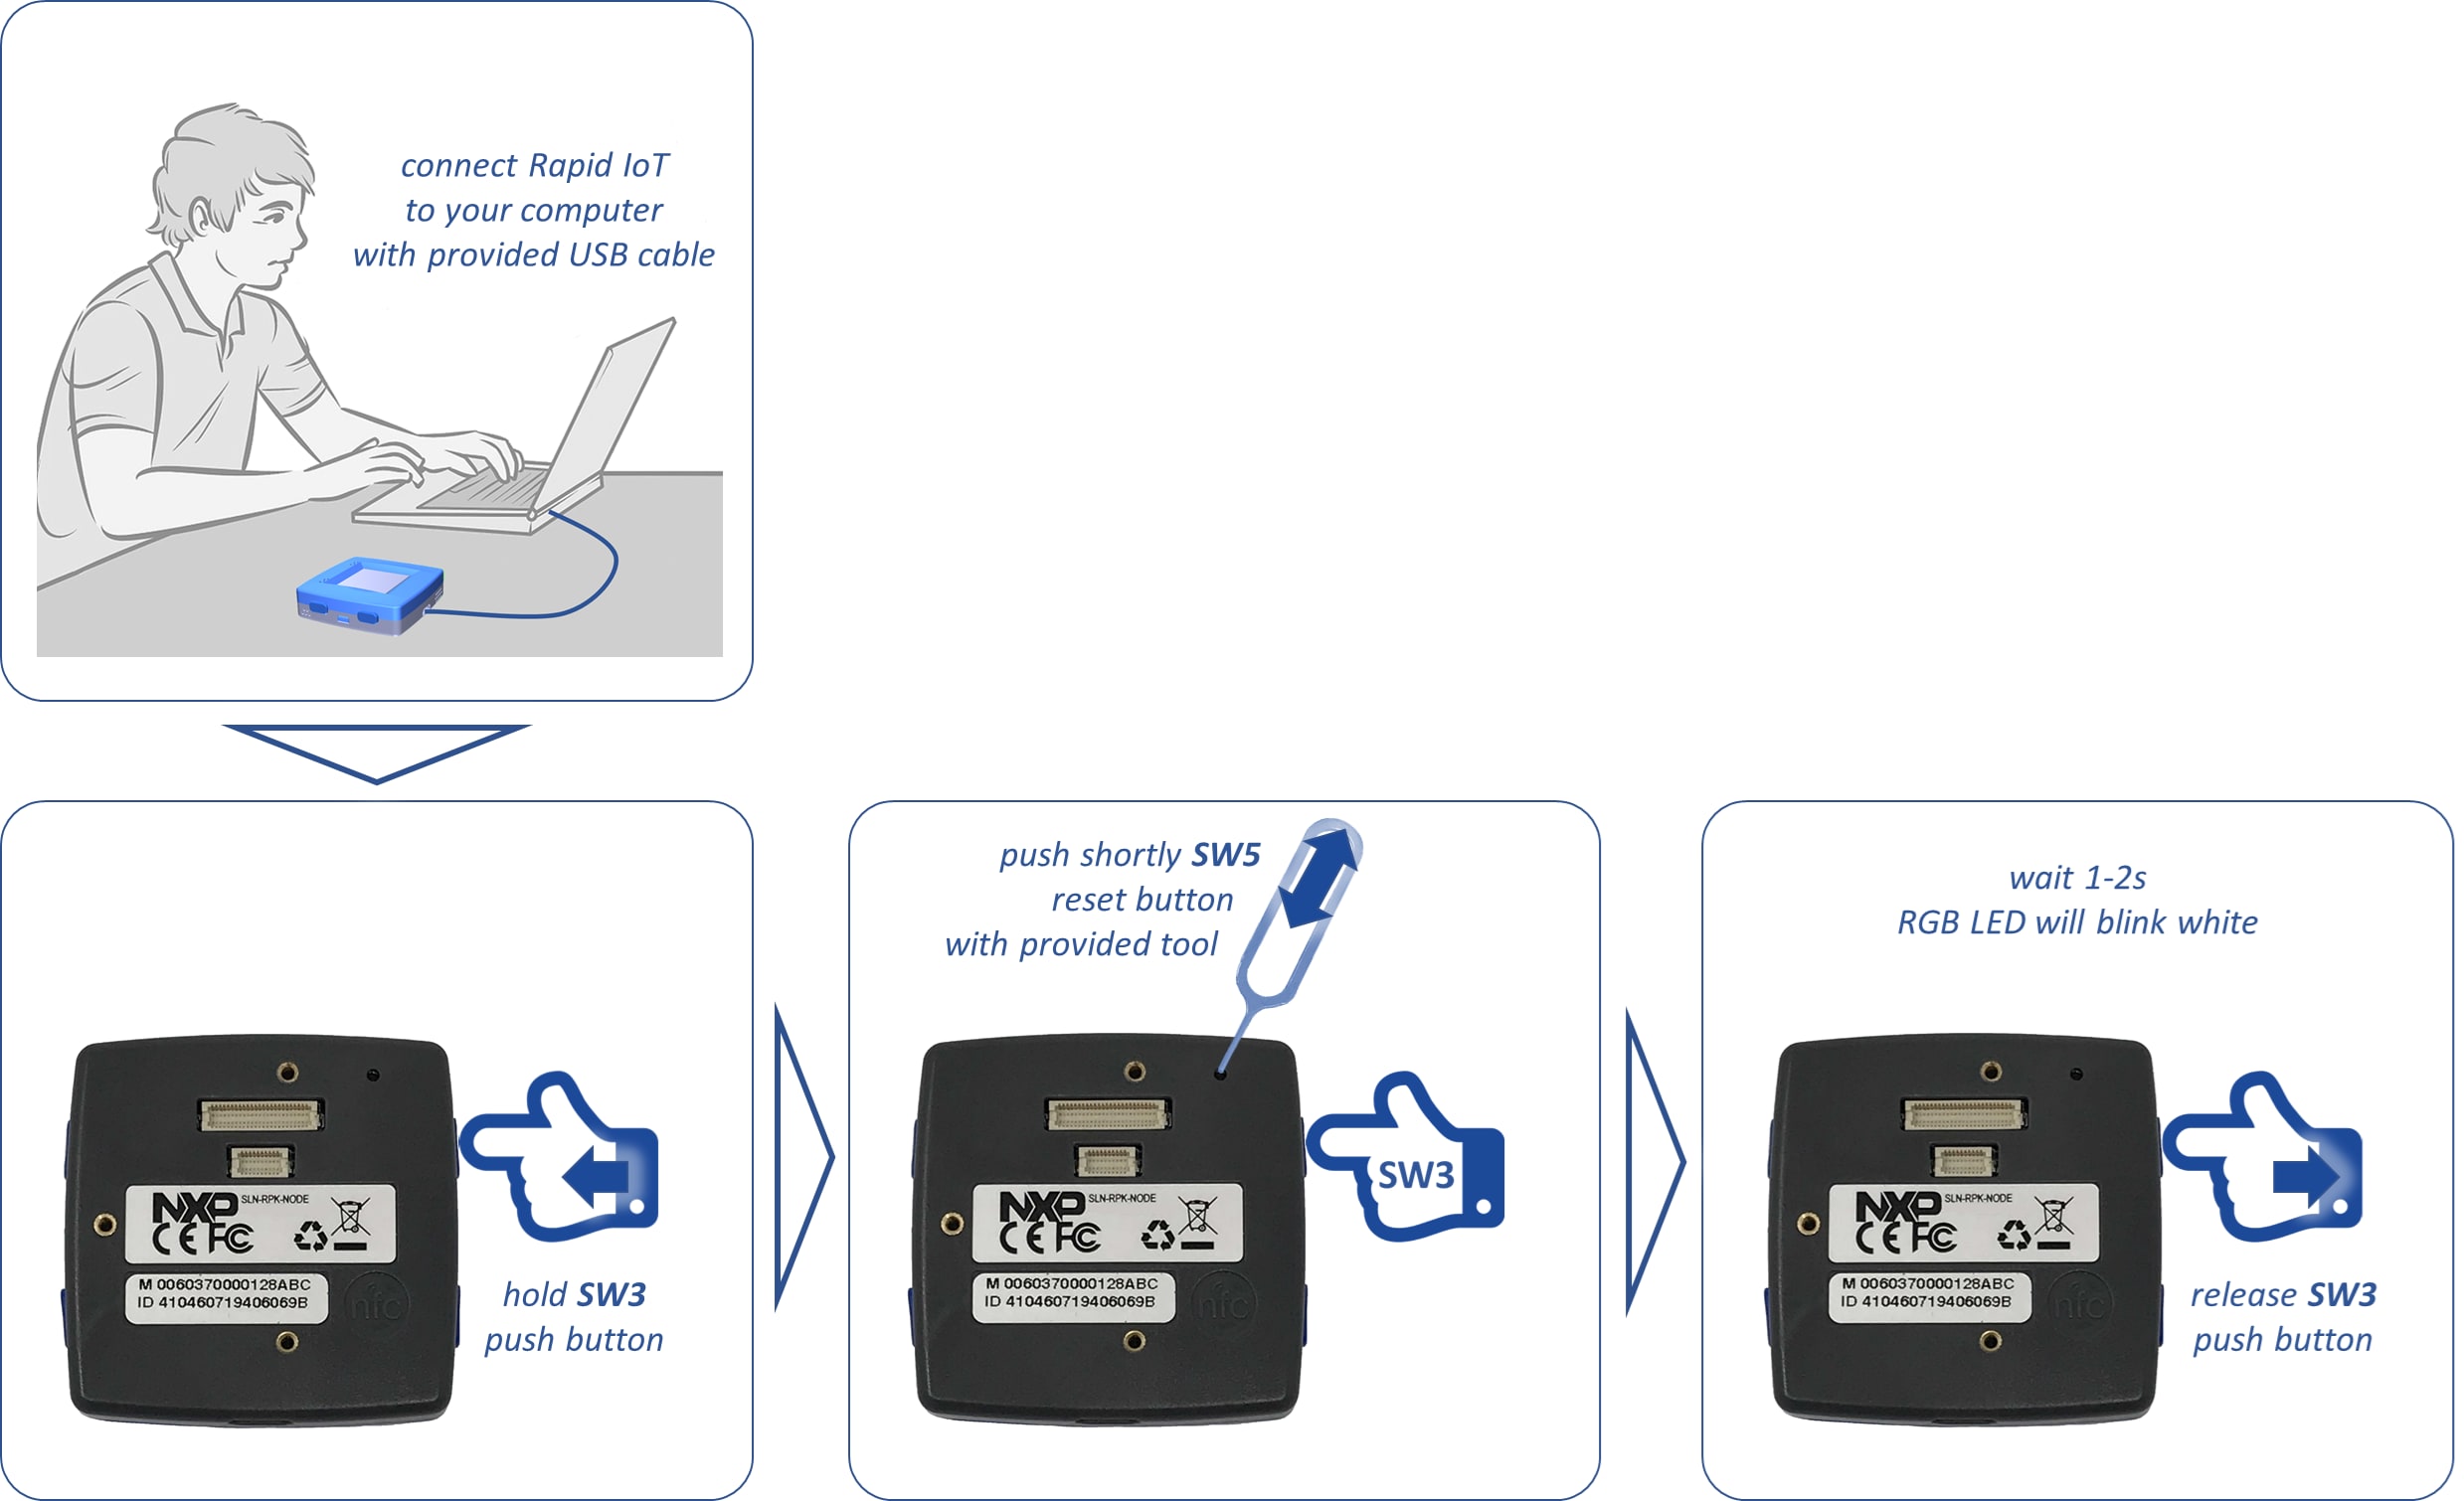

Bootloader will automatically identify the MCU target to reprogram thanks to the binary file
signature.
RGB LED will blink purple during download and blink
blue
during serial flash programming.
RGB
LED will blink green during K64F internal flash (re)programming with the new
application
(read from Serial Flash memory) and automatically reset, when ready.
Congratulations, you have now officially compiled and programmed an Atmosphere Studio example on your Rapid IoT board
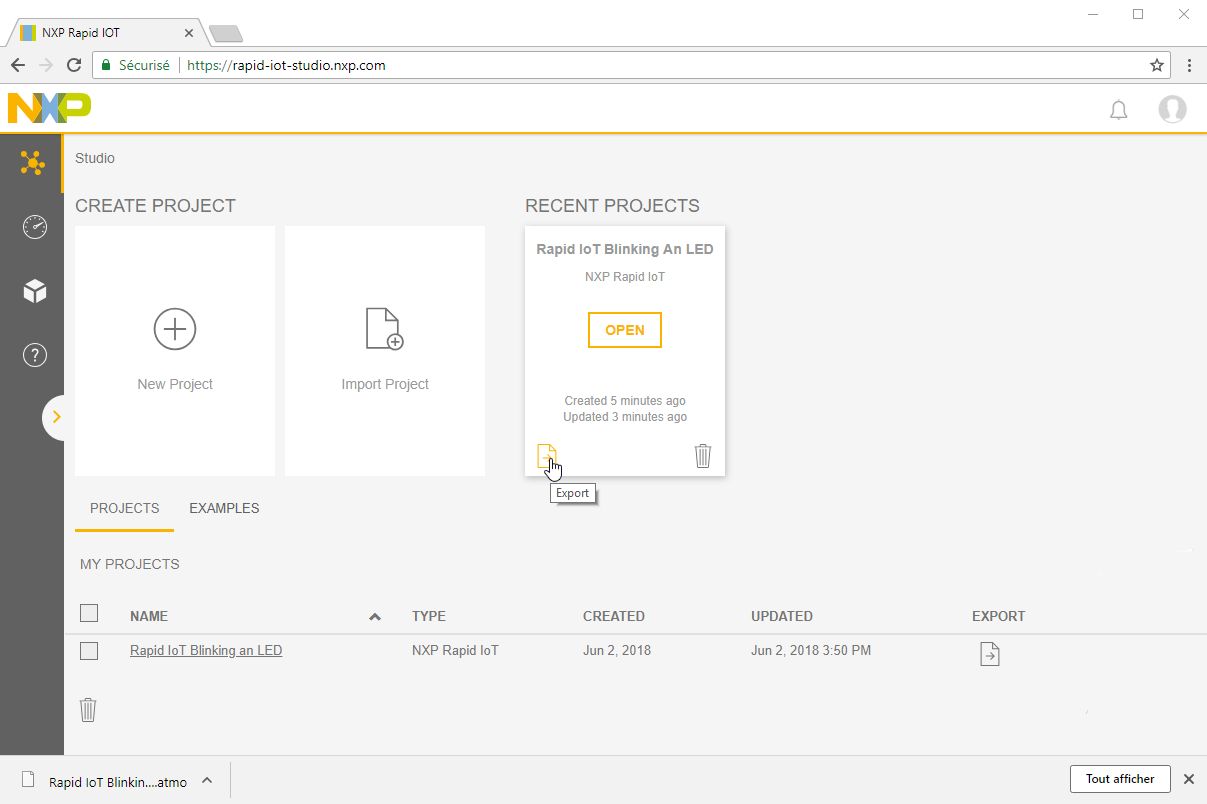
Your project is stored online by Atmosphere Studio for Rapid IoT.
You can access it from any
computer with
an internet connection logging-in with your user-account.
But you can also save your project configuration Offline.
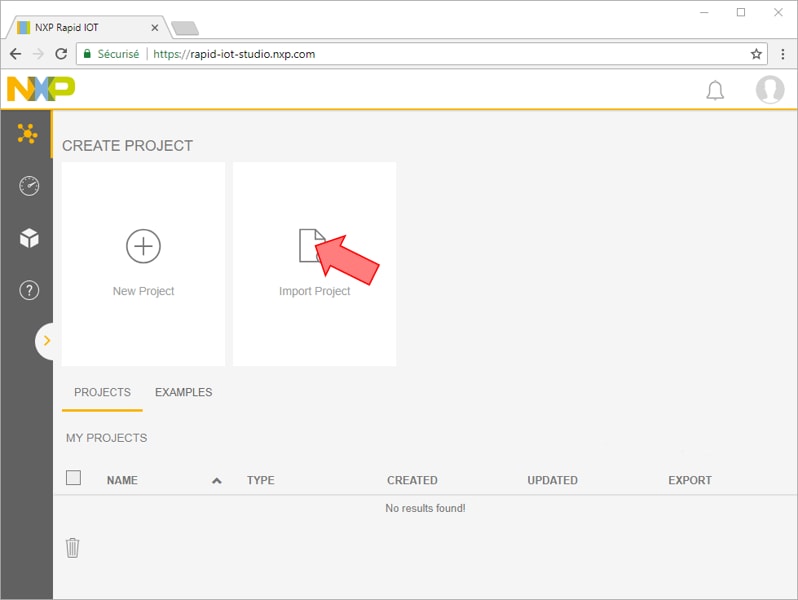
From the Studio Project Manager view
select the
icon Export next to your project.
The file Rapid IoT Blinking an
LED.atmo will be automatically
downloaded by your web browser.
Then you can easily import your project to Atmosphere Studio.
From the Studio Project Manager
view select
the icon Import Project.
Select the file Rapid IoT Blinking an
LED.atmo
from the browser
window and press OK.
Your project will now be automatically added to your Online library.
You can also export your Atmosphere Studio project to debug it with MCUXpresso IDE.
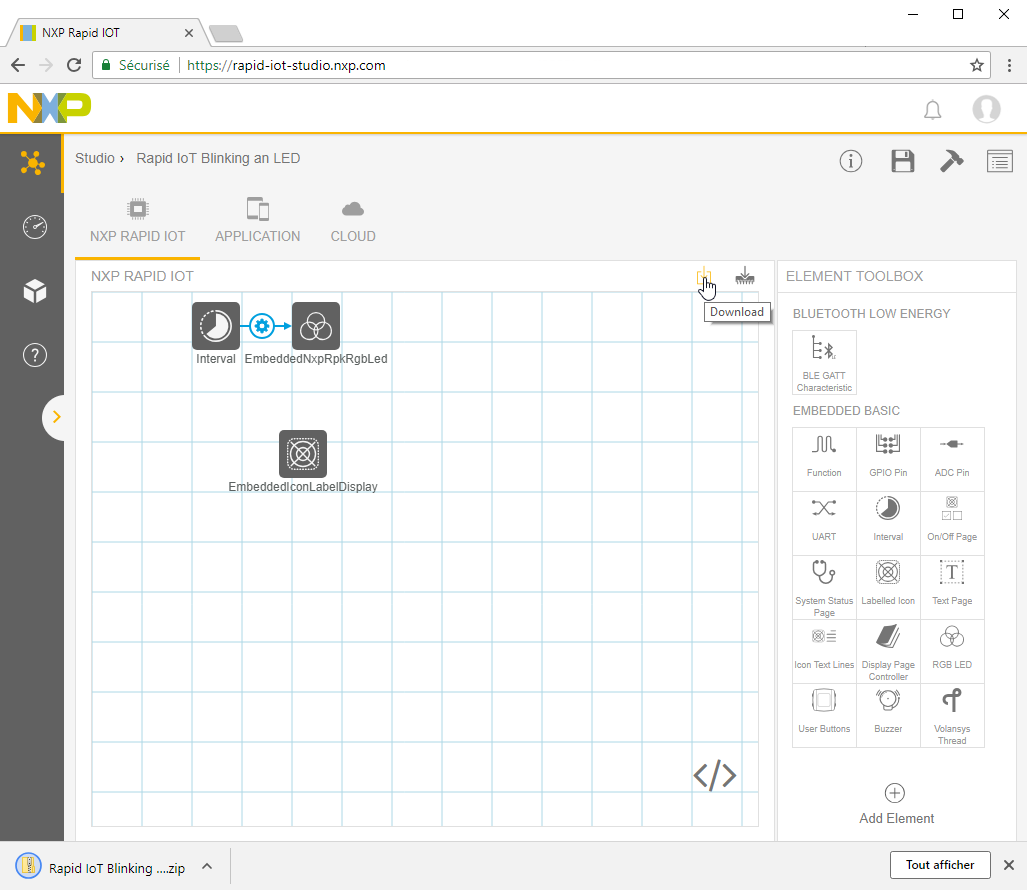
Open your project and select the icon Download from the Embedded View
toolbar.
The file
Rapid IoT Blinking an LED source.zip will be automatically downloaded by your
web browser.
MCUXpresso Software Development Kit (SDK) + Integrated Development Environment (IDE)
Import Rapid IoT projects into MCUXpresso IDE
The Rapid IoT SDKs require to import manually the projects unlike classical MCUXpresso SDKs.
This
feature (as
well as the documentation) will be upgraded during the periodic updates.
To import Rapid
IoT
projects
into MCUXpresso IDE,
follow those steps:
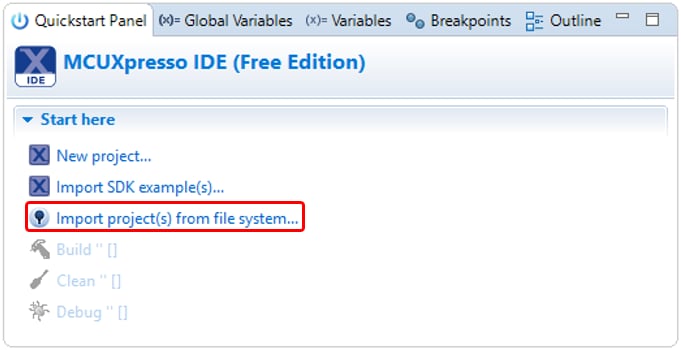
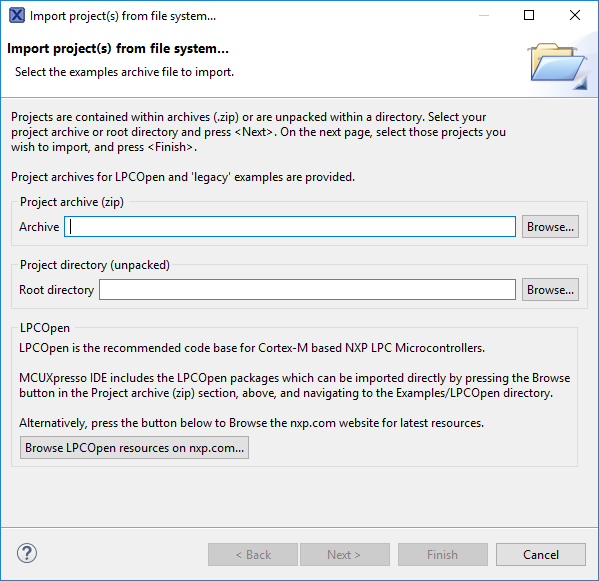
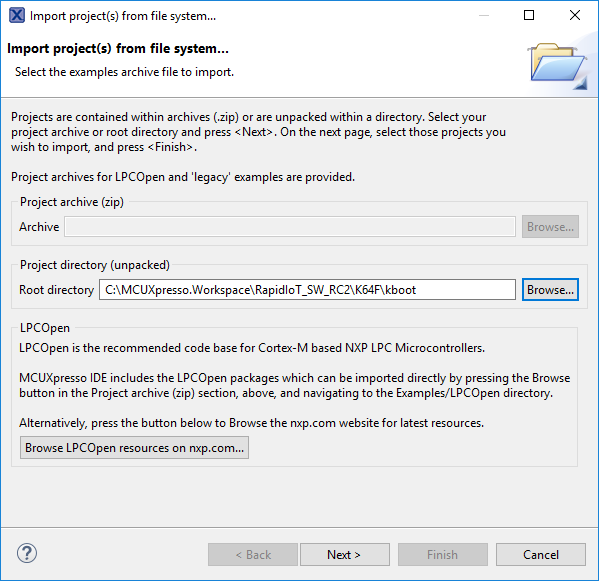
From the Quickstart Panel, select the option Import project(s) from
file
system…
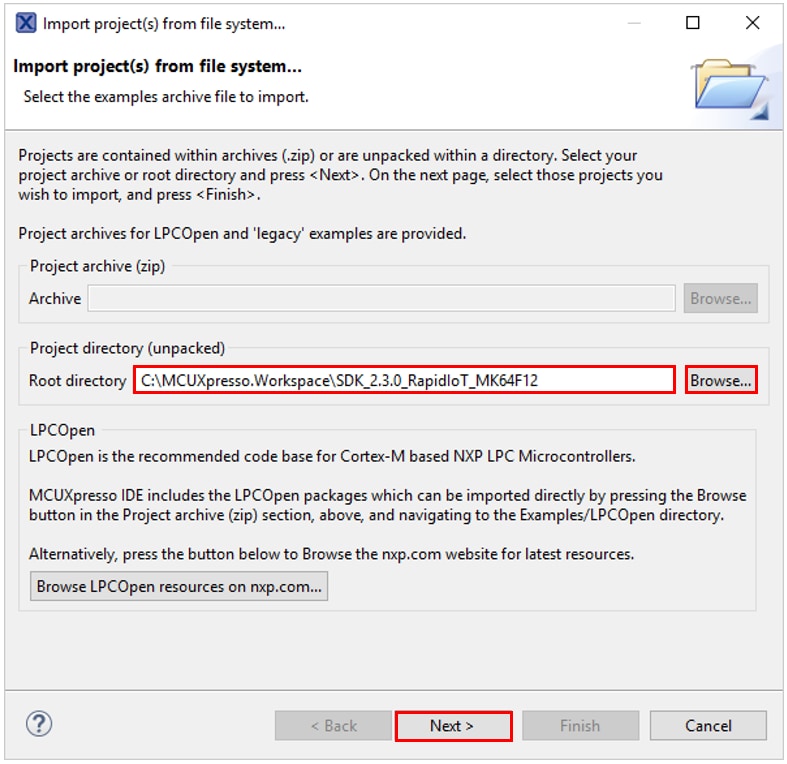
Enter (or browse to) the file system location of the intended target SDK package.
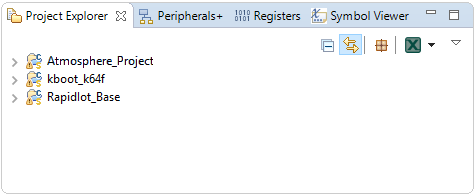
Select the projects by pushing Select All button (NOTE: the RapidIot_Base project must be selected if the Atmosphere_Project is selected) and make sure that the box Copy projects into workspace is un-checked, then press the button Finish
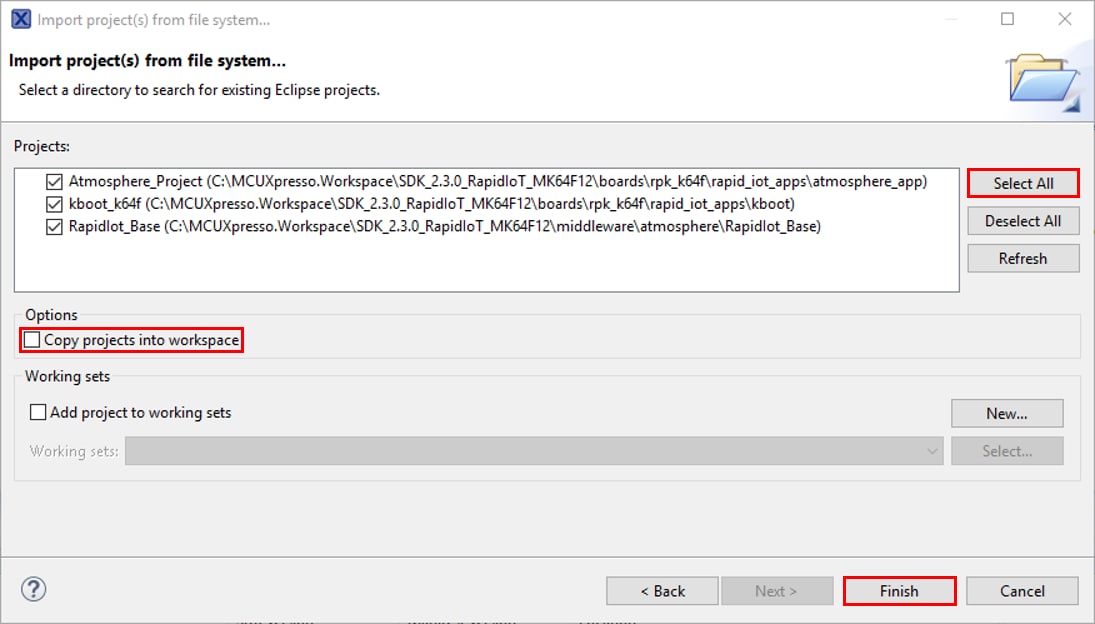
The projects will now appear in the Project Explorer window.
Build a Rapid IoT Project
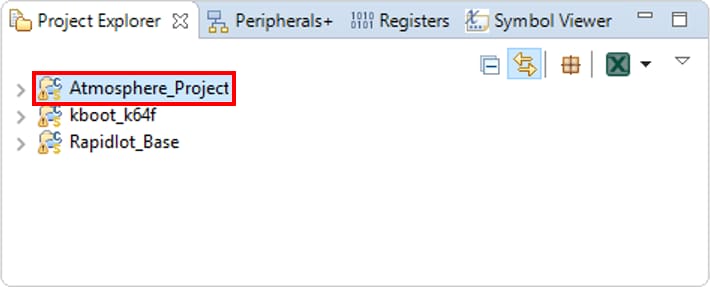
Select from the Project Explorer window the project that you want to compile (ex. Atmosphere_Project)
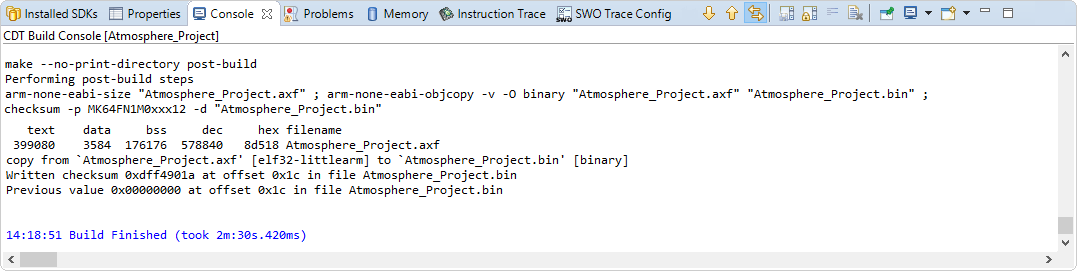
From the Quickstart Panel, select the option Build ‘Atmosphere_Project’ [Debug]
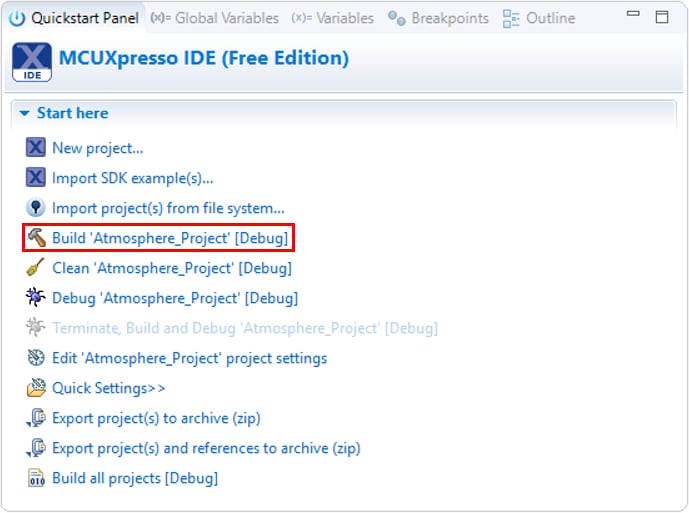
Wait for the Console window to confirm that the compilation ended up successfully (approx. 2min for the first time to compile the Atmosphere_Project).
Congratulation, you successfully built your Rapid IoT project with MCUXpresso IDE
Debug a Rapid IoT Project
Select from the Project Explorer window, the same project that you just compiled successfully.
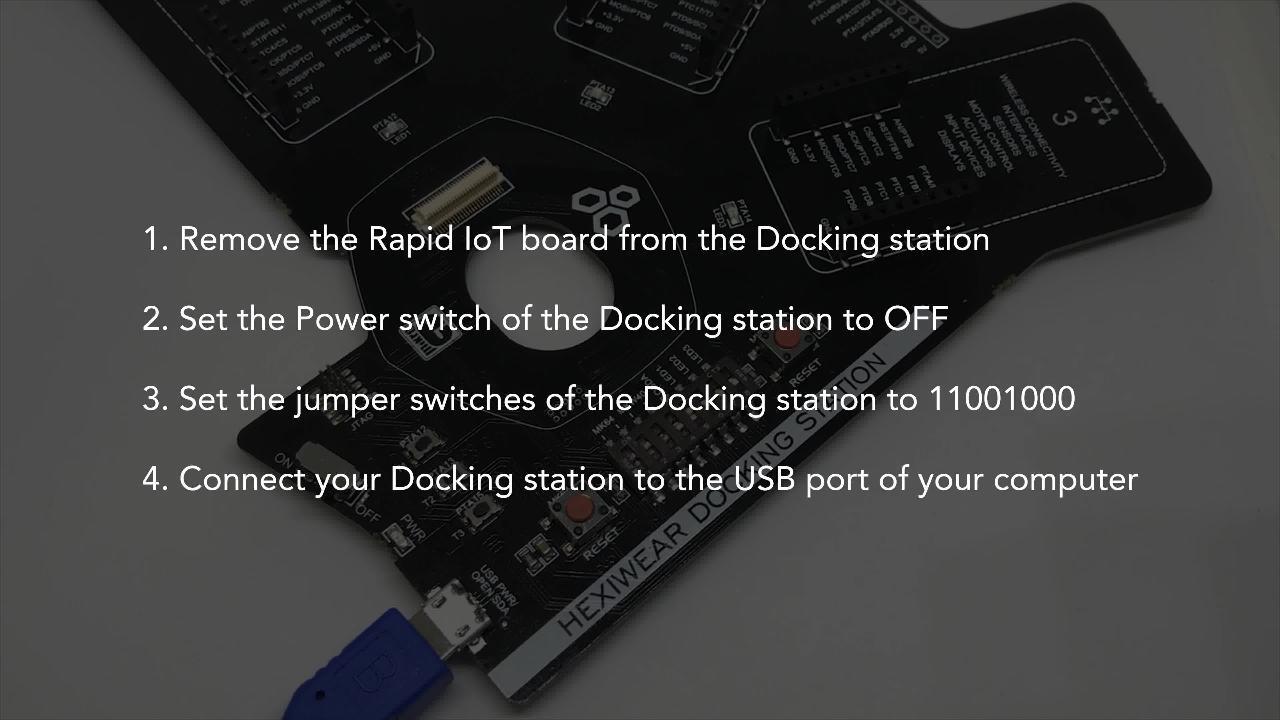
Before connecting your Rapid IoT to the MikroElektronika Docking-station or changing the Jumper Switches make sure to set the Power switch of the Docking station (red below) to OFF.
To download for Docking station DAP-LINK for Rapid IoT go online at:
www.nxp.com/rapid-iot
Select from the PRODUCTS tab Rapid IoT prototyping kit.
Go to SOFTWARE and TOOLS tab and select the latest version of the Rapid IoT DAP-LINK.
You will be asked to sign-in/up with a free NXP user-account
When the download of the compressed file completed, extract it in your MCUXpresso Workspace on your computer HDD.
To reprogram the OpenSDA Application from the MikroElektronika Docking-station follow those steps (Rapid IoT board should not be mounted to the Docking station):
- Set the Power switch of the Docking station (red below) to OFF
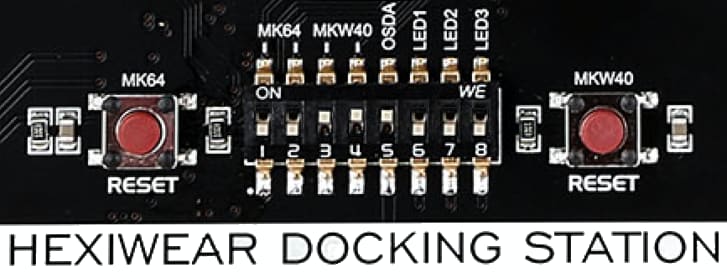
- Set the jumper switches of the Docking station to 11001000
- Connect your Docking station to the USB port of your computer
- Keep MK64 RESET button of the Docking station pressed, while setting the Power switch of the Docking station to ON, wait 2 seconds then release the MK64 RESET button
Your computer will detect a new Mass Storage drive named MAINTENANCE and automatically install the appropriate drivers.

- From your computer file explorer, drag-n-drop or copy-paste into the MAINTENANCE drive the binary file k20dx_rapid_iot_if_crc_legacy_0x8000.bin
Wait for the download to complete.
- Set the Power switch of the Docking station (red below) to OFF
- Set the Power switch of the Docking station (red below) to ON
Your computer should detect new Mass Storage drive named IOT-DAPLINK and automatically install the appropriate drivers.
Congratulation your MikroElektronika Docking-station is now ready to program, serial-monitor and debug safely both MCU targets of your Rapid IoT board!
Before connecting your Rapid IoT to the MikroElektronika Docking-station or changing the Jumper Switches make sure to set the Power switch of the Docking station (red below) to OFF.
Plug your Rapid IoT to the Docking station aligning carefully the board to board connectors (yellow below).
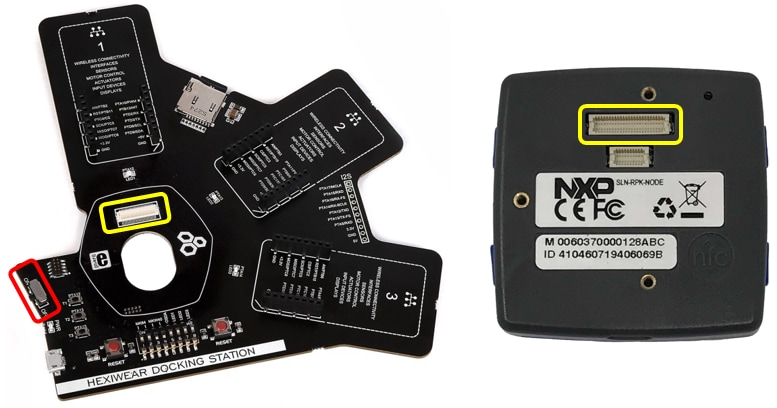
The OpenSDA circuitry embedded in the Mikroelektronika Hexiwear Docking-station (MIKROE-2094) can program, serial-monitor and debug alternately the K64F and the KW41Z target MCUs featured in the Rapid IoT.
Set the jumper switches of the Docking station to 11001000 to program or debug the Application/K64F controller.
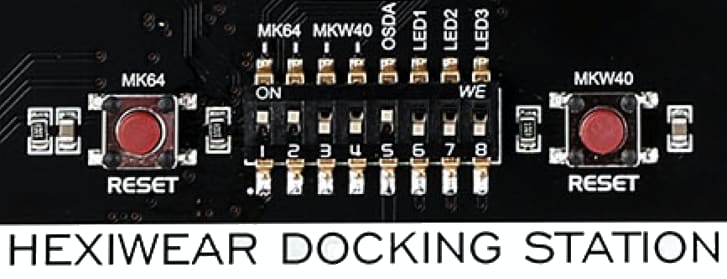
Set the jumper switches of the Docking station to 00111000 to program or debug the Wireless/KW41Z controller.
From the Quickstart Panel, select the option Debug ‘Atmosphere_Project’ [Debug]
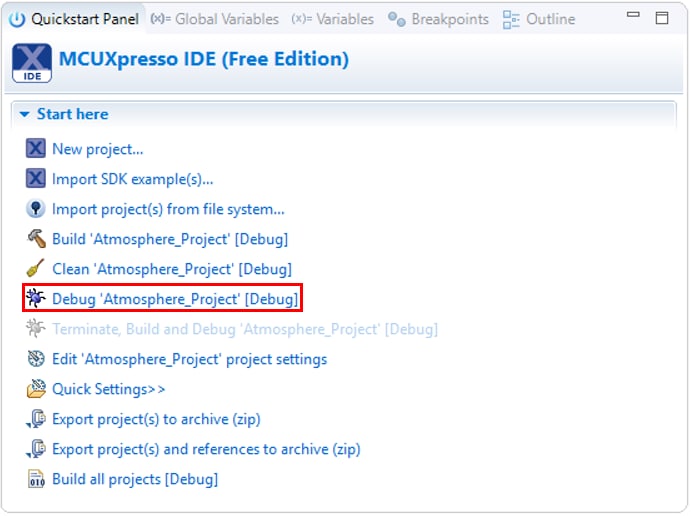
A configuration window should popup to ask you to select your debug Probe.
If your Docking station has been properly programmed with the DAP-LINK application for the Rapid IoT (see Docking station programming in the Hardware section), a CMSIS-DAP probe should be detected.
Otherwise check the box MCUXpresso IDE LinkServer (inc. CMSIS-DAP) probes and press Search again.
When your probe is properly detected, simply select it from the list of the Available attached probes, check the box Remember my selection (for this Launch configuration) to avoid the same window to popup at the next debug and press OK.

Wait for MCUXpresso IDE to switch to the Debug view and press the Resume button from the toolbar.
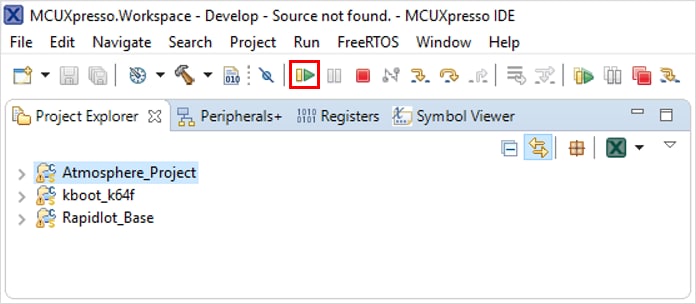
Congratulation, you successfully debugged your Rapid IoT with MCUXpresso IDE
4. Create
4.1 Choose a Development Path
Rapid IoT Studio
Atmosphere WEB/GUI-Programming tool
Atmosphere is a robust IoT platform for creating, deploying, and managing connected products. Atmosphere enables users to bring their IoT solutions to market quickly, affordably, and securely through a complete end-to-end experience.
The graphic below represents the typical architecture of connected products managed using Atmosphere.
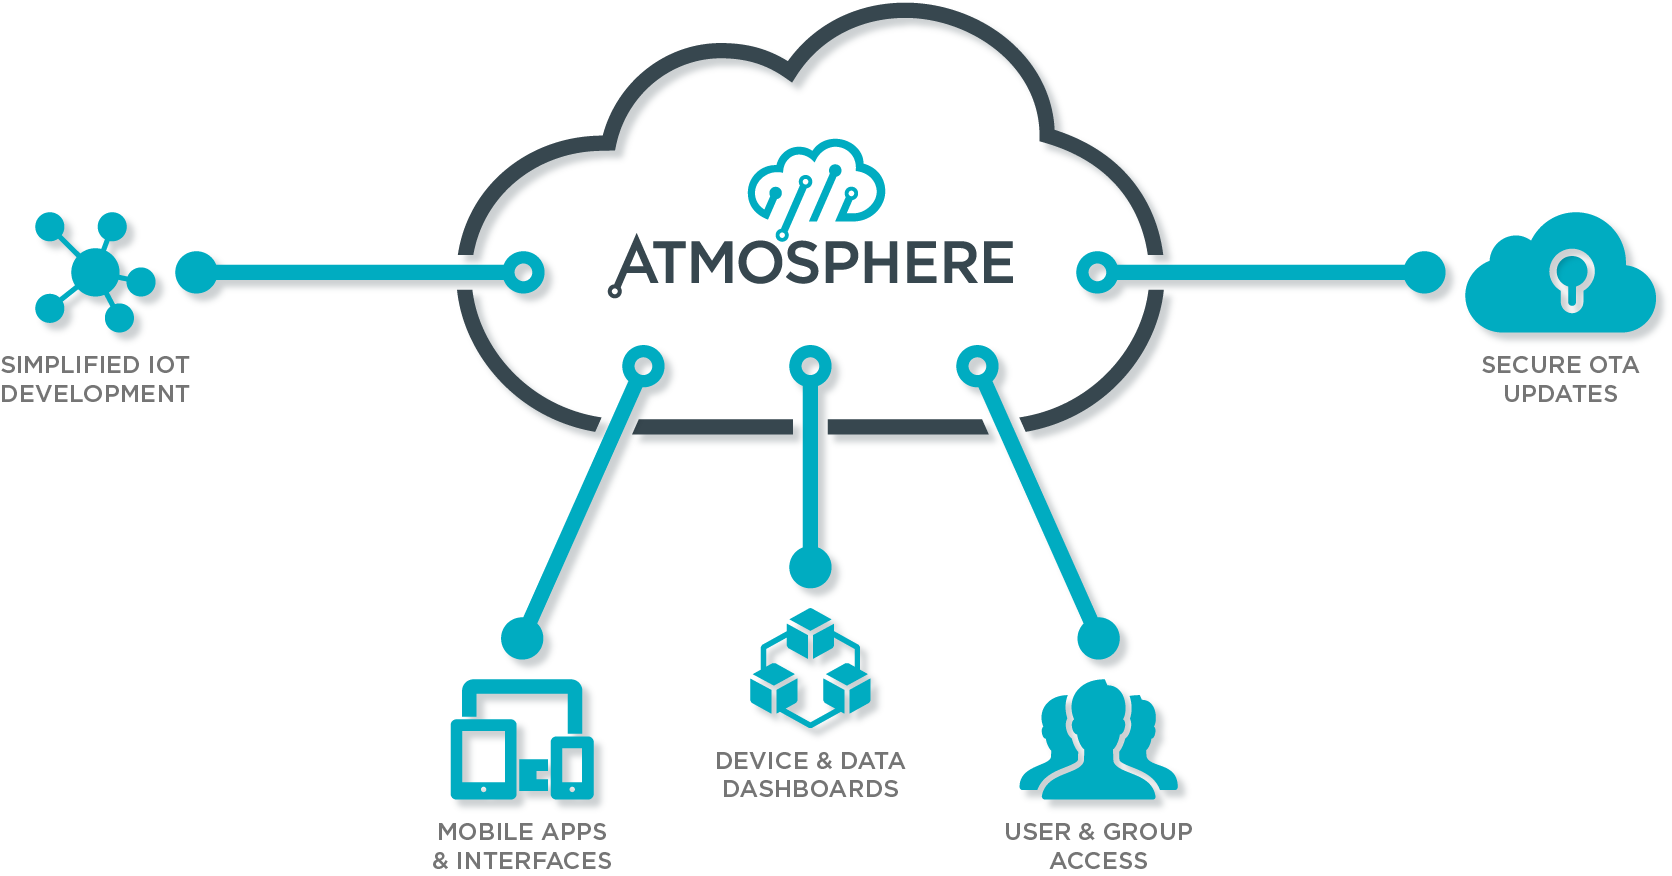
All aspects of your connected product needs can be managed with Atmosphere no matter where you are in the process, from concept and prototype through deployment and management.
Unlike platforms that focus purely on developing embedded hardware or software, or managing devices, users, and data, Atmosphere accomplishes each of them simultaneously, providing the means to create and manage IoT solutions from start to finish. Atmosphere uses common connectivity protocols such as Wi-Fi and Bluetooth Low Energy to connect to your devices where it then receives device data, allowing for powerful aggregation, analysis, and reporting.
What is Included?
Atmosphere is composed of the following suite of applications:
Atmosphere IoT Platform: The Atmosphere IoT Platform is cloud-based software that offers a complete IoT development and management experience. Through its easy-to-use development environment, configurable dashboard editor, and device management console, Atmosphere provides you a single secure platform for every area of your IoT solution.
Atmosphere IoT App: The Atmosphere IoT app is a mobile app available in the Apple App Store and Google Play Store. The app is an extension of the Atmosphere IoT Platform, and enables you to use Atmosphere as you would from within a desktop browser, including registering and managing devices, viewing device data through dashboards, and more.
Atmosphere IoT Agent: The Atmosphere IoT Agent is a local application that runs in your computer’s system tray, and acts as an intermediary between the computer’s connectivity protocol drivers and the browser running Atmosphere. It is used for programming hardware, and enables you to program an end device from within the Atmosphere IoT Platform.
Create a new Project
Visit the dedicated Atmosphere Studio portal for the NXP Rapid IoT at:
http://rapid-iot-studio.nxp.com
You will need a free NXP account to access Atmosphere Studio for Rapid IoT.
Press LOGIN NXP SSO to log-in with your free NXP account (section 2.2 Get Started with Atmosphere Studio to get instructions to register for a free NXP account)
You will be automatically redirected to the NXP Sign In page.
Enter you Email
Address
and Password and press Sign In.
The Dashboard view will open automatically.
Open the left panel by selecting the icon
located in
the left edge.

Select the option Studio> to launch the online programming interface.

From the Studio view under CREATE PROJECT select New Project to create a new project.
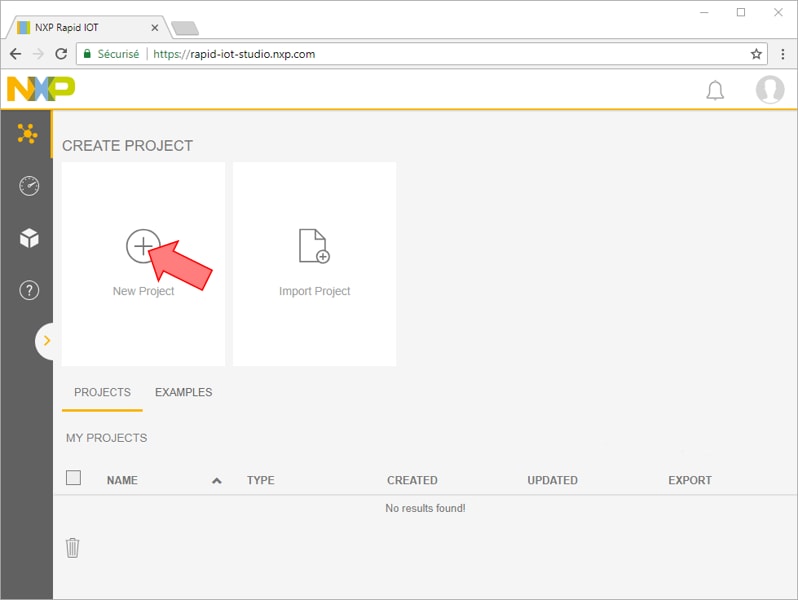
From the NEW PROJECT window enter your new project name (ex. BLE Light Sensor) and press the button CONFIRM.

A new blank NXP RAPID IOT workspace will appear.
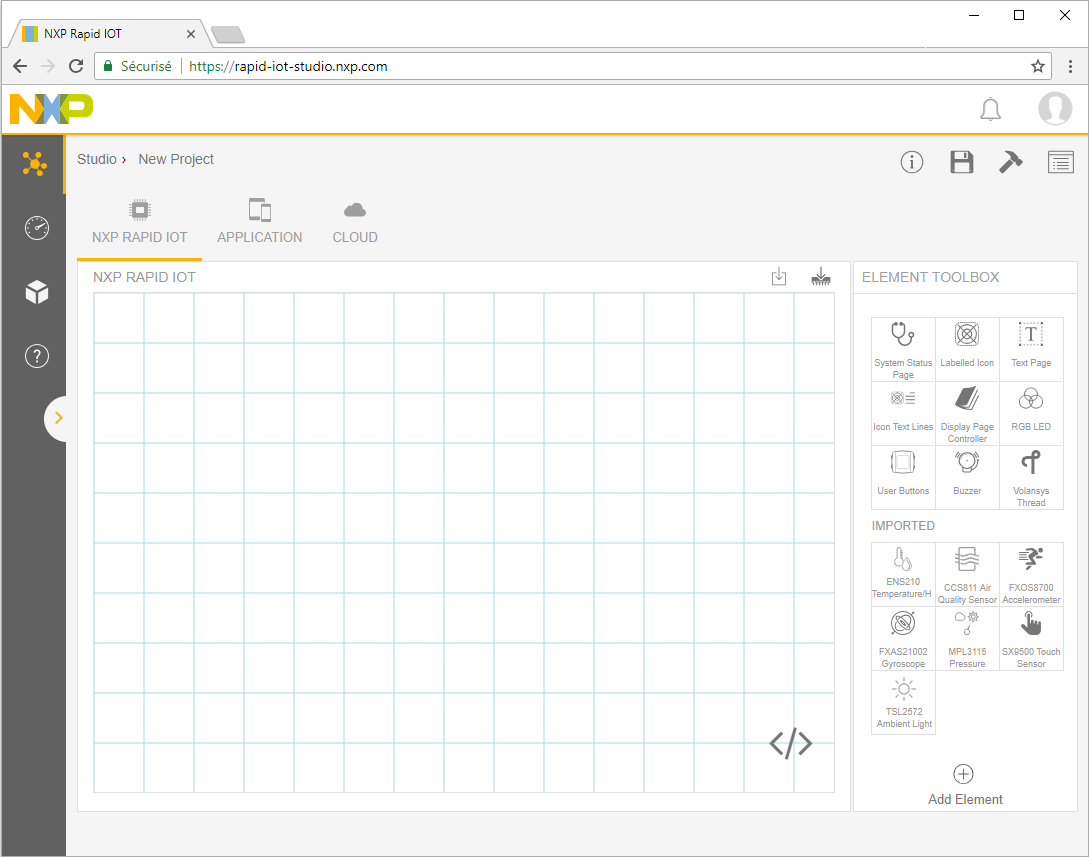
Embedded View
Embedded View is a workspace in Atmosphere Studio for developing an IoT project's embedded firmware. While in Embedded View, the Element Toolbox displays elements that execute on the project's end device. Embedded elements operate as a bridge between the embedded firmware and device interacting with it.
Embedded View's toolbar includes access to the code editor and the programmer.
Code editor is an advanced text editor for writing and modifying the embedded code of a project.
Click the Code Editor button to display the embedded code
editor beside
Embedded View's canvas.
While the code editor is open, any embedded element selected in the
canvas has
its corresponding code
highlighted.
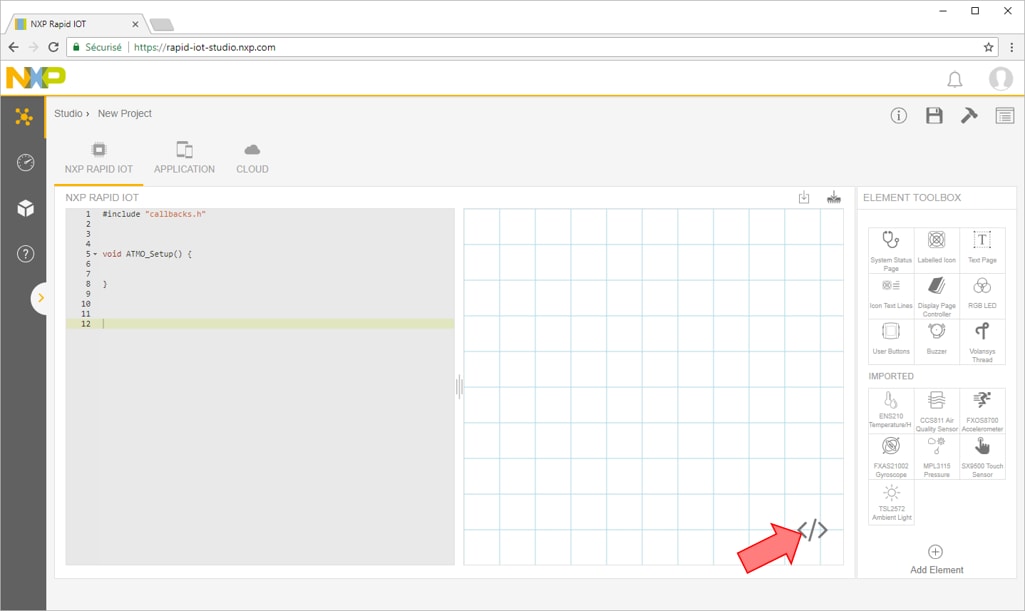
In addition to being added to the canvas, embedded elements may have their source code customized when added to the canvas and when connected to other elements. While most elements do not require their code to be customized and are designed to operate as-is, the option is available to expand their functionality through custom code. The function element for example is a blank slate element, which relies entirely on customizing code to your liking.
The default headers in the code editor include an area to define variables and custom functions, an interval function, a connected function, a disconnected function, and a setup function.

Elements are blocks of code that perform a variety of programmable functions within Studio. Located within the Element Toolbox's elements panel, elements enable the functionality, visualization, and cloud connectivity for an Atmosphere project.
Elements are added to a view canvas from the Element Toolbox to visually construct your project,
and may also
be clicked within the toolbox and added directly to the canvas.
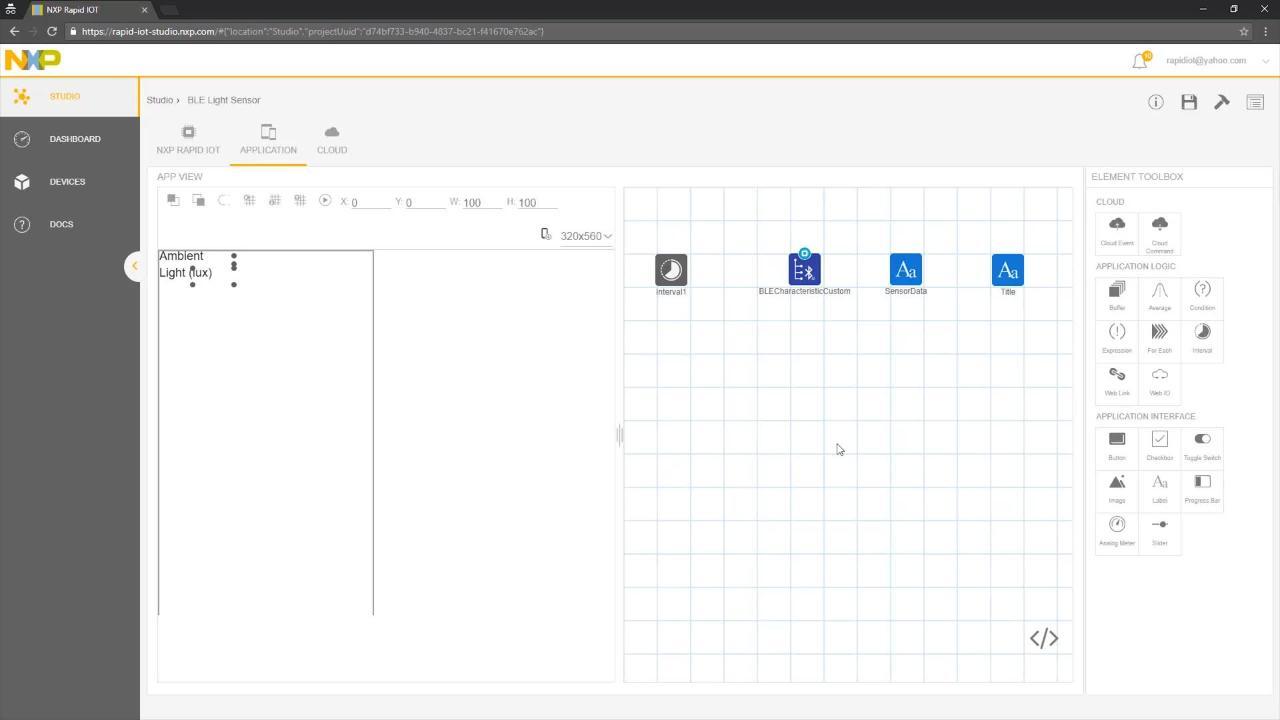
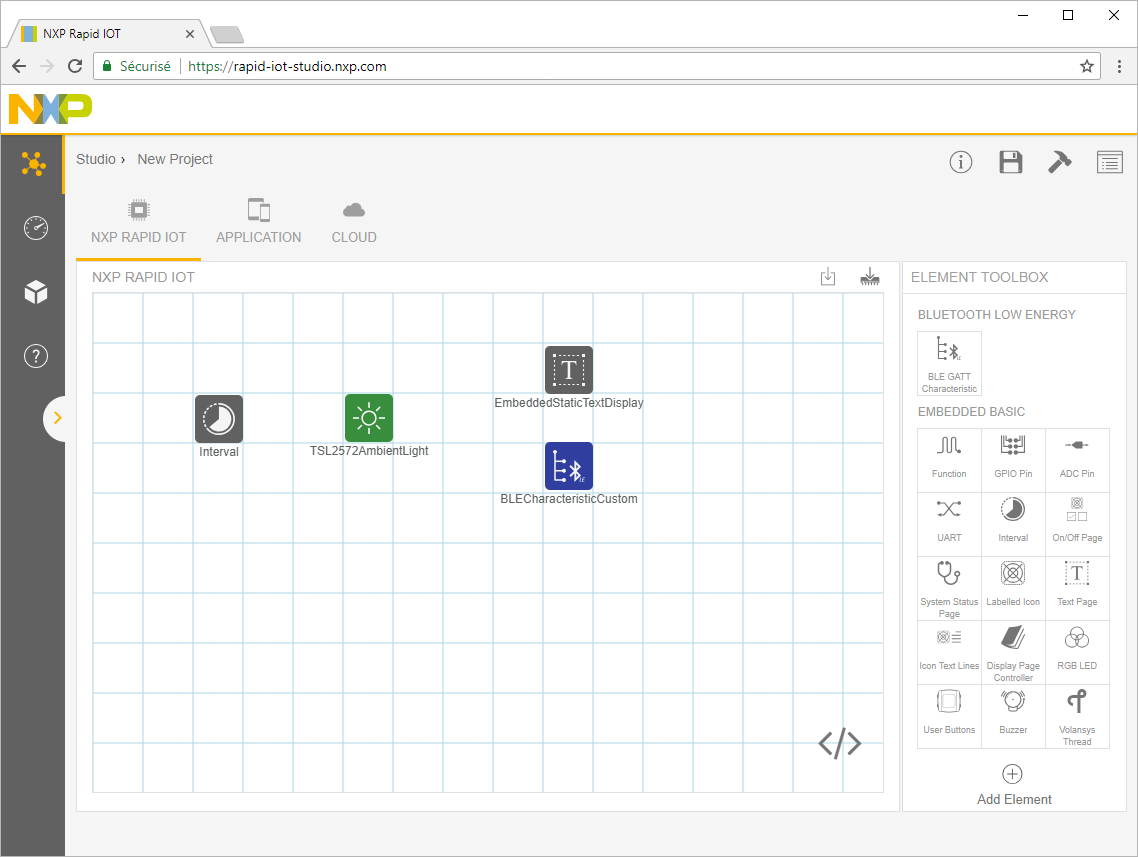
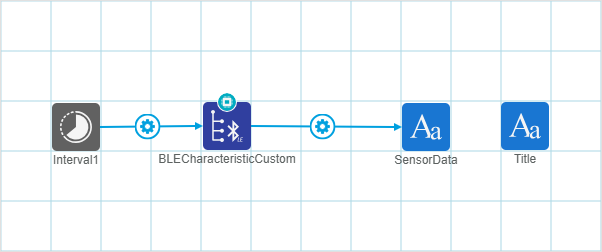
For this project, we want to use Bluetooth to send ambient light sensor data to a mobile application. To accomplish this, we only need four elements: a time interval, display text, the light sensor and a BLE GATT characteristic.
To add the elements, select individually the following items in the Element Toolbox located in the right panel:

Selecting an element in the canvas displays its properties in the Element Toolbox's properties panel. Each element has a set of default properties and functionality included within them. Properties vary based on the element, and may be changed based on their needs.
To remove an element, select it in the canvas, then remove it pressing Delete or using the Trash Can button in the element's properties.
When all the Elements have been added to your canvas, your workspace should look like as below.
Elements on the canvas can connect to one another to create a chain of functionality between them
by using a
"connector." Connectors represent the flow of information from a "source" (beginning) element to
a "target"
(ending) element.
To
create a connector, click and hold the edge of the source element, then drag the cursor
to the
target element and release it.
Now connect the Elements like represented below.
When two elements become connected, it creates an "event" between them. Events define the actions that occur between the source and target element.
Events can be modified either in the source element's properties, or by selecting the connector's Configuration button between the two elements. Events consist of the following:
- The trigger that causes the event
- The target element
- The target element's ability
- Any ability arguments
When adding the Bluetooth Element to our Workspace, Studio automatically configured the UUIDs and sets some default settings, but we still need to adjust some parameters for our specific need.
From the Workspace, select the Bluetooth Element to display its Properties in the right panel. Disable the options Write and Notify since we will output the Light Sensor data via Bluetooth. Change Data Type from String to Unsigned Integer to display properly the Ambient Light value.
Coupled Elements, like Bluetooth Element, bridge a project's functionality across one view to another.
When a coupled element is added to the canvas, it creates a corresponding copy of it on an associated view (likewise, deleting a coupled element will remove its copy). This allows the element to extend its functionality to that view. Clicking on a coupled element's badge moves you to that view with that element selected and its properties displayed.
Application View
Application View is a workspace in Atmosphere Studio for developing a phone App interface that interacts with the NXP Rapid IoT hardware. Application View also acts as a gateway between Embedded View and Cloud View, and is used to have data sent from the embedded firmware up to Atmosphere Cloud.
Open the Application view from the upper Project toolbar.
You’ll notice that a Bluetooth Element has been automatically added to the Application Workspace. It is coupled to the Bluetooth Element from the Embedded application.
Now we need to configure the mobile application. First, we need an interval to determine how often to read data from the Rapid IoT. Afterward, we need to display properly the data on the phone screen.
While in Application View, the Element Toolbox displays elements that execute on the application, which includes visual elements that represent interface components and functional elements that run in the background.
Select individually the following items in the Element Toolbox to add them to your Application Workspace.
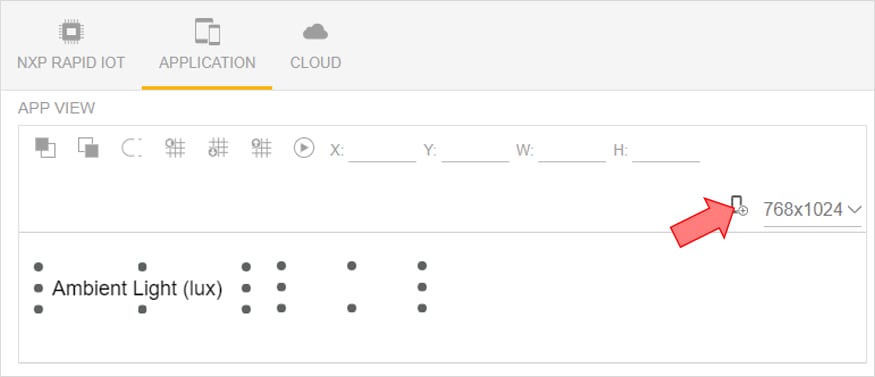
Select the Element Label in the Workspace.
Change its PROPERTIES NAME to
SensorData and remove TEXT information.
Select the Element Label1 in the Workspace.
Change its PROPERTIES NAME to
Title and TEXT
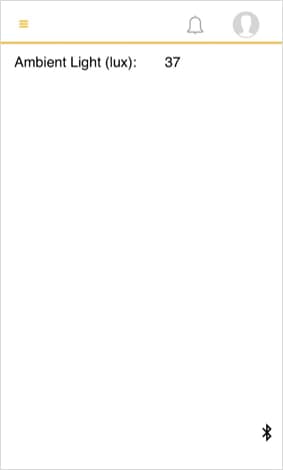
to Ambient Light (lux)

The APP VIEW window located in the left side provides an overview of the phone App interface. Place the Title and the SensorData at the preferred location on the phone screen.

Now, add connectors as shown below. The title label doesn’t need to be connected to anything since it just displays static text.
There is no additional configuration needed for the Application.
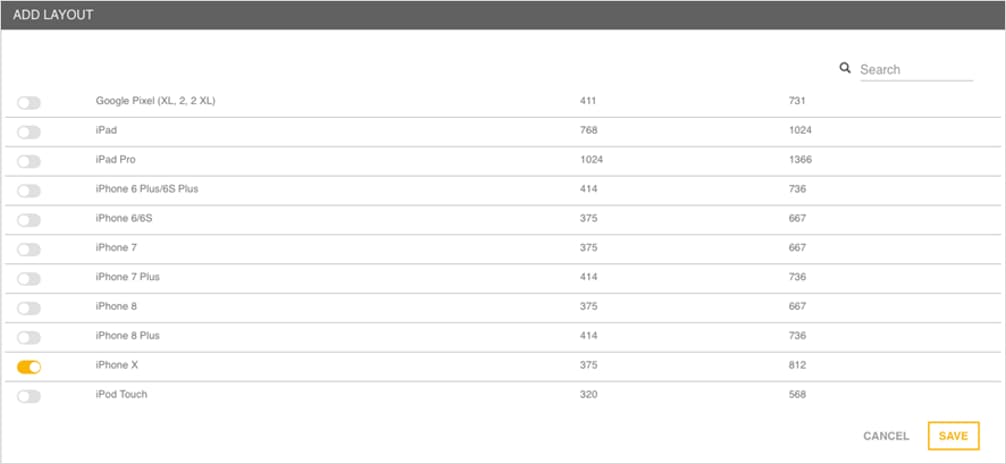
Now, we need to select layouts that our application will support. To do this, select the little phone icon next to the resolution drop-down.
In the window that pops up, select any devices you want to support (your device or the closest match).
Before launching any Build or Programming, please make sure to save first your
project.
Select the Save button from the toolbar located in the
top right
corner to save your modifications

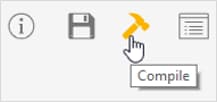
In both the NXP Rapid IoT (Embedded) and Application (Mobile) views there is a Compile button that must be selected.
Once both applications are built, click on the Program Firmware button in the NXP Rapid IoT view to download the binary for the Rapid IoT.

Atmosphere IDE will then link the project and generate the binary output. The file BLE Light Sensor firmware.bin will be automatically downloaded by your web browser.
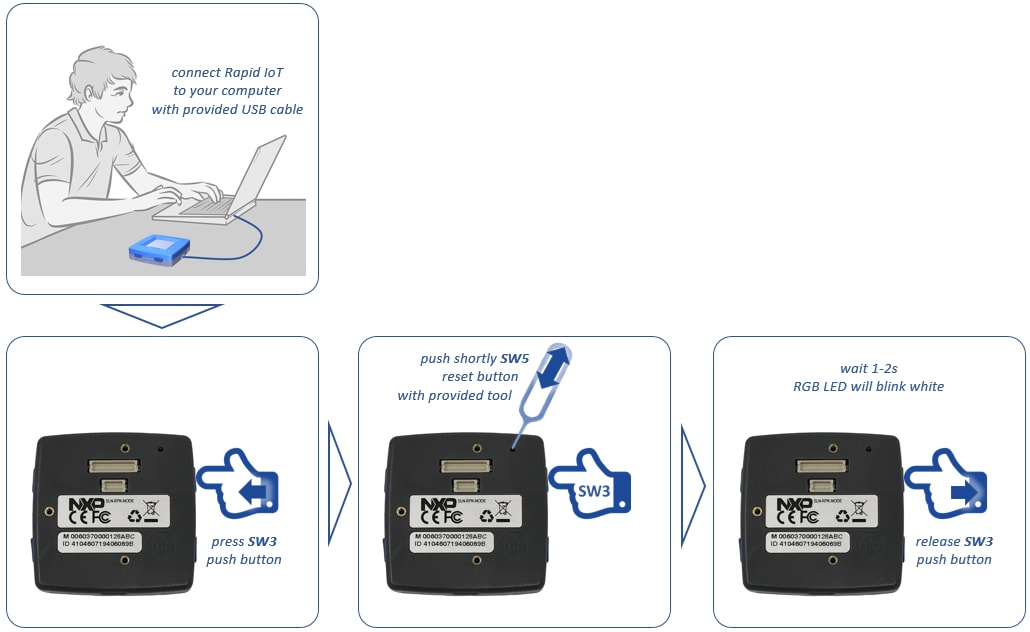
SLN-RPK-NODE Application and Wireless MCUs are pre-programmed in factory with a Bootloader to easily update their application through the onboard USB connector. To reprogram K64F internal flash with the new Rapid IoT Blinking an LED application, simply follow those steps:
- Connect one end of the provided USB cable to the computer and the other end to the micro USB type-B connector of the SLN-RPK-NODE
- Keep SW3 button pressed while pushing shortly SW5/Reset button
- Wait 1-2s for RGB LED to blink Green then release SW3 button
RGB LED will blink green and your computer will detect a new Mass Storage drive and automatically install the appropriate drivers
- From your computer file explorer, drag-n-drop into the Mass Storage drive the file BLE Light Sensor firmware.bin generated by Atmosphere Studio available from your download folder

Bootloader will automatically identify the MCU target to reprogram thanks to the binary file
signature.
RGB LED will blink purple during download and blink blue
during serial
flash programming.
RGB LED will blink green during K64F internal flash
(re)programming
with the new application (read from Serial Flash memory) and automatically reset, when ready.


Launch the Rapid IoT phone App from your phone/tablet.
Press the button LOGIN NXP SSO.
Enter the Email Address and
Password of your free NXP account and press Sign In.
The phone App will automatically launch the Dashboard view.
Open the left panel by selecting the icon located in the top left
corner.
Select the
Device view to pair your equipment with your Rapid IoT board.
Select the icon located in the top right corner to scan the Bluetooth devices in the range.
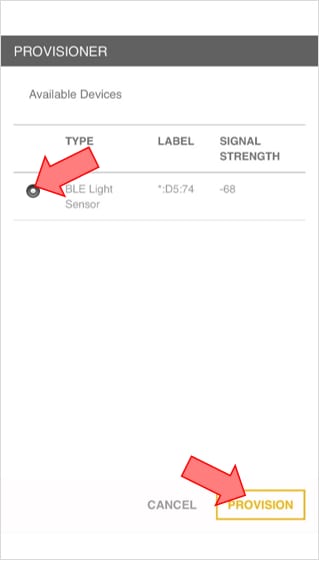
The phone App indicates the list of the Bluetooth devices detected with the type of Application programmed in their memory as well as the last four Hexadecimal numbers of their MAC address.
Select your Rapid IoT board with TYPE BLE Light Sensor and press PROVISION.
The phone App will automatically launch the phone App interface for the BLE Light Sensor
Demo.
It takes
approx. 5s for the first sensor value to appear on the phone App.
Congratulation you now successfully created, built and programmed your first Rapid IoT Project featuring Embedded and Mobile services
MCUXpresso Software Development Kit (SDK) + Integrated Development Environment (IDE)
MCUXpresso SDK Architecture
The Rapid IoT SDK is a composite SDK. It features two SDK target specific SDKs, for each target MCU in the Rapid IoT device.
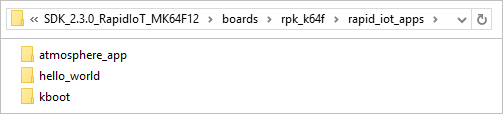
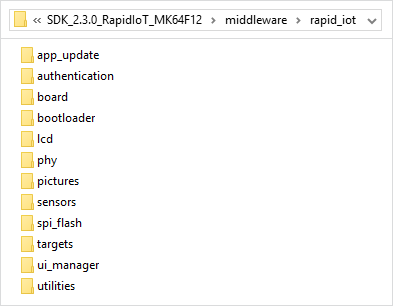
Each target specific SDK features a similar structure to traditional MCUXpresso SDKs. Under the ‘rapid_iot_apps’ directory you will find the factory installed applications on your Rapid IoT device.

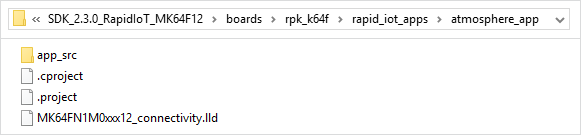
The included K64F application is from the Atmosphere IDE, repackaged to this SDK format. The application’s code base has been split between ‘app_src’ (shown in Figure 220) and ‘middleware/atmosphere’ (shown in Figure 221). This provides a clean directory structure for users to copy and modify as needed.
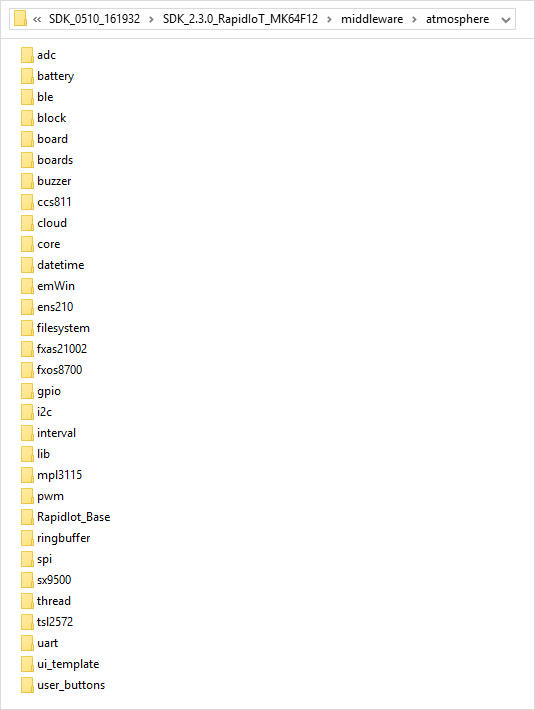
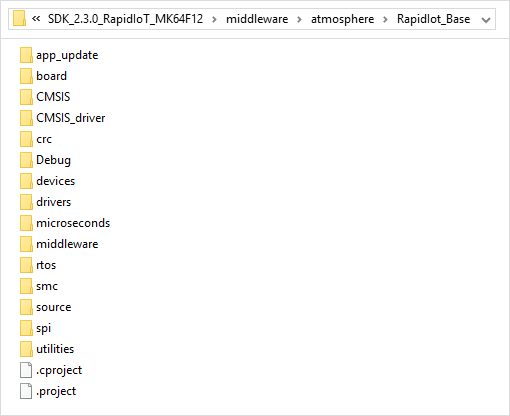
The Atmosphere source is divided further into two groups. The first is shown above in Figure 221. The second is a static library that is illustrated in Figure 222. This static library features lower level code for application updating, connectivity, RTOS, etc.
For non-Atmosphere based projects (kboot(s) and rpk_kw41z_hybrid), there is a rapid_iot specific middleware directory. Figure 223 illustrates the stucture of this middleware folder.
Create a new Project
We will now create a new MCUXpresso project for Rapid IoT using the Hello project as a default template to get all the components embedded in the SLN-RPK-NODE board properly initialized.
If you already followed the instruction to Get started with MCUXpresso, you can skip the following steps to download and import Rapid IoT SDKs into MCUXpresso IDE.
Download Rapid IoT SDKs
Download first the Rapid IoT SDK package online at: www.nxp.com/rapid-iot
Select from the PRODUCTS tab Rapid IoT prototyping kit.
Go to SOFTWARE and TOOLS tab and select the latest version of the Rapid IoT SDK package.
You will be asked to sign-in/up with a free NXP user-account.
When the download of the compressed file completes, extract it in your MCUXpresso Workspace on your computer HDD.
Import Rapid Iot SDKs
The Rapid IoT SDK is a composite SDK. It features two SDK target specific SDKs, for each target MCU in the Rapid IoT device.

Before building the Rapid IoT SDK example projects, the target SDKs need to be imported into MCUXpresso IDE by drag and dropping each target SDK into the “Installed SDKs” window from MCUXpresso IDE.
For each package a confirmation window will pop-up, select OK to validate.

Import the Hello World project for Rapid Iot
The Hello World project for Rapid IoT can be automatically imported and cloned into MCUXpresso IIDE like a classical SDK Example.
To import the Hello World project for Rapid IoT projects into MCUXpresso IDE, follow those steps:
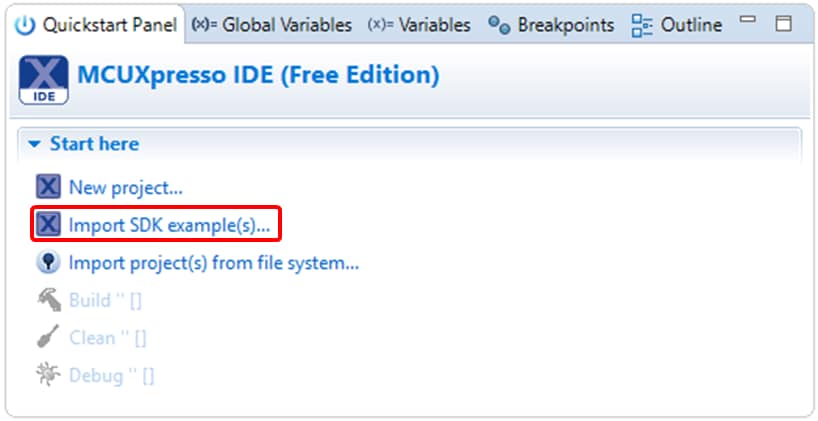
From the Quickstart Panel, select the option Import SDK Example(s)
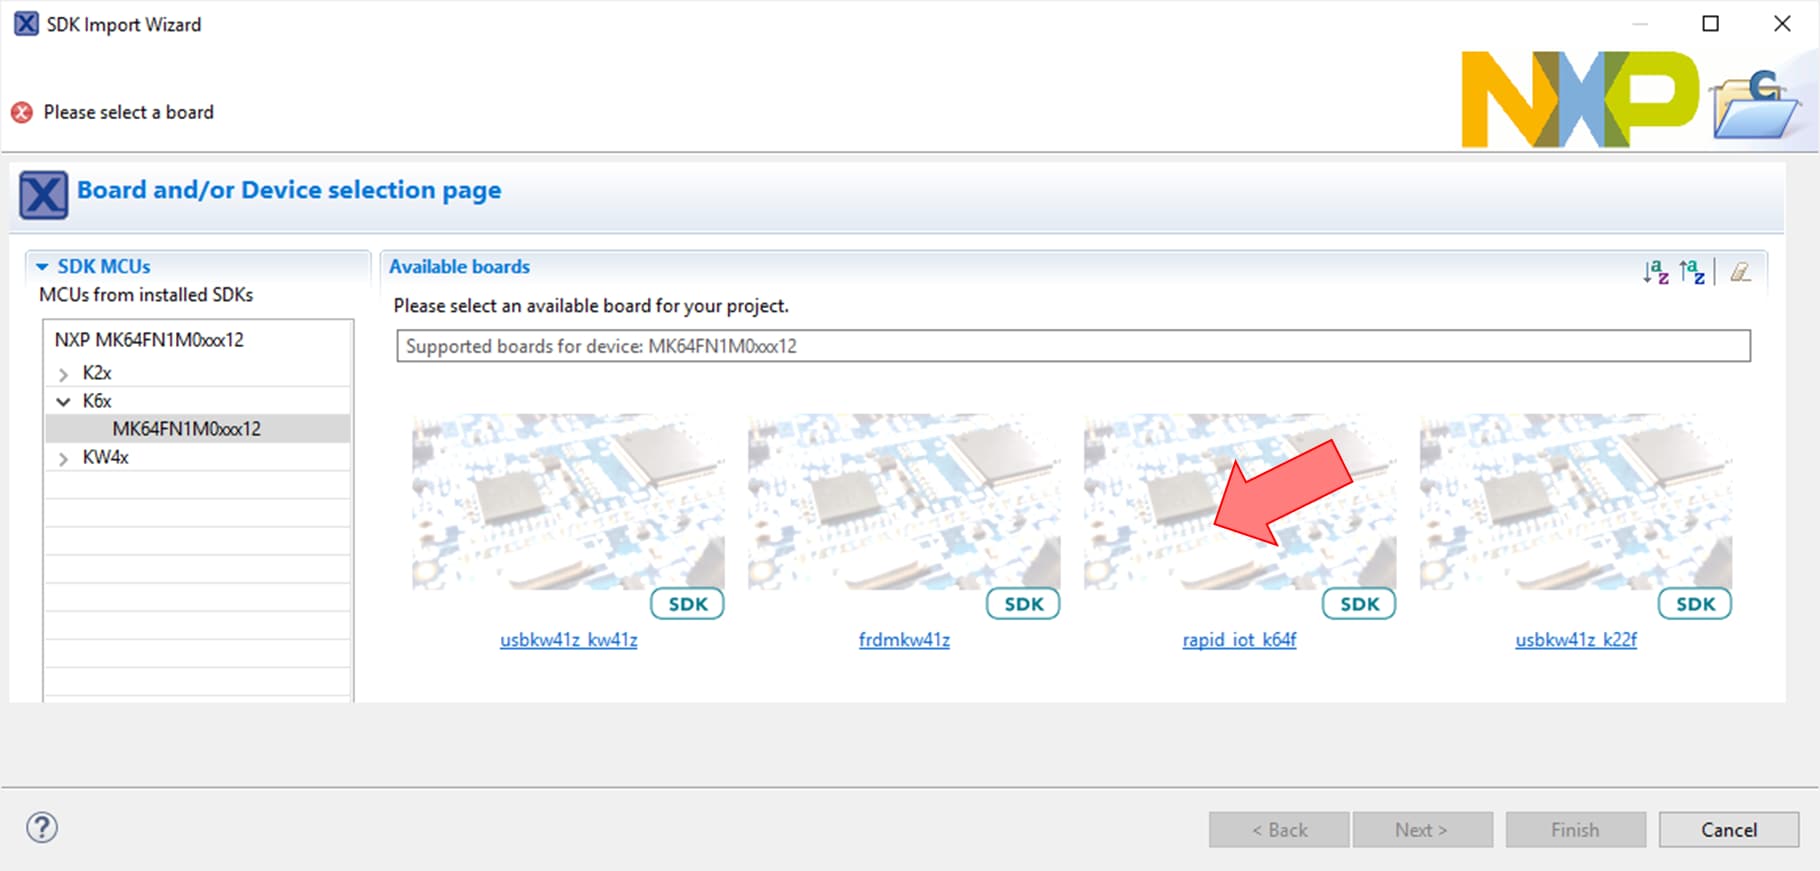
From the Board and/or Device selection page select the rapid iot k64f then press Next
From the project selection page expand the rapid_iot_apps and the hello_world fields then select the hello_world example and press Next
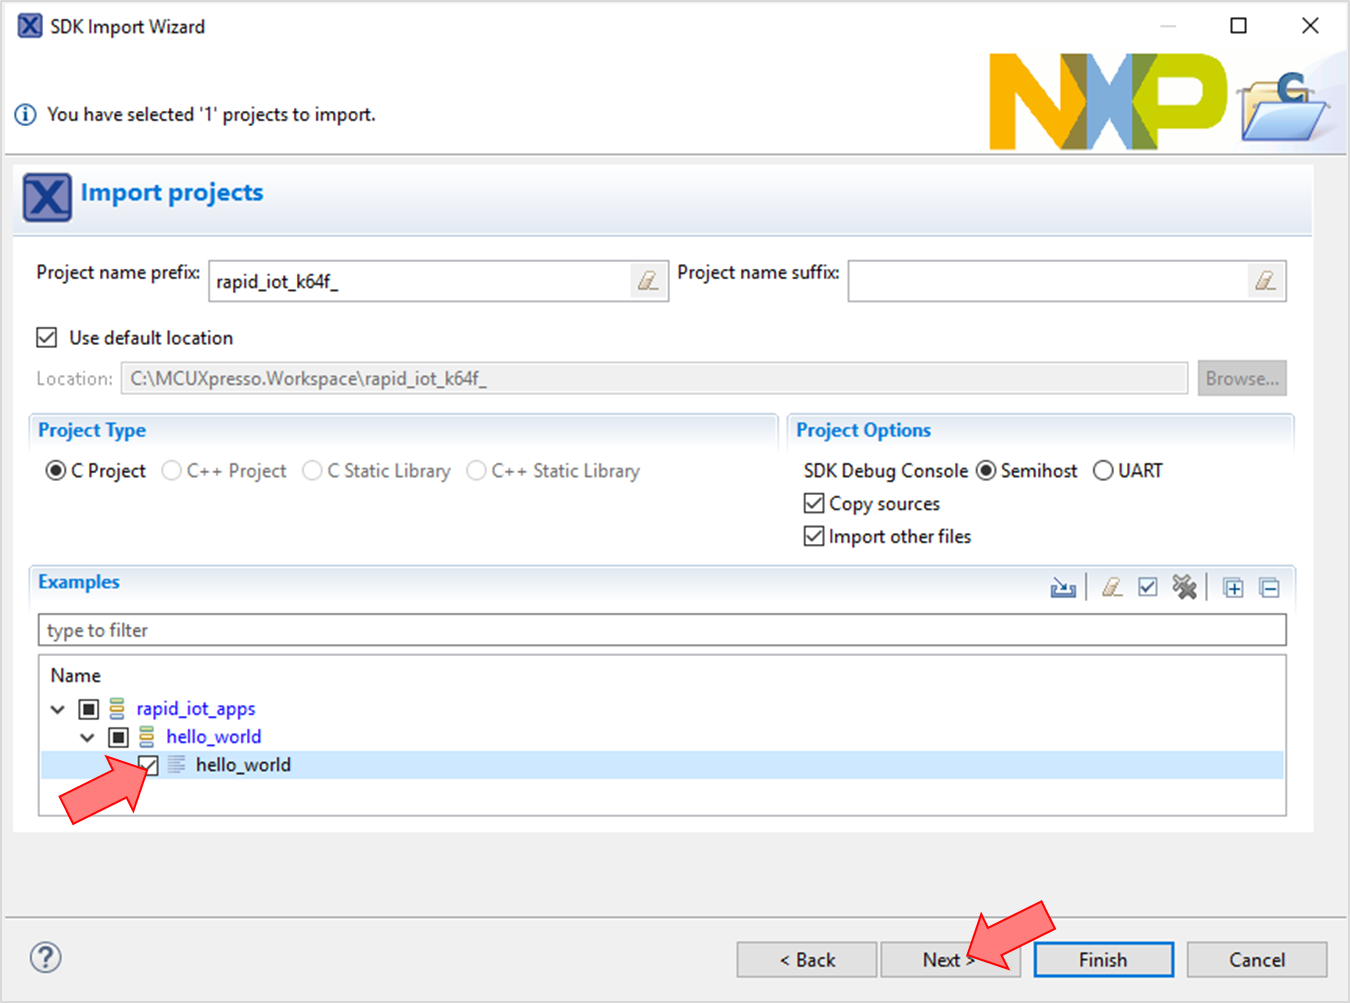
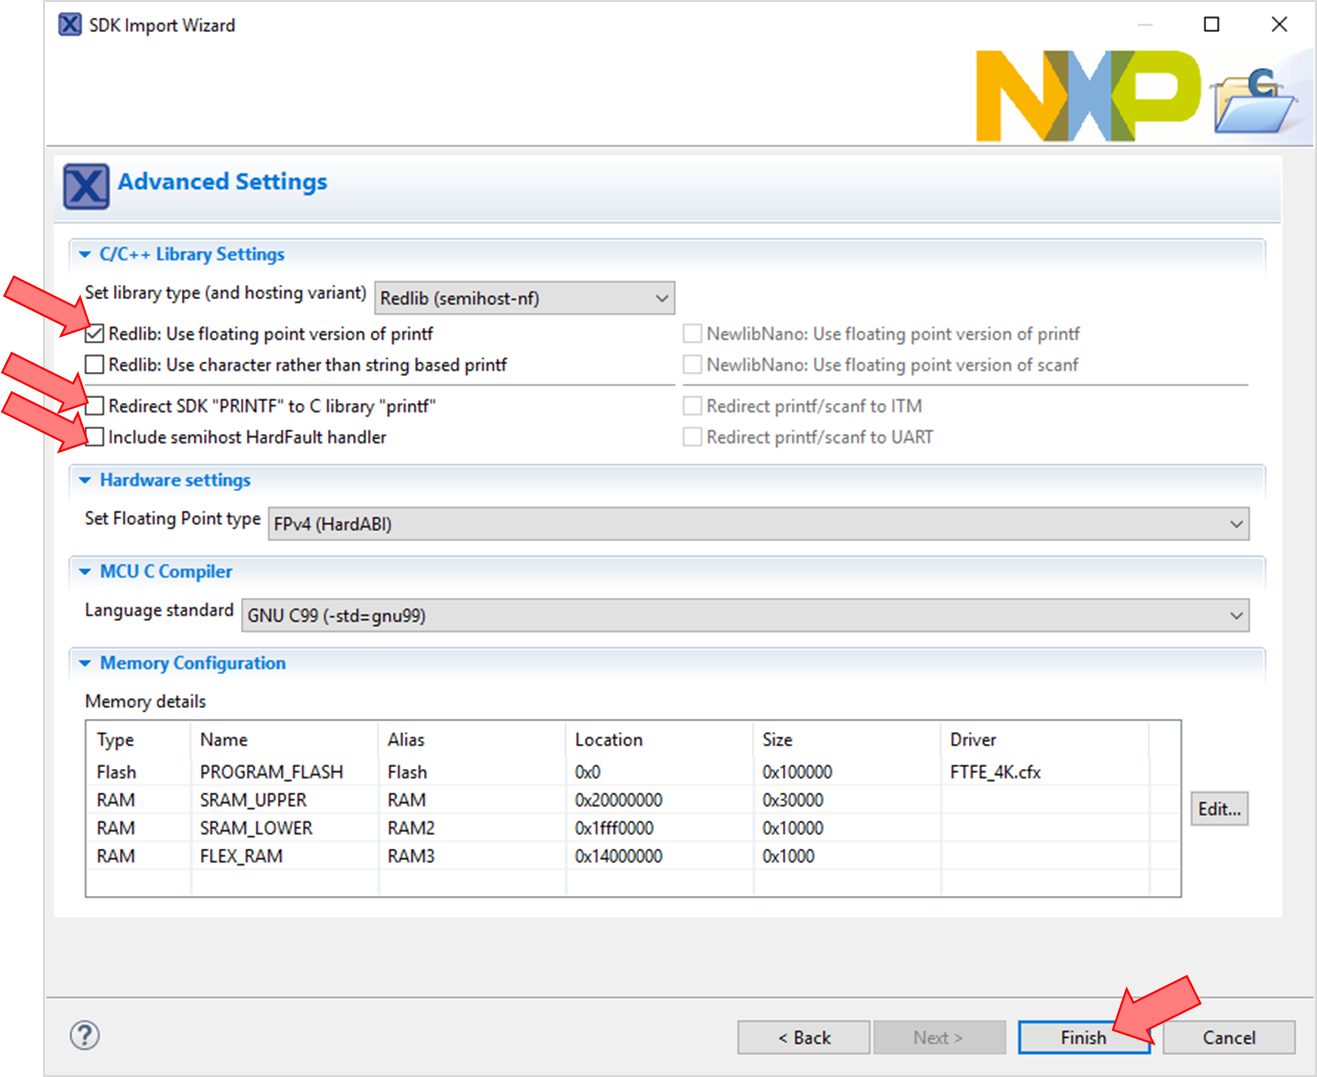
From the project Advanced Settings page, uncheck the two options Redirect SDK “PRINTF” to C library “printf” and Include semihost Hardfault handler and check the option Redlib: Use floating point version of printf, then press Finish
The project Hello World for Rapid IoT is now accessible from your Project Workspace with every files required to create any kind of Rapid IoT application
From the source folder, double-click on the file hello_world.c

Create a new project for Rapid IoT
The Hello World project is a default template to start any new Rapid IoT application
Let’s modify the hello_world.c code to control the RGB LED
The RGB LED, like every Rapid IoT components (including Application/K64F MCU peripherals), has been already configured and initialized
Right after the intialization of the LED, under the code below:
12/* Init Led module */
LED_Init();
Add the following code to turn the LED blue, then white, then red during 1s each and turn it off.
1234567RGB_Led_Set_State(RGB_LED_BRIGHT_HIGH, RGB_LED_COLOR_BLUE);
App_WaitMsec(1000);
RGB_Led_Set_State(RGB_LED_BRIGHT_HIGH, RGB_LED_COLOR_WHITE);
App_WaitMsec(1000);
RGB_Led_Set_State(RGB_LED_BRIGHT_HIGH, RGB_LED_COLOR_RED);
App_WaitMsec(1000);
RGB_Led_Set_State(RGB_LED_BRIGHT_OFF, RGB_LED_COLOR_WHITE);
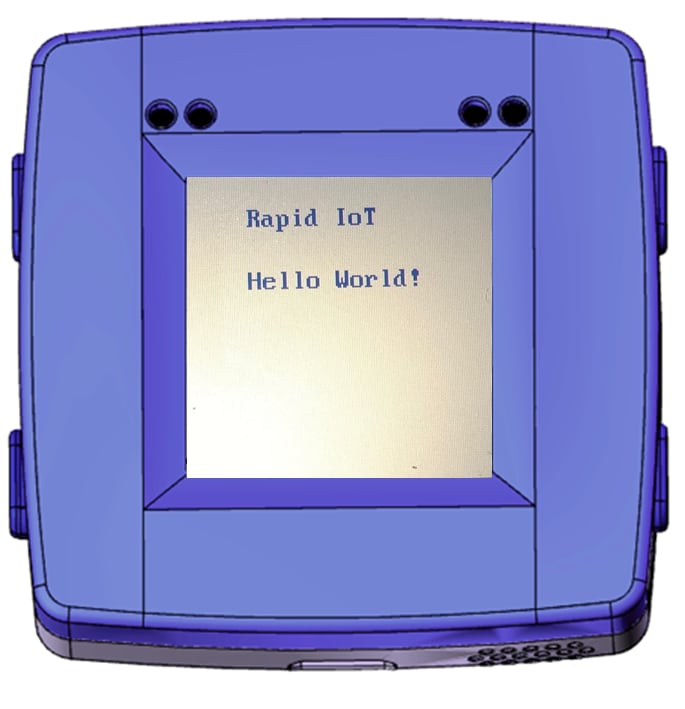
Now let’s modify the hello_world.c code to display a simple message on the Rapid IoT
screen
The display has been already configured and initialized in the Hello World project
Right after the intialization of the LED, under the code below:
1234567/* Display a Message */
GUI_SetFont(&GUI_Font8x18);
GUI_SetBkColor(GUI_WHITE);
GUI_Clear();
GUI_SetColor(GUI_BLUE);
GUI_DispString("\n Rapid IoT\n\n");
GUI_DispString(" Hello World!\n\n");
Don’t forget to save your modification by pressing Save All from the toolbar or Ctrl + Shift + S
Build the Hello World project for Rapid IoT
From the Quickstart Panel, select Build ‘rapid_iot_k64f_rapid_iot_apps_hello_world’ [Debug]
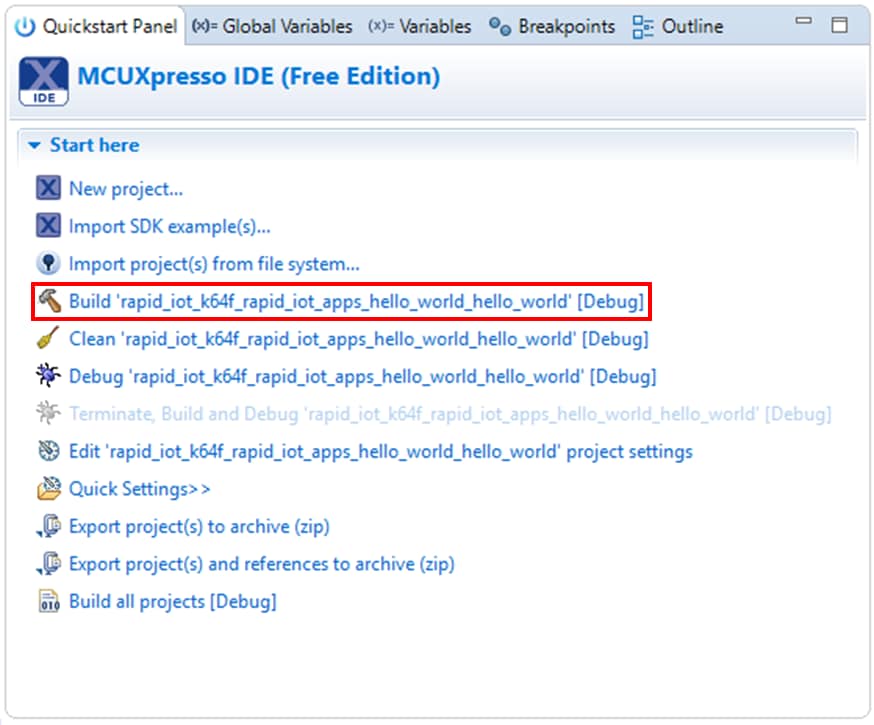
Wait for the Console window to confirm that the compilation ended up successfully.

Debug a Rapid IoT Project
Before launching the debug session make sure that your Docking station has been properly updated.
If you already followed the instruction to Get started with MCUXpresso, you can skip the following step to update the Docking station firmware.
Note: The Docking station shipped by MikroElektronika is preprogrammed in factory with an OpenSDA DAP-LINK application dedicated for the MikroElektronika Hexiwear platform. User should reprogram (once) the OpenSDA application of their Docking station before programming or debugging their Rapid IoT board.
To download for Docking station DAP-LINK for Rapid IoT go online at: www.nxp.com/rapid-iot
Select from the PRODUCTS tab Rapid IoT prototyping kit.
Go to SOFTWARE and TOOLS tab and select the latest version of the Rapid IoT DAP-LINK.
You will be asked to sign-in/up with a free NXP user-account
When the download of the compressed file completed, extract it in your MCUXpresso Workspace on your computer HDD.
To reprogram the OpenSDA Application from the MikroElektronika Docking-station follow those steps (Rapid IoT board should not be mounted to the Docking station):
- Set the Power switch of the Docking station (red below) to OFF
- Set the jumper switches of the Docking station to 11001000
- Connect your Docking station to the USB port of your computer
- Keep MK64 RESET button of the Docking station pressed, while setting the Power switch of the Docking station to ON, wait 2 seconds then release the MK64 RESET button
Your computer will detect a new Mass Storage drive named MAINTENANCE and automatically install the appropriate drivers.
- From your computer file explorer, drag-n-drop or copy-paste into the MAINTENANCE drive the binary file k20dx_rapid_iot_if_crc_legacy_0x8000.bin
Wait for the download to complete.
- Set the Power switch of the Docking station (red below) to OFF
- Set the Power switch of the Docking station (red below) to ON
Your computer should detect new Mass Storage drive named IOT-DAPLINK and automatically install the appropriate drivers.

Congratulation your MikroElektronika Docking-station is now ready to program, serial-monitor and debug safely both MCU targets of your Rapid IoT board
Note: Before connecting your Rapid IoT to the MikroElektronika Docking-station or changing the Jumper Switches make sure to set the Power switch of the Docking station (red below) to OFF.
Plug your Rapid IoT to the Docking station aligning carefully the board to board connectors (yellow below).
The OpenSDA circuitry embedded in the Mikroelektronika Hexiwear Docking-station (MIKROE-2094) can program, serial-monitor and debug alternately the K64F and the KW41Z target MCUs featured in the Rapid IoT.
Set the jumper switches of the Docking station to 11001000 to program or debug the Application/K64F controller.
Set the jumper switches of the Docking station to 00111000 to program or debug the Wireless/KW41Z controller.
From the Quickstart Panel, select Debug ‘rapid_iot_k64f_rapid_iot_apps_hello_world’ [Debug]
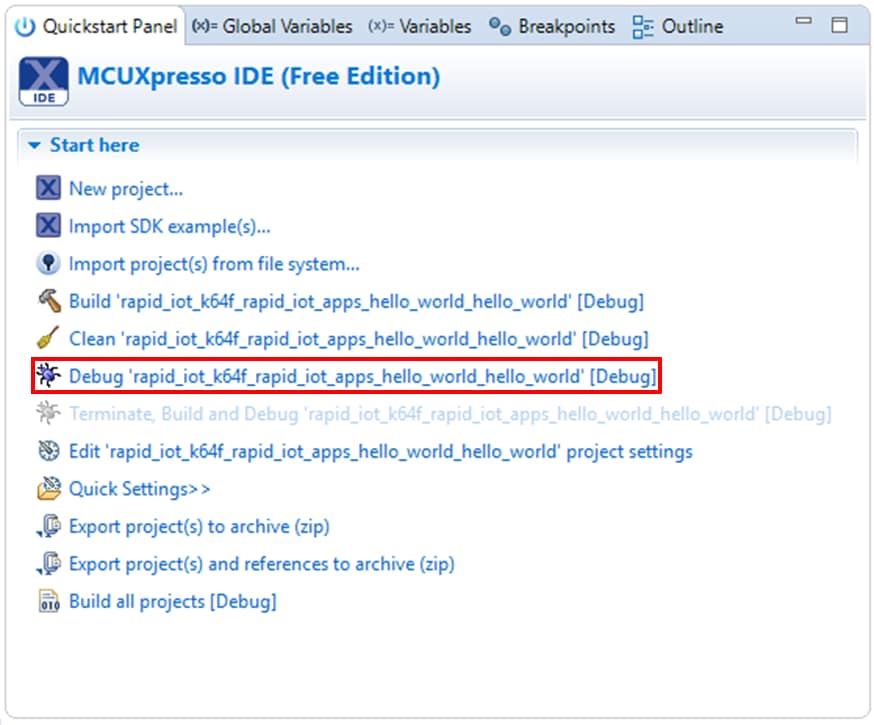
A configuration window should popup to ask you to select your debug Probe.
If your Docking station has been properly programmed with the DAP-LINK application for the Rapid IoT (see Docking station programming in the Hardware section), a CMSIS-DAP probe should be detected.
Otherwise check the box MCUXpresso IDE LinkServer (inc. CMSIS-DAP) probes and press Search again.
When your probe is properly detected, simply select it from the list of the Available attached probes, check the box Remember my selection (for this Launch configuration) to avoid the same window to popup at the next debug and press OK.

Wait for MCUXpresso IDE to switch to the Debug view and press the Resume button from the toolbar.
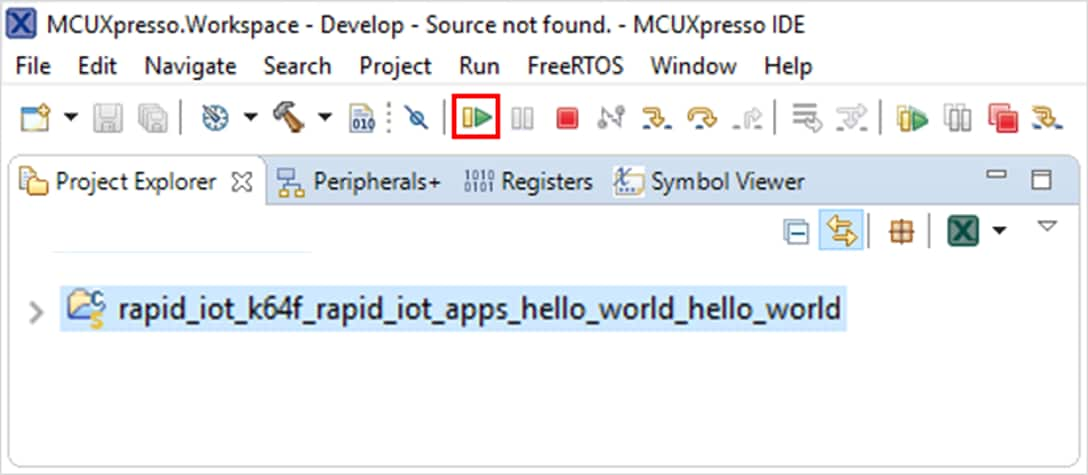
Congratulations, you successfully debugged your Rapid IoT with MCUXpresso IDE
5. Learn
5.1 Choose a Developmet Path
Mikroelektronika Docking-station
SLN-RPK-NODE is fully compatible with Mikroelektronika Hexiwear Docking-station (MIKROE-2094).
Mikroelektronika Hexiwear Docking-station features:
- Micro USB type-B connector to give access to OpenSDA circuitry and provide power to both Docking-station and SLN-RPK-NODE board
- OpenSDA probe to program, serial-monitor and debug via SWD both SLN-RPK-NODE MCUs
- Three mikroBUSTM sockets
- ON/OFF power-switch
- Two reset push buttons, one for K6x and another one for KW4x
- MicroSD slot
- JTAG connector for external programmers
- I2S interface (10 pins header)
- 50-pin connector to plug SLN-RPK-NODE hardware
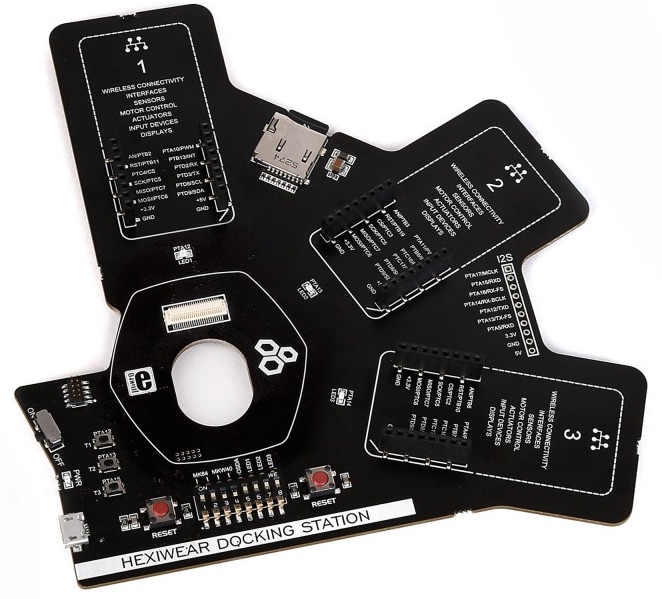
The following table provides the equivalence between Mikroelektronika Docking-station labels and K64F signals from the SLN-RPK-NODE.

The Docking station shipped by MikroElektronika is preprogrammed in factory with an OpenSDA DAP-LINK application dedicated for the MikroElektronika Hexiwear platform. User should reprogram (once) the OpenSDA application of their Docking station before programming or debugging their Rapid IoT board.
To download for Docking station DAP-LINK for Rapid IoT go online at: www.nxp.com/rapid-iot
Select from the PRODUCTS tab Rapid IoT prototyping kit.
Go to SOFTWARE and TOOLS tab and select the latest version of the Rapid IoT DAP-LINK.
You will be asked to sign-in/up with a free NXP user-account
When the download of the compressed file completed, extract it in your MCUXpresso Workspace
on your computer HDD.
To reprogram the OpenSDA Application from the MikroElektronika Docking-station follow those steps (Rapid IoT board should not be mounted to the Docking station):
- Set the Power switch of the Docking station (red below) to OFF
- Set the jumper switches of the Docking station to 11001000
- Connect your Docking station to the USB port of your computer
- Keep MK64 RESET button of the Docking station pressed, while setting the Power switch of the Docking station to ON, wait 2 seconds then release the MK64 RESET button
Your computer will detect a new Mass Storage drive named MAINTENANCE and automatically install the appropriate drivers.

You can download those two OpenSDA debug-only Applications at the address below:
- J-Link OpenSDA Generic Firmware v2.1 at: https://www.segger.com/downloads/jlink/
- Pemicro DEBUG_OpenSDA_for_MBED_Bootloader_by_Pemicro_v108_v2.1.bin at: http://www.pemicro.com/opensda/
Before connecting your Rapid IoT to the MikroElektronika Docking-station or changing the Jumper Switches make sure to set the Power switch of the Docking station (red below) to OFF.
Plug your Rapid IoT to the Docking station aligning carefully the board to board connectors (yellow below).

The OpenSDA circuitry embedded in the Mikroelektronika Hexiwear Docking-station (MIKROE-2094) can program, serial-monitor and debug alternately the K64F and the KW41Z target MCUs featured in the Rapid IoT.
Set the jumper switches of the Docking station to 11001000 to program or debug the Application/K64F controller.

Set the jumper switches of the Docking station to 00111000 to debug or debug the Wireless/KW41Z controller.

Embedded Bootloader
Rapid IoT Advanced features
1. Embedded Bootloader
SLN-RPK-NODE MCUs are both pre-programmed in factory with an innovative Bootloader to easily update their firmware from a computer over USB or from a smartphone over BLE, or restore from the embedded serial Flash memory their default application.
At every startup the bootloader for the Application and the Wireless controllers will check the integrity of the application loaded in their internal flash memory, as well as the push button status.
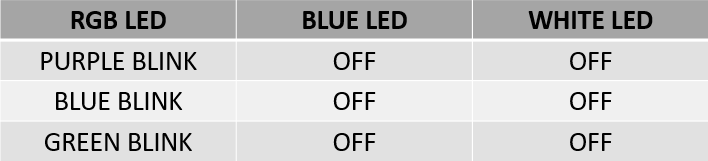
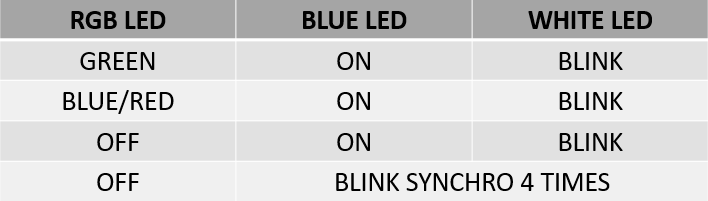
If no push button is pressed during reset, the K64F and KW41Z bootloaders will execute the following LED sequences before running the preloaded K64F and KW41Z applications.
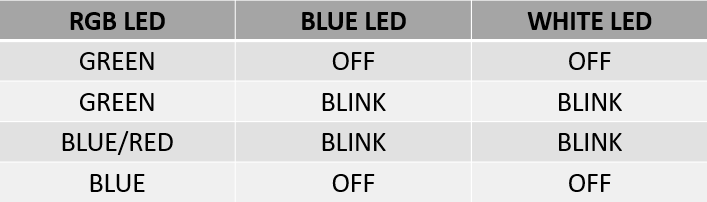
During reset, the push button combination below will launch the following (re)programming mode:
- Keep SW1 pressed during startup/reset to launch Application/K64F MCU firmware recovery
- Keep SW2 pressed during startup/reset to launch Wireless/KW41Z MCU firmware recovery
- Keep SW3 pressed during startup/reset to launch the USB MSD Programming mode
2. Factory application recovery for the Application/K64F MCU
Rapid IoT embeds a serial Flash memory pre-programmed with the factory application for the Application/K64F MCU. If you accidentally erased the application programmed in the internal flash of the Application/K64F MCU, follow those steps to recover the default factory application:
- Check your Rapid IoT battery is full or provide power through USB connector
- Keep SW1 pressed, while pushing shortly SW5/Reset button
- Wait 1-2s for RGB LED to turn green then release SW1 button
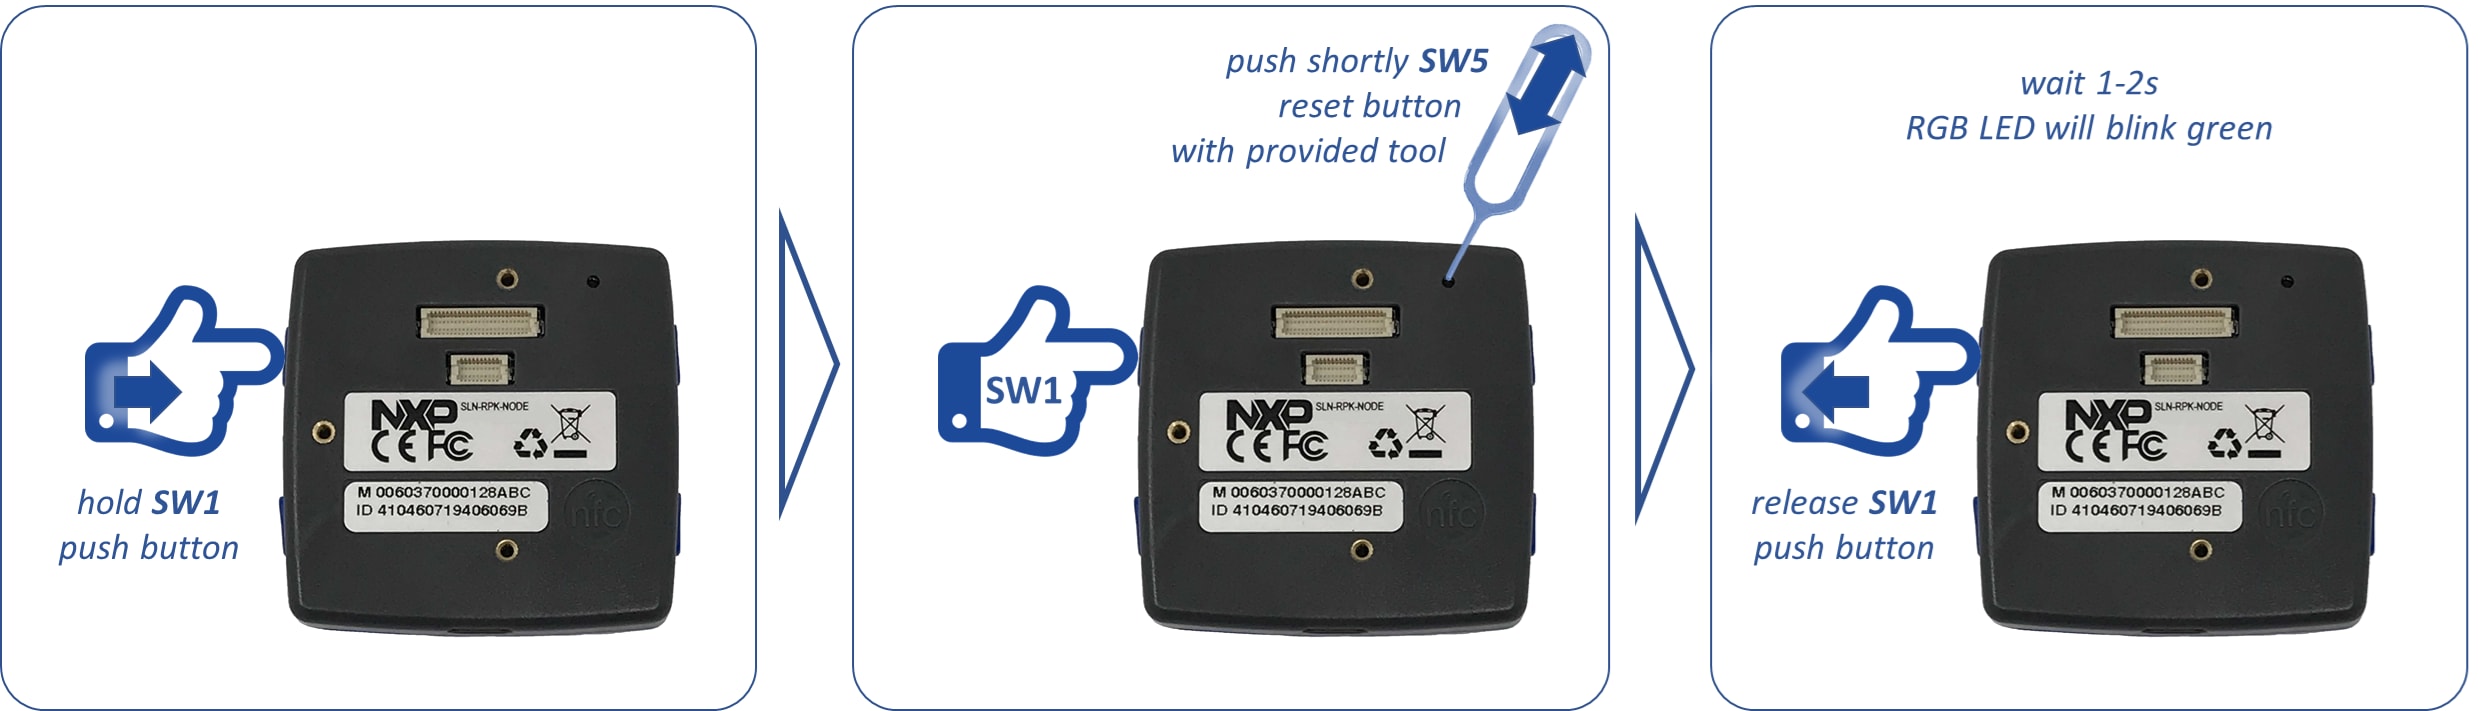
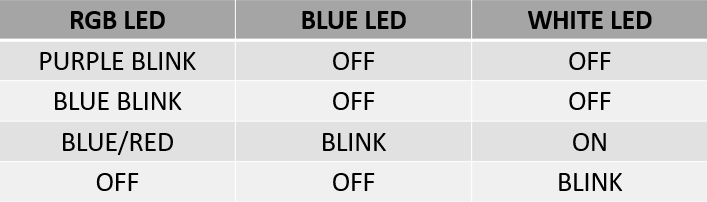
RGB LED will blink green during the reprogramming of K64F internal flash with the factory application and automatically reset, when it is ready.
Don’t press any button or reset the board until reprogramming completed successfully or the application will be corrupted and you will have to restart the programming from the beginning.

3. Factory application recovery for the Wireless/KW41Z MCU
Rapid IoT embeds a serial Flash memory pre-programmed with the factory application for the Wireless/KW41Z MCU. If you accidentally erased the application programmed in the internal flash of the Wireless/KW41Z MCU, follow those steps to recover the default factory application:
- Check your Rapid IoT battery is full or provide power through USB connector
- Keep SW2 pressed, while pushing shortly SW5/Reset button
- Wait 1-2s for RGB LED to blink Green then release SW2 button
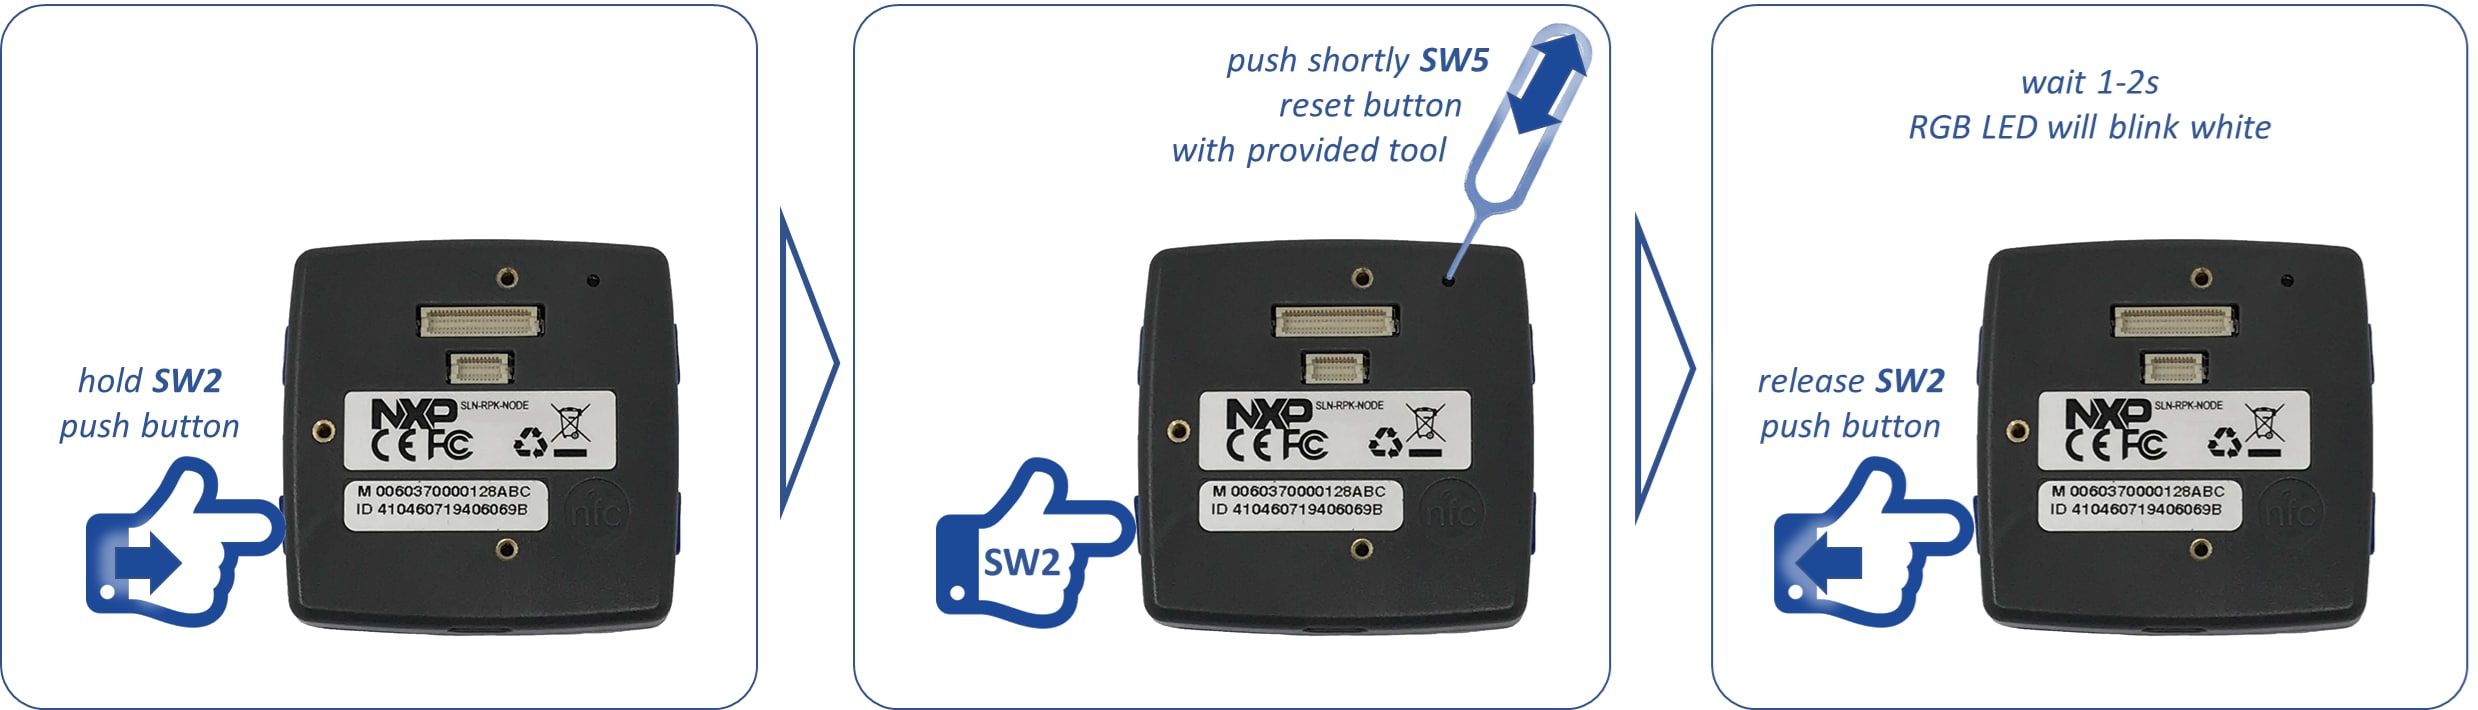
White LED will blink during the reprogramming of KW41Z internal flash with the factory application and automatically reset, when it is ready.
Don’t press any button or reset the board until reprogramming completed successfully or the application will be corrupted and you will have to restart the programming from the beginning.
4. USB Mass-Storage Device Programming for both K64F/KW41Z MCUs
SLN-RPK-NODE Application and Wireless MCU are pre-programmed in factory with a Bootloader to easily update their application through USB. If you want to reprogram K64F or KW41Z internal flash with a new application, simply follow those steps:
- Connect one end of the provided USB cable to the computer and the other end to the micro USB type-B connector of the SLN-RPK-NODE
- Keep SW3 button pressed while pushing shortly SW5/Reset button
- Wait 1-2s for RGB LED to blink Green then release SW3 button

RGB LED will blink green and your computer will detect a new Mass Storage drive and automatically install the appropriate drivers
- From your computer file explorer, drag-n-drop or copy-paste into the Mass Storage drive a precompiled application (*.bin file) for the K64F or the KW41Z MCU

Bootloader will automatically identify the MCU target to reprogram thanks to the binary file signature.
RGB LED will blink purple during download, then blink blue during programming of the serial Flash memory and automatically reset.
If you pushed a new binary for the Application/K64F MCU, RGB LED will blink green during the reprogramming of K64F internal flash with the new application and automatically reset, when ready.

If you pushed a new binary for the Wireless/KW41Z MCU, White LED will blink during the reprogramming of KW41Z internal flash with the new application and automatically reset, when ready.
Don’t press any button, reset the board or remove the USB cable until reprogramming completed successfully or the application will be corrupted and you will have to restart the programming from the beginning. Depending from the size of the file, reprogramming may take up to one minute.
5. (Re)Programming of the Factory Applications in the Serial Flash
The K64F bootloader also supports the (re)programming of both K64F/KW41Z Recovery applications stored in the serial Flash memory through USB. Simply follow those steps to (re)program/replace those firmware in serial Flash memory:
- Connect one end of the provided USB cable to the computer and the other end to the micro USB type-B connector of the SLN-RPK-NODE
- Keep SW1, SW2 and SW3 buttons pressed while pushing shortly SW5/Reset button
- Wait 1-2s for RGB LED to blink Yellow then release SW1, SW2 and SW3 buttons
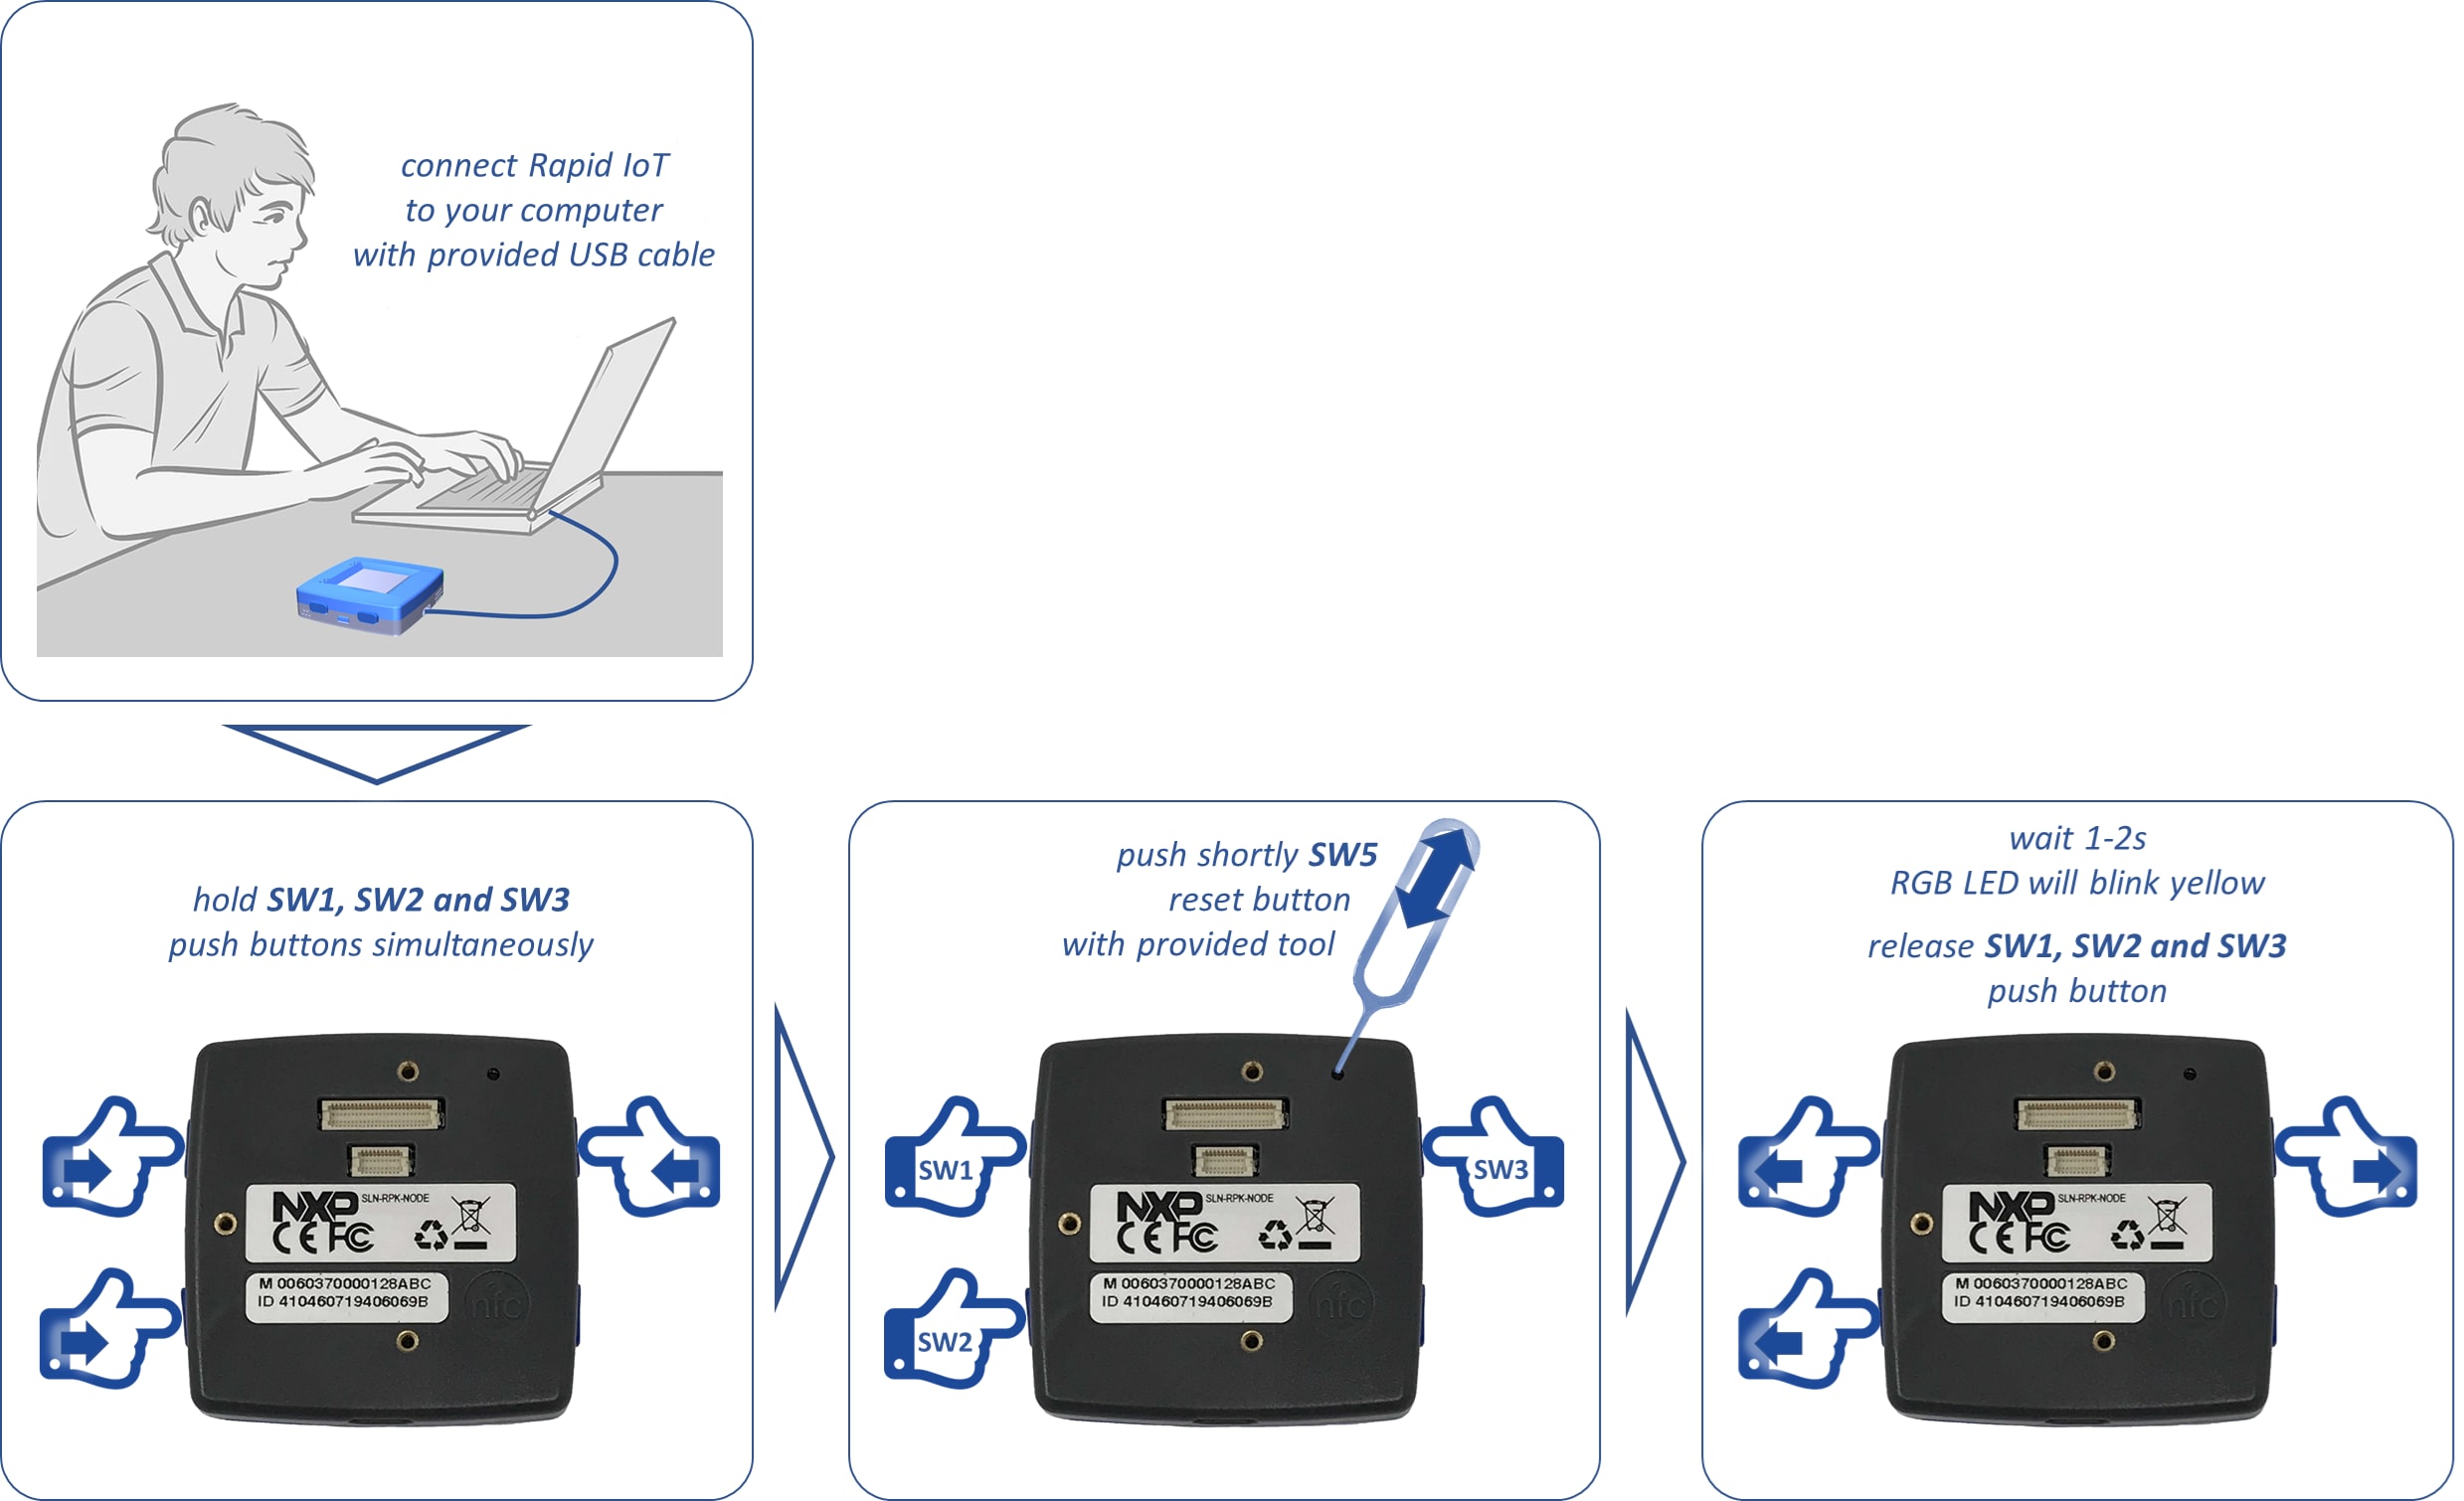
RGB LED will blink yellow and your computer will detect a new Mass Storage drive and automatically install the appropriate drivers
- From your computer file explorer, drag-n-drop or copy-paste into the Mass Storage drive a precompiled application (*.bin file) for the K64F or the KW41Z MCU.

Bootloader will automatically identify thanks to the binary file signature the MCU target and program the recovery firmware at the right location of the serial Flash memory.
RGB LED will blink purple during download, then blink blue during programming of the serial Flash memory and automatically reset.
SLN-RPK-NODE will now launch the application previously programmed in the internal memory of the Application/K64F and the Wireless/KW41Z MCUs
5. (Re)Programming of K64F and KW41Z Bootloaders
The Rapid IoT bootloaders are running from the internal Flash memory of the K64F and the KW41Z MCUs. They can be (re)programmed with the Docking station following one of the two methods described below.
Using Segger J-Link commander and precompiled binary files
Segger proposes a free software flashing tool controled by command lines compatible with the OpenSDA circuitry embedded in the Docking station thanks to a specific firmware, which emulates a JLink-lite probe. Follow those steps to flash the binaries of the Rapid IoT bootloaders with Segger tools:
- Download the latest version of the J-Link Software and Documentation Pack (min v6.32) and the J-Link OpenSDA Generic Firmware v2.1 at: https://www.segger.com/downloads/jlink/
- Install the J-Link Software package on your computer
The latest version of the bootloader binaries kboot_k64f.bin and kboot_kw41z.bin are available in the Rapid IoT SDK package:
- To download for free Rapid IoT SDK package go online at: www.nxp.com/rapid-iot
- Select from the PRODUCTS tab Rapid IoT prototyping kit.
- Go to SOFTWARE and TOOLS tab and select the latest version of the Rapid IoT SDK package.
- You will be asked to sign-in/up with a free NXP user-account.
- Copy those two binary files in the folder C:\Program Files (x86)\SEGGER\JLink_V632\
- Set the Power switch of the Docking station (red below) to OFF
- Plug your Rapid IoT to the Docking station aligning carefully the board to board connectors (yellow below)
- Set the jumper switches of the Docking station to 11001000 to debug the Application/K64F MCU
- Keep MK64 RESET button of the Docking station pressed, while setting the Power switch of the Docking station to ON
Your computer will detect a new Mass Storage drive named MAINTENANCE and automatically install the appropriate drivers
- From your computer file explorer, drag-n-drop or copy-paste into the MAINTENANCE drive the binary file OpenSDA_V2_1.bin.
Wait for the download to complete. Your computer should detect new peripherals and automatically install the appropriate drivers.
- Launch JLink Commander
- Type the command “connect”
- Enter the device “MK64FN1M0XXX12”
- Type “S” and press ENTER
- Select the default speed by pressing ENTER
- Type “erase” and press ENTER to erase the K64F memory
- Type “loadbin kboot_k64f.bin 0” to program the bootloader into K64F internal memory
Wait for the download to complete
- Close the program by typing “exit” and pressing ENTER
Congratulations you successfully programmed the bootloader in the K64F internal memory.
Now let’s configure the Docking station to flash the bootloader in the KW41Z internal memory
- Set the Power switch of the Docking station to OFF
- Set the jumper switches of the Docking station to 00111000 to debug the Application/KW41Z MCU
- Set the Power switch of the Docking station to ON
- Launch JLink Commander
- Type the command “connect”
- Enter the device “MKW41Z512XXX4”
- Type “S” and press ENTER
- Select the default speed by pressing ENTER
- Type “erase” and press ENTER to erase the KW41Z memory
- Type “loadbin kboot_kw41z.bin 0” to program the bootloader into KW41Z internal memory
Wait for the download to complete
- Close the program by typing “exit” and pressing ENTER
Congratulations you successfully programmed the bootloader in the KW41Z internal memory
Using MCUXpresso and source-code projects
The SDK package for the Rapid IoT embeds the drivers for every components onboards as well as the project source-code for both K64F and KW41Z Bootloader and factory Applications for the MCUXpresso IDE. Follow those steps to reprogram the Rapid IoT bootloaders with MCUXpresso tools:
- Download for free NXP MCUXpresso IDE online at: www.nxp.com/MCUXpresso
- Select from the PRODUCTS tab MCUXpresso IDE.
- Go to DOWNLOADS tab and select the LATEST VERSION of the tool.
- You will be asked to sign-in/up with a free NXP user-account.
- Install MCUXpresso IDE on your computer
- Download for free Rapid IoT SDK package go online at: www.nxp.com/rapid-iot
- Select from the PRODUCTS tab Rapid IoT prototyping kit.
- Go to SOFTWARE and TOOLS tab and select the latest version of the Rapid IoT SDK package.
- You will be asked to sign-in/up with a free NXP user-account.
- Launch MCUXpresso IDE and select C:\MCUXpresso.Workspace\ as workspace location
- Extract the Rapid IoT SDK Package in the location C:\MCUXpresso.Workspace\
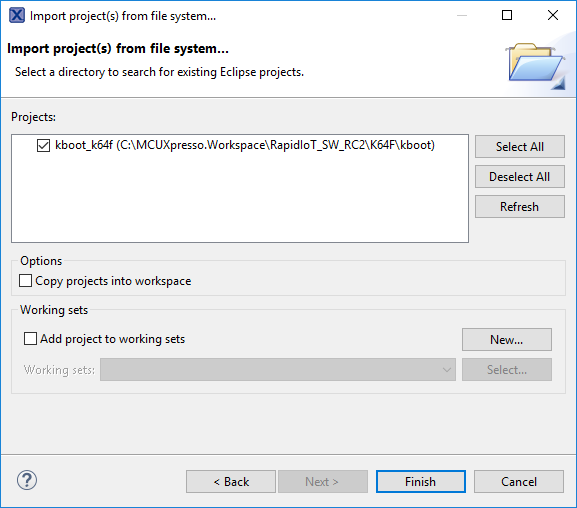
- From MCUXpresso Quickstart Panel, select Import project(s) from file system…
- Under Project directory (unpacked) press Browse…
- Select the folder
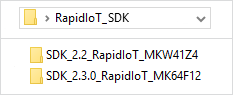
\SDK_2.3.0_RapidIoT_MK64F12\boards\rpk_k64f\rapid_iot_apps\kbootand press OK.

- In the new window, press Next
- Check the project kboot_k64f and make sure to uncheck the option Copy projects into workspace, then press Finish
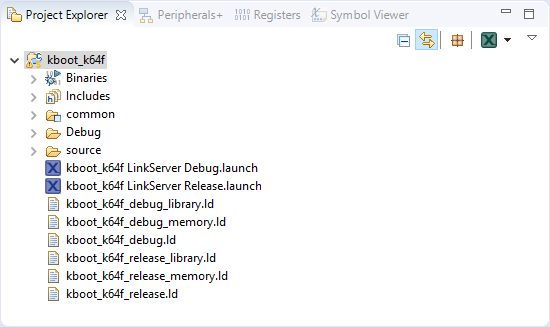
- From MCUXpresso Project Explorer, select and expand the project kboot_k64F
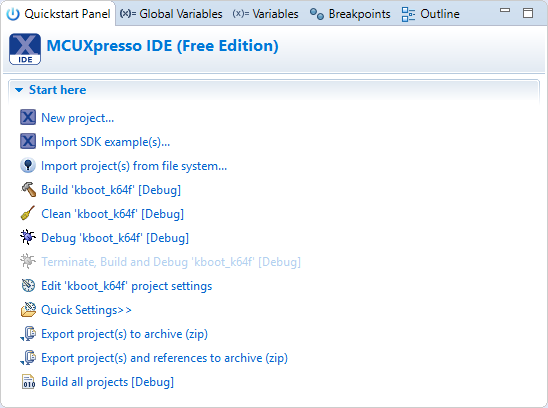
- From MCUXpresso Quickstart Panel, select Build ‘kboot_k64f’ [debug]
Wait for the compilation to finish successfully. It may take few minutes the first time be patient.
Make sure that your Docking station is programmed with the Rapid IoT DAP-LINK debug interface. Instruction to reprogram your Docking station are described section 3.18.
- Set the Power switch of the Docking station (red below) to OFF
- Plug your Rapid IoT to the Docking station aligning carefully the board to board connectors (yellow below)
- Set the jumper switches of the Docking station to 11001000 to debug the Application/K64F MCU
- Set the Power switch of the Docking station to ON
- From MCUXpresso Quickstart Panel, select Debug ‘kboot_k64f’ [debug]
- In the message window select the probe CMSIS-DAP and press Debug
Wait for the application to be programmed in the K64F internal flash and the debug session to start
- From the debug view press the stop button to halt the debug session
- Repeat the previous step to import KW41Z bootloader project located at \SDK_2.2_RapidIoT_MKW41Z4\boards\rpk_kw41z\rapid_iot_apps\kboot and debug it
- Set the Power switch of the Docking station (red below) to OFF
- Set the jumper switches of the Docking station to 00111000 to debug the Wireless/KW41Z MCU
- Set the Power switch of the Docking station to ON
- From MCUXpresso Quickstart Panel, select Debug ‘kboot_kw41z’ [debug]
- In the message window select the probe CMSIS-DAP and press Debug
Wait for the application to be programmed in the KW41Z internal flash and the debug session to start
- From the debug view press the stop button to halt the debug session
Congratulations, you have successfully reprogrammed both K64F and KW41Z bootloaders
NXP Modular IoT Gateway
1. NXP Modular IoT Gateway
Out-Of-The-Box SLN-RPK-NODE connects through Thread radio with the i.MX6UL/ULL Gateway (included in the NXP SLN-IOT-GPI kit) to monitor and control its sensors and actuators from the Cloud. According to Thread standards, one single gateway can monitor and control up to 200 Rapid IoT end-devices.
Search, download and install the modular gateway Android or iOS phone App from the Google or Apple App store.

Then launch the modular gateway phone App from your phone/tablet and press Next.

To the question Allow Modular Gateway Mgr to make and manage phone calls choose Allow

Register your gateway in the phone App with the Serial Number printed on its back, check the box Remember me and press Submit.

If you are registering your gateway for the first time, you will be required to fill out some small details to register the NXP Modular Gateway. An email will be sent to you with a verification code that needs to be added into the OTP field (One-Time-Password).

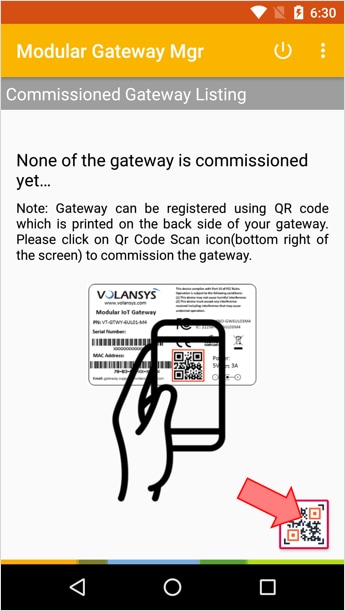
On successful authentication, user is redirected to the list of registered gateways. If no gateway is already commissioned the following screen will invite the user to scan the QR code printed in the back of the gateway by selecting the icon in the bottom right corner.
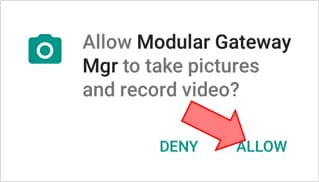
To the question Allow Modular Gateway Mgr to take pictures and record video select Allow
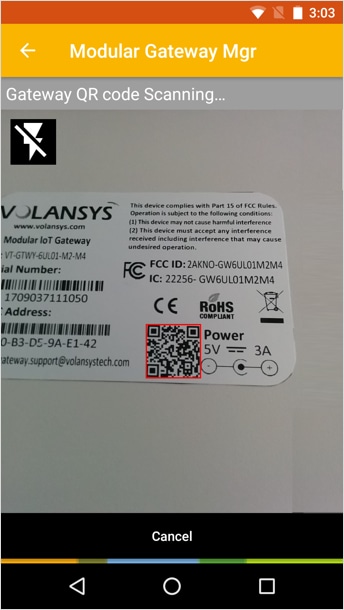
Then scan the QR code printed in the back of the gateway to finalize its registration
Now we are ready to connect the Gateway to the Cloud over Ethernet or WiFi
To connect the Gateway to the Cloud over Ethernet:
Plug one end of the Ethernet cable to the router and the other end to the Gateway Ethernet port

Plug the power-adapter to the outlet and to the Gateway D/C power input

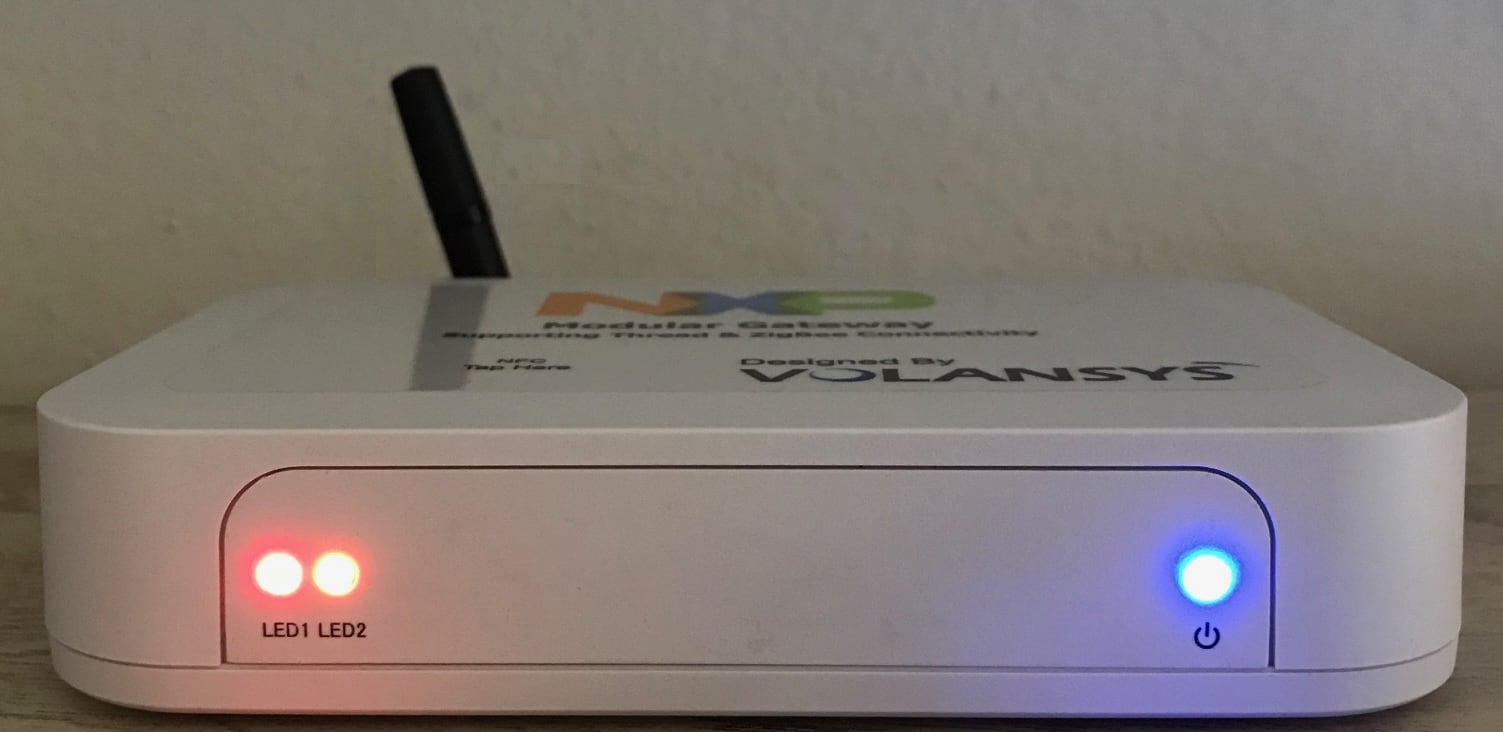
During Gateway startup the LED located in the front panel will change as follow:
- The (right) blue LED will lit up to confirm that power is supplied to the Gateway
- LED2 will turn solid Green to confirm Gateway is powered on and NFC/BLE provisioning are disabled
- LED1 will sequentially turn Orange during Cloud connection then solid Green to confirm that Gateway is connected to the Cloud. LED1 turning RED indicates no IP address is assigned or no internet connectivity. For Ethernet connected Gateway, User must confirm the LED1 as solid green to further go ahead

To connect the Gateway to the Cloud over WiFi:
Plug out the Ethernet cable from the Gateway Ethernet port.
Plug the power-adapter to the outlet and to the Gateway D/C power input port.

During Gateway startup the LEDs located in the front panel will change as follow:
- The right power LED will lit up BLUE confirming that power is supplied to the Gateway
- LED2 will turn GREEN confirming Gateway is powered-on and NFC/BLE provisioning is disabled
- LED1 will turn RED indicating no IP address was assigned or Gateway doesn’t have valid Wi-Fi credential and no internet connectivity is available

We will now provide the Wi-Fi credentials to the Gateway through NFC/BLE commissioning
Select your Gateway from the list of the Commissioned Gateway in the phone App

Open the Gateway Options by selecting the icon located in the top right corner

From the menu select Gateway Properties

The Gateway Property menu provides useful information such like your Gateway Name and the version of the Firmware (when connected to the Cloud).
Choose WiFi for the Network Interface

To the question Allow Modular Gateway Mgr to access this device’s location select Allow

Select from the list your WiFi network and enter its Password

Scroll down to choose the commissioning interface
Select NFC if you have an Android phone NFC-enabled or BLE otherwise and press Submit
Following instructions will consider an NFC-enabled equipment

The phone App will display the instructions to initiate the commissioning on the Gateway

At the back of the Gateway, keep the SW1 button pressed during 5 seconds

LED2 will turn ORANGE confirming Gateway NFC/BLE provisioning is enabled
Position your phone on the top of the Gateway near the inscription NFC Tap Here
Your phone should emit a sound to confirm that the NFC reader of the Gateway has been detected
Touch the phone screen to start the WiFi credential transfer over NFC

A message will be displayed in the phone App during the NFC transfer

When the NFC commissioning is completed, the phone App should display a confirmation message
Select OK to close the message

LED1 will turn solid GREEN confirming that the Gateway is connected to the Cloud over WiFi.
You can now remove your phone from the top of the Gateway.

Congratulations, your Gateway is now successfully connected to the Cloud.
Now let’s update the firmware of the Gateway.
Select your Gateway from the list of the Commissioned Gateway in the phone App
Open the Gateway Options by selecting the icon located in the top right corner
From the menu select Gateway Firmware Update

Now that the Gateway is connected to the Cloud, the version of the Firmware programmed in the Gateway is available, in this case 1.8.1
The available Firmware available through Over-The-Air Update are listed below
Select the
first option full_x.x.x_golden.swu (ota_demo_test is for test purpose)
SLN-RPK-NODE is supported by the Gateway firmware 1.8.5 or higher

Start the Firmware Update by pressing UPDATE in the confirmation window

A progression bar will appear at the bottom of the screen to indicate the progress of the
update.
The Gateway firmware is large and takes some time to download and program in the
Gateway memory
Don’t power-off your gateway or turn-off the internet connection during the update.
Your Gateway will reboot after reprogramming and the phone App will display a confirmation message that the Update ended up successfully

If you return to the Gateway Properties menu in the phone App, your Gateway Firmware Information should now indicate the Firmware version selected for the update, in this case 1.8.5

Congratulations, your Gateway is now successfully updated with the latest Firmware version.
Now let’s connect our SLN-RPK-NODE to the Gateway over Thread
The application programmed in factory in the SLN-RPK-NODE supports both Bluetooth and Thread connectivity alternately. By default, Bluetooth radio is enabled so we must activate Thread from the application settings to connect SLN-RPK-NODE to the Gateway.
From the Welcome screen touch the Electrode T1 to open the Application screen.
Then touch the Electrode T2 to open the Settings screen.
Next touch the Electrode T1 to access the Bluetooth menu.
Finally touch the Electrode T2 to reach the Thread menu.

Now press the push button SW4 to activate Thread radio (and automatically disable Bluetooth radio).
After few seconds a message will confirm the selection and indicates that SLN-RPK-NODE must
restarts to start Thread radio
Press the push button SW2 to restart the board

Open the Gateway Options by selecting the icon located in the top right corner

From the menu select End node commissioning
NFC Commissioning will be available in the next release
For now we will share the
SLN-RPK-NODE MAC address manually with the Gateway

Select Thread and enter the SLN-RPK MAC address printed at the back of the SLN-RPK-NODE casing and press Submit

The phone App will display shortly a confirmation message that the SLN-RPK-NODE is successfully commissioned for Thread and open a new window with the instruction to connect each type of End Node supported by the Gateway (including the Rapid IoT board)

From the SLN-RKP-NODE Thread menu press the push button SW2 to join the Thread network. The White LED will start blinking quickly to confirm that SLN-RPK-NODE is trying to connect.

After few seconds the phone App will display a message to confirm that SLN-RPK-NODE joined
successfully the Thread network and ask if we want to commission/connect another
device.
Choose NO to display the list of the connected End nodes.

Select your Rapid IoT board from the list of the connected device thanks to its unique MAC address.

The phone App will display a new interface to monitor and control SLN-RPK-NODE sensors and actuators from the Cloud through Thread connectivity.

Congratulations, your SLN-RPK-NODE is now successfully connected to the Cloud through Thread
Features
Mikroelektronika Docking-station
SLN-RPK-NODE is fully compatible with Mikroelektronika Hexiwear Docking-station (MIKROE-2094).
Mikroelektronika Hexiwear Docking-station features:
- Micro USB type-B connector to give access to OpenSDA circuitry and provide power to both Docking-station and SLN-RPK-NODE board
- OpenSDA probe to program, serial-monitor and debug via SWD both SLN-RPK-NODE MCUs
- Three mikroBUSTM sockets
- ON/OFF power-switch
- Two reset push buttons, one for K6x and another one for KW4x
- MicroSD slot
- JTAG connector for external programmers
- I2S interface (10 pins header)
- 50-pin connector to plug SLN-RPK-NODE hardware
The following table provides the equivalence between Mikroelektronika Docking-station labels and K64F signals from the SLN-RPK-NODE.
The Docking station shipped by MikroElektronika is preprogrammed in factory with an OpenSDA DAP-LINK application dedicated for the MikroElektronika Hexiwear platform. User should reprogram (once) the OpenSDA application of their Docking station before programming or debugging their Rapid IoT board.
To download for Docking station DAP-LINK for Rapid IoT go online at: www.nxp.com/rapid-iot
Select from the PRODUCTS tab Rapid IoT prototyping kit.
Go to SOFTWARE and TOOLS tab and select the latest version of the Rapid IoT
DAP-LINK.
You will be asked to sign-in/up with a free NXP user-account
When the download of the compressed file completed, extract it in your MCUXpresso
Workspace on your computer HDD.
To reprogram the OpenSDA Application from the MikroElektronika Docking-station follow those steps (Rapid IoT board should not be mounted to the Docking station):
- Set the Power switch of the Docking station (red below) to OFF
- Set the jumper switches of the Docking station to 11001000
- Connect your Docking station to the USB port of your computer
- Keep MK64 RESET button of the Docking station pressed, while setting the Power switch of the Docking station to ON, wait 2 seconds then release the MK64 RESET button
Your computer will detect a new Mass Storage drive named MAINTENANCE and automatically install the appropriate drivers.
You can download those two OpenSDA debug-only Applications at the address below:
- J-Link OpenSDA Generic Firmware v2.1 at: https://www.segger.com/downloads/jlink/
- Pemicro DEBUG_OpenSDA_for_MBED_Bootloader_by_Pemicro_v108_v2.1.bin at: http://www.pemicro.com/opensda/
Before connecting your Rapid IoT to the MikroElektronika Docking-station or changing the Jumper Switches make sure to set the Power switch of the Docking station (red below) to OFF.
Plug your Rapid IoT to the Docking station aligning carefully the board to board connectors (yellow below).
The OpenSDA circuitry embedded in the Mikroelektronika Hexiwear Docking-station (MIKROE-2094) can program, serial-monitor and debug alternately the K64F and the KW41Z target MCUs featured in the Rapid IoT.
Set the jumper switches of the Docking station to 11001000 to program or debug the Application/K64F controller.
Set the jumper switches of the Docking station to 00111000 to debug or debug the Wireless/KW41Z controller.
Embedded Bootloader
Rapid IoT Advanced features
1. Embedded Bootloader
SLN-RPK-NODE MCUs are both pre-programmed in factory with an innovative Bootloader to easily update their firmware from a computer over USB or from a smartphone over BLE, or restore from the embedded serial Flash memory their default application.
At every startup the bootloader for the Application and the Wireless controllers will check the integrity of the application loaded in their internal flash memory, as well as the push button status.
If no push button is pressed during reset, the K64F and KW41Z bootloaders will execute the following LED sequences before running the preloaded K64F and KW41Z applications.
During reset, the push button combination below will launch the following (re)programming mode:
- Keep SW1 pressed during startup/reset to launch Application/K64F MCU firmware recovery
- Keep SW2 pressed during startup/reset to launch Wireless/KW41Z MCU firmware recovery
- Keep SW3 pressed during startup/reset to launch the USB MSD Programming mode
2. Factory application recovery for the Application/K64F MCU
Rapid IoT embeds a serial Flash memory pre-programmed with the factory application for the Application/K64F MCU. If you accidentally erased the application programmed in the internal flash of the Application/K64F MCU, follow those steps to recover the default factory application:
- Check your Rapid IoT battery is full or provide power through USB connector
- Keep SW1 pressed, while pushing shortly SW5/Reset button
- Wait 1-2s for RGB LED to turn green then release SW1 button
RGB LED will blink green during the reprogramming of K64F internal flash with the factory application and automatically reset, when it is ready.
Don’t press any button or reset the board until reprogramming completed successfully or the application will be corrupted and you will have to restart the programming from the beginning.
3. Factory application recovery for the Wireless/KW41Z MCU
Rapid IoT embeds a serial Flash memory pre-programmed with the factory application for the Wireless/KW41Z MCU. If you accidentally erased the application programmed in the internal flash of the Wireless/KW41Z MCU, follow those steps to recover the default factory application:
- Check your Rapid IoT battery is full or provide power through USB connector
- Keep SW2 pressed, while pushing shortly SW5/Reset button
- Wait 1-2s for RGB LED to blink Green then release SW2 button
White LED will blink during the reprogramming of KW41Z internal flash with the factory application and automatically reset, when it is ready.
Don’t press any button or reset the board until reprogramming completed successfully or the application will be corrupted and you will have to restart the programming from the beginning.
4. USB Mass-Storage Device Programming for both K64F/KW41Z MCUs
SLN-RPK-NODE Application and Wireless MCU are pre-programmed in factory with a Bootloader to easily update their application through USB. If you want to reprogram K64F or KW41Z internal flash with a new application, simply follow those steps:
- Connect one end of the provided USB cable to the computer and the other end to the micro USB type-B connector of the SLN-RPK-NODE
- Keep SW3 button pressed while pushing shortly SW5/Reset button
- Wait 1-2s for RGB LED to blink Green then release SW3 button
RGB LED will blink green and your computer will detect a new Mass Storage drive and automatically install the appropriate drivers
- From your computer file explorer, drag-n-drop or copy-paste into the Mass Storage drive a precompiled application (*.bin file) for the K64F or the KW41Z MCU
Bootloader will automatically identify the MCU target to reprogram thanks to the binary file signature.
RGB LED will blink purple during download, then blink blue during programming of the serial Flash memory and automatically reset.
If you pushed a new binary for the Application/K64F MCU, RGB LED will blink green during the reprogramming of K64F internal flash with the new application and automatically reset, when ready.
If you pushed a new binary for the Wireless/KW41Z MCU, White LED will blink during the reprogramming of KW41Z internal flash with the new application and automatically reset, when ready.
Don’t press any button, reset the board or remove the USB cable until reprogramming completed successfully or the application will be corrupted and you will have to restart the programming from the beginning. Depending from the size of the file, reprogramming may take up to one minute.
5. (Re)Programming of the Factory Applications in the Serial Flash
The K64F bootloader also supports the (re)programming of both K64F/KW41Z Recovery applications stored in the serial Flash memory through USB. Simply follow those steps to (re)program/replace those firmware in serial Flash memory:
- Connect one end of the provided USB cable to the computer and the other end to the micro USB type-B connector of the SLN-RPK-NODE
- Keep SW1, SW2 and SW3 buttons pressed while pushing shortly SW5/Reset button
- Wait 1-2s for RGB LED to blink Yellow then release SW1, SW2 and SW3 buttons
RGB LED will blink yellow and your computer will detect a new Mass Storage drive and automatically install the appropriate drivers
- From your computer file explorer, drag-n-drop or copy-paste into the Mass Storage drive a precompiled application (*.bin file) for the K64F or the KW41Z MCU.
Bootloader will automatically identify thanks to the binary file signature the MCU target and program the recovery firmware at the right location of the serial Flash memory.
RGB LED will blink purple during download, then blink blue during programming of the serial Flash memory and automatically reset.
SLN-RPK-NODE will now launch the application previously programmed in the internal memory of the Application/K64F and the Wireless/KW41Z MCUs
5. (Re)Programming of K64F and KW41Z Bootloaders
The Rapid IoT bootloaders are running from the internal Flash memory of the K64F and the KW41Z MCUs. They can be (re)programmed with the Docking station following one of the two methods described below.
Using Segger J-Link commander and precompiled binary files
Segger proposes a free software flashing tool controled by command lines compatible with the OpenSDA circuitry embedded in the Docking station thanks to a specific firmware, which emulates a JLink-lite probe. Follow those steps to flash the binaries of the Rapid IoT bootloaders with Segger tools:
- Download the latest version of the J-Link Software and Documentation Pack (min v6.32) and the J-Link OpenSDA Generic Firmware v2.1 at: https://www.segger.com/downloads/jlink/
- Install the J-Link Software package on your computer
The latest version of the bootloader binaries kboot_k64f.bin and kboot_kw41z.bin are available in the Rapid IoT SDK package:
- To download for free Rapid IoT SDK package go online at: www.nxp.com/rapid-iot
- Select from the PRODUCTS tab Rapid IoT prototyping kit.
- Go to SOFTWARE and TOOLS tab and select the latest version of the Rapid IoT SDK package.
- You will be asked to sign-in/up with a free NXP user-account.
- Copy those two binary files in the folder C:\Program Files (x86)\SEGGER\JLink_V632\
- Set the Power switch of the Docking station (red below) to OFF
- Plug your Rapid IoT to the Docking station aligning carefully the board to board connectors (yellow below)
- Set the jumper switches of the Docking station to 11001000 to debug the Application/K64F MCU
- Keep MK64 RESET button of the Docking station pressed, while setting the Power switch of the Docking station to ON
Your computer will detect a new Mass Storage drive named MAINTENANCE and automatically install the appropriate drivers
- From your computer file explorer, drag-n-drop or copy-paste into the MAINTENANCE drive the binary file OpenSDA_V2_1.bin.
Wait for the download to complete. Your computer should detect new peripherals and automatically install the appropriate drivers.
- Launch JLink Commander
- Type the command “connect”
- Enter the device “MK64FN1M0XXX12”
- Type “S” and press ENTER
- Select the default speed by pressing ENTER
- Type “erase” and press ENTER to erase the K64F memory
- Type “loadbin kboot_k64f.bin 0” to program the bootloader into K64F internal memory
Wait for the download to complete
- Close the program by typing “exit” and pressing ENTER
Congratulations you successfully programmed the bootloader in the K64F internal memory.
Now let’s configure the Docking station to flash the bootloader in the KW41Z internal memory
- Set the Power switch of the Docking station to OFF
- Set the jumper switches of the Docking station to 00111000 to debug the Application/KW41Z MCU
- Set the Power switch of the Docking station to ON
- Launch JLink Commander
- Type the command “connect”
- Enter the device “MKW41Z512XXX4”
- Type “S” and press ENTER
- Select the default speed by pressing ENTER
- Type “erase” and press ENTER to erase the KW41Z memory
- Type “loadbin kboot_kw41z.bin 0” to program the bootloader into KW41Z internal memory
Wait for the download to complete
- Close the program by typing “exit” and pressing ENTER
Congratulations you successfully programmed the bootloader in the KW41Z internal memory
Using MCUXpresso and source-code projects
The SDK package for the Rapid IoT embeds the drivers for every components onboards as well as the project source-code for both K64F and KW41Z Bootloader and factory Applications for the MCUXpresso IDE. Follow those steps to reprogram the Rapid IoT bootloaders with MCUXpresso tools:
- Download for free NXP MCUXpresso IDE online at: www.nxp.com/MCUXpresso
- Select from the PRODUCTS tab MCUXpresso IDE.
- Go to DOWNLOADS tab and select the LATEST VERSION of the tool.
- You will be asked to sign-in/up with a free NXP user-account.
- Install MCUXpresso IDE on your computer
- Download for free Rapid IoT SDK package go online at: www.nxp.com/rapid-iot
- Select from the PRODUCTS tab Rapid IoT prototyping kit.
- Go to SOFTWARE and TOOLS tab and select the latest version of the Rapid IoT SDK package.
- You will be asked to sign-in/up with a free NXP user-account.
- Launch MCUXpresso IDE and select C:\MCUXpresso.Workspace\ as workspace location
- Extract the Rapid IoT SDK Package in the location C:\MCUXpresso.Workspace\
- From MCUXpresso Quickstart Panel, select Import project(s) from file system…
- Under Project directory (unpacked) press Browse…
- Select the folder
\SDK_2.3.0_RapidIoT_MK64F12\boards\rpk_k64f\rapid_iot_apps\kbootand press OK.
- In the new window, press Next
- Check the project kboot_k64f and make sure to uncheck the option Copy projects into workspace, then press Finish
- From MCUXpresso Project Explorer, select and expand the project kboot_k64F
- From MCUXpresso Quickstart Panel, select Build ‘kboot_k64f’ [debug]
Wait for the compilation to finish successfully. It may take few minutes the first time be patient.
Make sure that your Docking station is programmed with the Rapid IoT DAP-LINK debug interface. Instruction to reprogram your Docking station are described section 3.18.
- Set the Power switch of the Docking station (red below) to OFF
- Plug your Rapid IoT to the Docking station aligning carefully the board to board connectors (yellow below)
- Set the jumper switches of the Docking station to 11001000 to debug the Application/K64F MCU
- Set the Power switch of the Docking station to ON
- From MCUXpresso Quickstart Panel, select Debug ‘kboot_k64f’ [debug]
- In the message window select the probe CMSIS-DAP and press Debug
Wait for the application to be programmed in the K64F internal flash and the debug session to start
- From the debug view press the stop button to halt the debug session
- Repeat the previous step to import KW41Z bootloader project located at \SDK_2.2_RapidIoT_MKW41Z4\boards\rpk_kw41z\rapid_iot_apps\kboot and debug it
- Set the Power switch of the Docking station (red below) to OFF
- Set the jumper switches of the Docking station to 00111000 to debug the Wireless/KW41Z MCU
- Set the Power switch of the Docking station to ON
- From MCUXpresso Quickstart Panel, select Debug ‘kboot_kw41z’ [debug]
- In the message window select the probe CMSIS-DAP and press Debug
Wait for the application to be programmed in the KW41Z internal flash and the debug session to start
- From the debug view press the stop button to halt the debug session
Congratulations, you have successfully reprogrammed both K64F and KW41Z bootloaders
NXP Modular IoT Gateway
1. NXP Modular IoT Gateway
Out-Of-The-Box SLN-RPK-NODE connects through Thread radio with the i.MX6UL/ULL Gateway (included in the NXP SLN-IOT-GPI kit) to monitor and control its sensors and actuators from the Cloud. According to Thread standards, one single gateway can monitor and control up to 200 Rapid IoT end-devices.
NOTE: The firmware of the gateway included in the NXP SLN-IOT-GPI kit might have to be updated first (once) to fully support our new SLN-RPK-NODE device. Follow the detailed instructions below including new gateway configuration.
Search, download and install the modular gateway Android or iOS phone App from the Google or Apple App store.
Then launch the modular gateway phone App from your phone/tablet and press Next.
To the question Allow Modular Gateway Mgr to make and manage phone calls choose Allow
Register your gateway in the phone App with the Serial Number printed on its back, check the box Remember me and press Submit.
If you are registering your gateway for the first time, you will be required to fill out some small details to register the NXP Modular Gateway. An email will be sent to you with a verification code that needs to be added into the OTP field (One-Time-Password).
On successful authentication, user is redirected to the list of registered gateways. If no gateway is already commissioned the following screen will invite the user to scan the QR code printed in the back of the gateway by selecting the icon in the bottom right corner.
To the question Allow Modular Gateway Mgr to take pictures and record video select Allow
Then scan the QR code printed in the back of the gateway to finalize its registration
Now we are ready to connect the Gateway to the Cloud over Ethernet or WiFi
To connect the Gateway to the Cloud over Ethernet:
Plug one end of the Ethernet cable to the router and the other end to the Gateway Ethernet port
Plug the power-adapter to the outlet and to the Gateway D/C power input
During Gateway startup the LED located in the front panel will change as follow:
- The (right) blue LED will lit up to confirm that power is supplied to the Gateway
- LED2 will turn solid Green to confirm Gateway is powered on and NFC/BLE provisioning are disabled
- LED1 will sequentially turn Orange during Cloud connection then solid Green to confirm that Gateway is connected to the Cloud. LED1 turning RED indicates no IP address is assigned or no internet connectivity. For Ethernet connected Gateway, User must confirm the LED1 as solid green to further go ahead
We will now provide the Wi-Fi credentials to the Gateway through NFC/BLE commissioning
Select your Gateway from the list of the Commissioned Gateway in the phone App
Open the Gateway Options by selecting the icon located in the top right corner
From the menu select Gateway Firmware Update
Now that the Gateway is connected to the Cloud, the version of the Firmware programmed in the Gateway is available, in this case 1.8.1
The available Firmware available through Over-The-Air Update are listed below
Select
the first option full_x.x.x_golden.swu (ota_demo_test is for test purpose)
SLN-RPK-NODE is supported by the Gateway firmware 1.8.5 or higher
Start the Firmware Update by pressing UPDATE in the confirmation window
A progression bar will appear at the bottom of the screen to indicate the progress of the
update.
The Gateway firmware is large and takes some time to download and program in
the
Gateway memory
Don’t power-off your gateway or turn-off the internet connection during the update.
Your Gateway will reboot after reprogramming and the phone App will display a confirmation message that the Update ended up successfully
If you return to the Gateway Properties menu in the phone App, your Gateway Firmware Information should now indicate the Firmware version selected for the update, in this case 1.8.5
Congratulations, your Gateway is now successfully updated with the latest Firmware version.
Now let’s connect our SLN-RPK-NODE to the Gateway over Thread
The application programmed in factory in the SLN-RPK-NODE supports both Bluetooth and Thread connectivity alternately. By default, Bluetooth radio is enabled so we must activate Thread from the application settings to connect SLN-RPK-NODE to the Gateway.
From the Welcome screen touch the Electrode T1 to open the Application screen.
Then touch the Electrode T2 to open the Settings screen.
Next touch the Electrode T1 to access the Bluetooth menu.
Finally touch the Electrode T2 to reach the Thread menu.
Now press the push button SW4 to activate Thread radio (and automatically disable Bluetooth radio).
After few seconds a message will confirm the selection and indicates that SLN-RPK-NODE
must restarts to start Thread radio
Press the push button SW2 to restart the board
Open the Gateway Options by selecting the icon located in the top right corner
From the menu select End node commissioning
NFC Commissioning will be available in the next release
For now we will share the
SLN-RPK-NODE MAC address manually with the Gateway
Select Thread and enter the SLN-RPK MAC address printed at the back of the SLN-RPK-NODE casing and press Submit
The phone App will display shortly a confirmation message that the SLN-RPK-NODE is successfully commissioned for Thread and open a new window with the instruction to connect each type of End Node supported by the Gateway (including the Rapid IoT board)
From the SLN-RKP-NODE Thread menu press the push button SW2 to join the Thread network. The White LED will start blinking quickly to confirm that SLN-RPK-NODE is trying to connect.
After few seconds the phone App will display a message to confirm that SLN-RPK-NODE
joined successfully the Thread network and ask if we want to commission/connect another
device.
Choose NO to display the list of the connected End nodes.
Select your Rapid IoT board from the list of the connected device thanks to its unique MAC address.
The phone App will display a new interface to monitor and control SLN-RPK-NODE sensors and actuators from the Cloud through Thread connectivity.
Congratulations, your SLN-RPK-NODE is now successfully connected to the Cloud through Thread