Getting Started with MC56F80000-EVK
Contents of this document
-
Plug It In
-
Get Software
-
Build, Run
-
Create
Sign in to save your progress. Don't have an account? Create one.

Purchase your MC56F80000-EVK
1. Plug It In
1.2 Attach the USB Cable
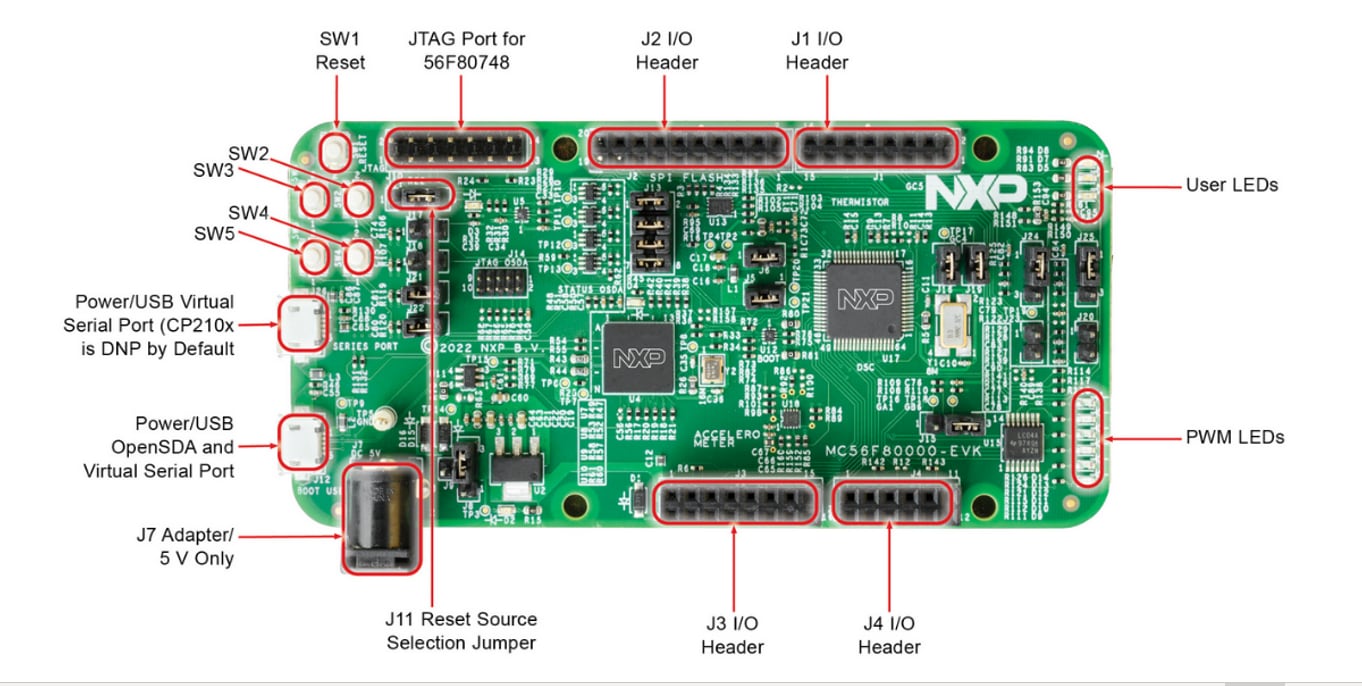
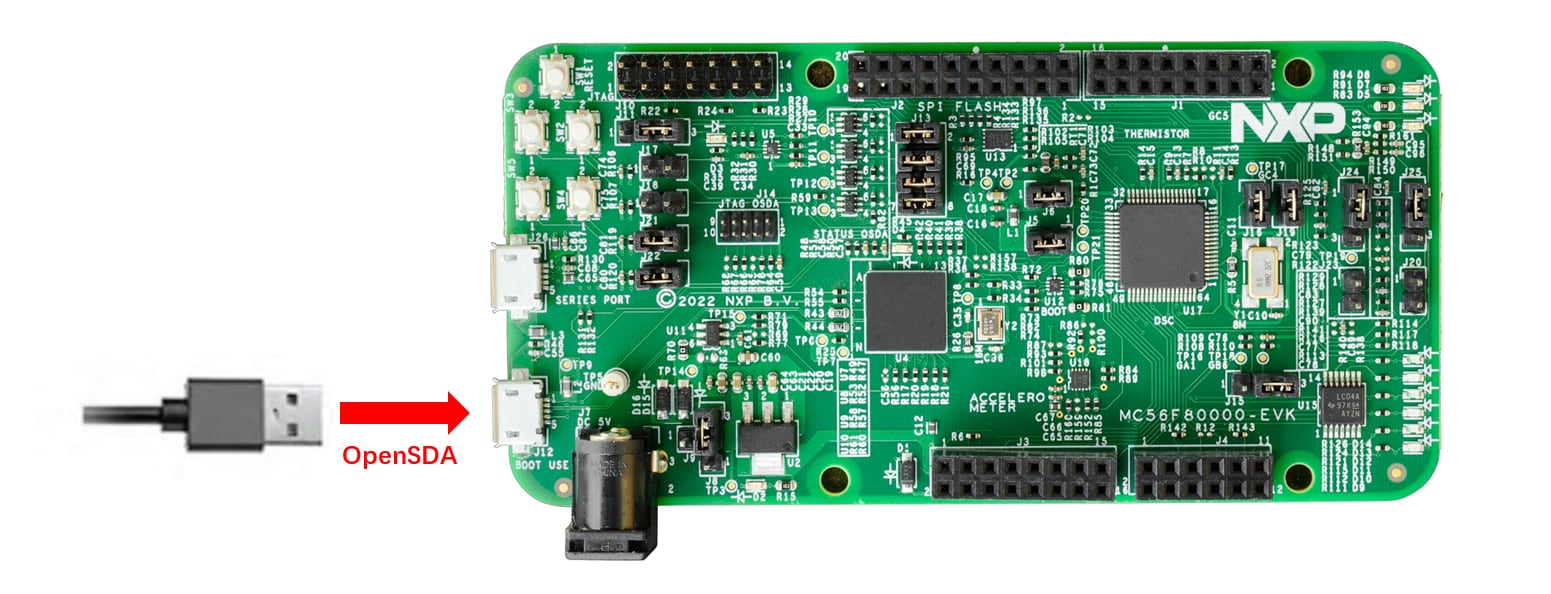
There are two micro-USB connectors on the board. The bottom one (J12) is for on-board OpenSDA to support programming, debugging and virtual serial port. The upper one (J26) is used as virtual serial port realized by CP2012N. Both micro-USB connectors can supply power for the board. Plug the USB cable into the bottom one for OpenSDA.
2. Get Software
Installing software for the MC56F80000-EVK
2.1 Install Your Toolchain
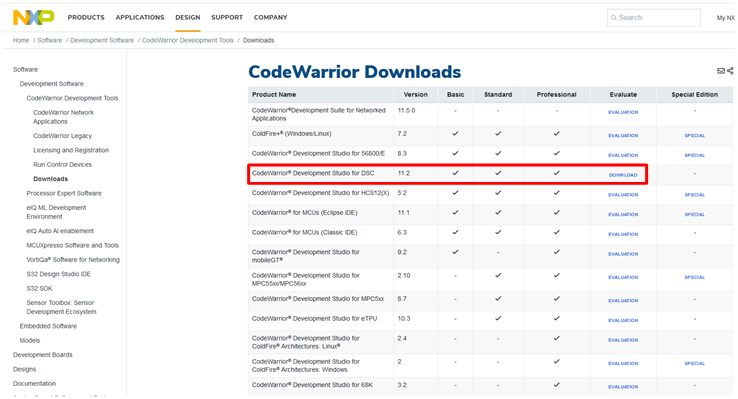
NXP offers a complimentary toolchain called CodeWarrior IDE. There are many versions of this IDE, to support MC56F80xxx, the version of the CodeWarrior for MCUs should be v11.2 or later.
You can find the installation steps for CodeWarrior v11.2 below.
-
Click the link
CodeWarrior. Find the CodeWarrior v11.2 item and click the DOWNLOAD
-
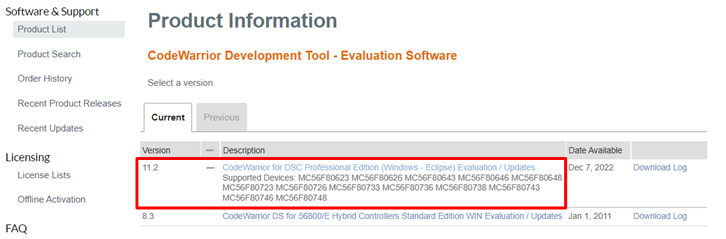
Click on “CodeWarrior for MCU Professional Edition” of version 11.2
-
Download “CodeWarrior for MCU v11.2 - Windows” and “
com.freescale.mcu11_2.dsc.updatesite.zip” files into the same directory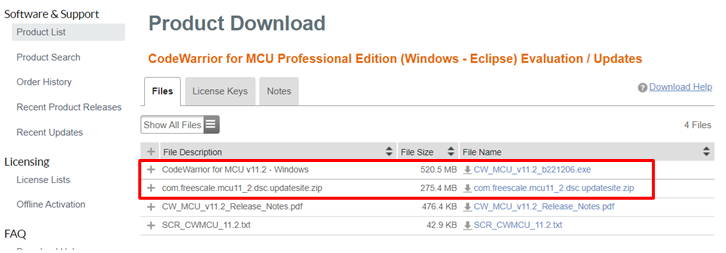
-
Click the
.exefile, then follow the instruction to finish the installation
2.2 Jump-Start Your Design with the MCUXpresso SDK
The MCUXpresso Software Development Kit (SDK) is complimentary and includes full source code under a permissive open-source license for all hardware abstraction and peripheral driver software.
Let's find out how to download the latest SDK release for the MC56F80000-EVK.
- Click the link Get MCUXpresso SDK . You will see the below page

-
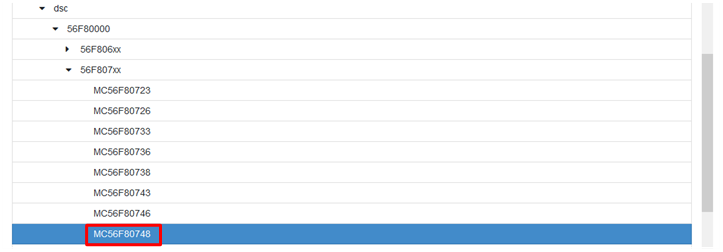
Select the Processors, dsc, 56F80000, 56F807xx items sequentially

You will find all the 56F807xx series parts shown here. Due to the MC56F80748 that is used on the EVK, we select the MC56F80748 here. If the other parts are used on your side, please select the corresponding item to download the appropriate SDK package
- Click the Build MCUXpresso SDK
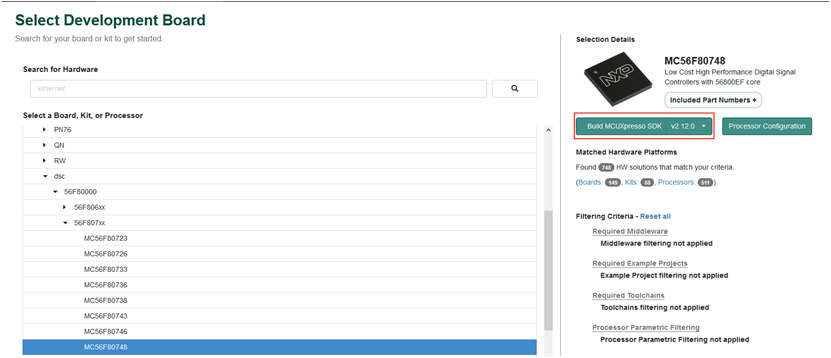
- You could select the middleware needed in your application here. Then click the DOWNLOAD SDK

- Once the building is done, the page below will appear. Click Download SDK
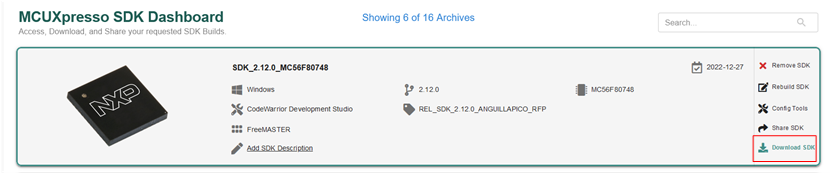
- In the pop up window, select the marked item shown in below figure

- Finally, select Agree to finish the download

2.3 FreeMASTER
FreeMASTER is a user-friendly real-time debug monitor and data visualization tool that enables runtime configuration and tuning of embedded software applications. Click below to download the latest FreeMASTER.
The OpenSDA supports the virtual COM port communication on MC56F80000-EVK for FreeMASTER.
If using the CP210x USB to UART bridge virtual COM port communication on MC56F80000-EVK, you need to download and install the CP210x drivers. The CP210x Windows Drivers v6.7.6 works well here.
2.4 MCUXpresso Config Tools
The MCUXpresso Config Tool is an integrated suite of configuration tools that guides users in creating new MCUXpresso SDK projects, and also provides pin and clock tools to generate initialization C code for custom board support. It's recommended to install the latest version of the MCUXpresso Config Tools.
2.5 Serial Terminal
Many of the MCUXpresso SDK examples output data over the MCU UART. Make sure you install an terminal application.
Not sure how to use a terminal application? Try one of these tutorials: Tera Term Tutorial, PuTTY Tutorial
3. Build, Run
3.1 Explore the MCUXpresso SDK Example Code
The MCUXpresso SDK comes with a long list of example applications code. To see what's available, browse to the SDK boards folder of your SDK installation and select mc56f80000evk(< SDK_Install_Directory>/boards/mc56f80000evk).
To learn more about specific example code, open the readme.txt file in an example's directory
3.2 Build, Run
If one or more of the demo application or driver examples sound interesting, you're probably wanting to know how you can build and debug by yourself. The following guide provides easy, step-by-step instructions on how to open, build and debug an example code using the CodeWarrior IDE.
-
Import an example project
- Launch CodeWarrior 11.2, then go to file → Import
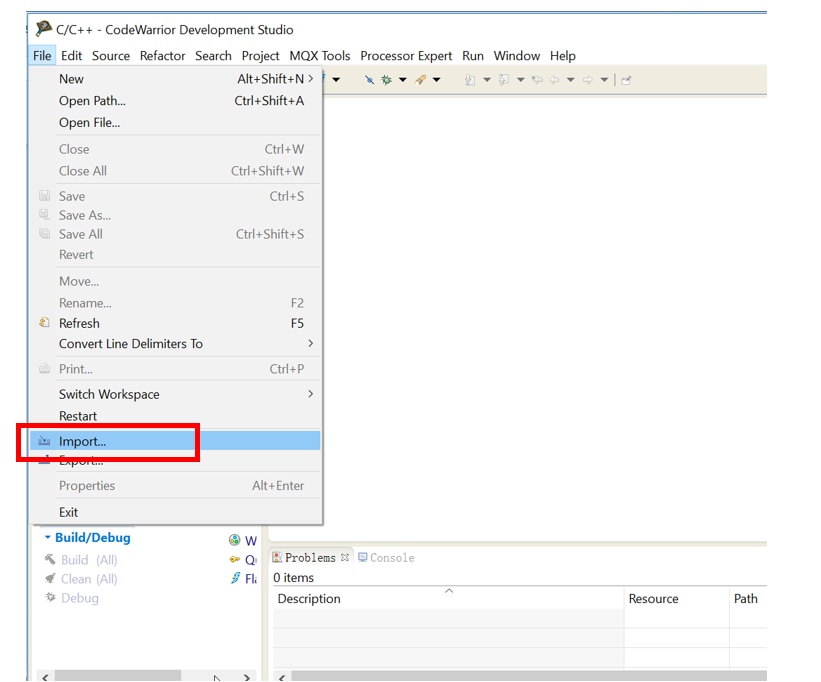
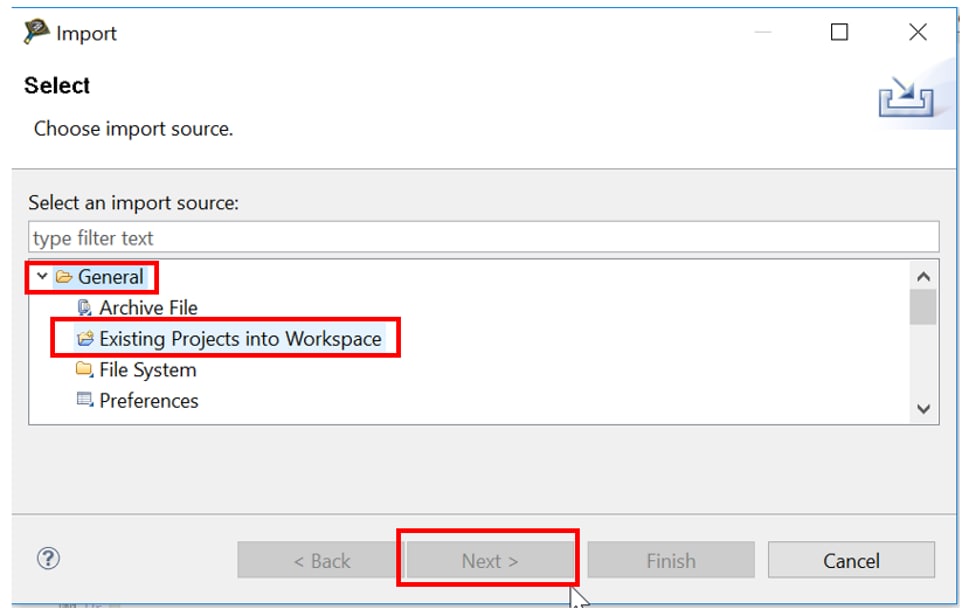
- In the list of import source, expand the General tree control and select Existing projects into Workspace. Then click Next
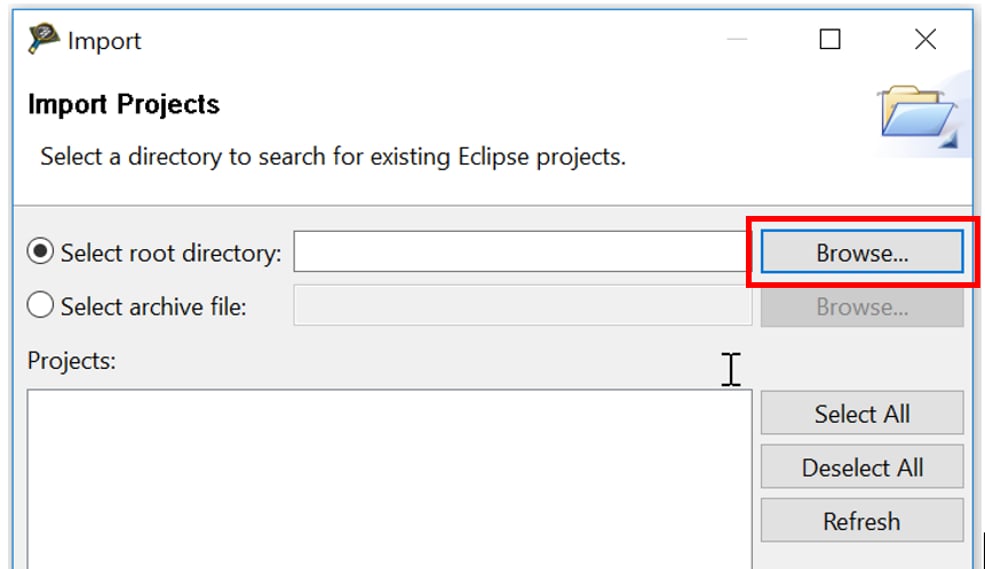
- Select Browse
-
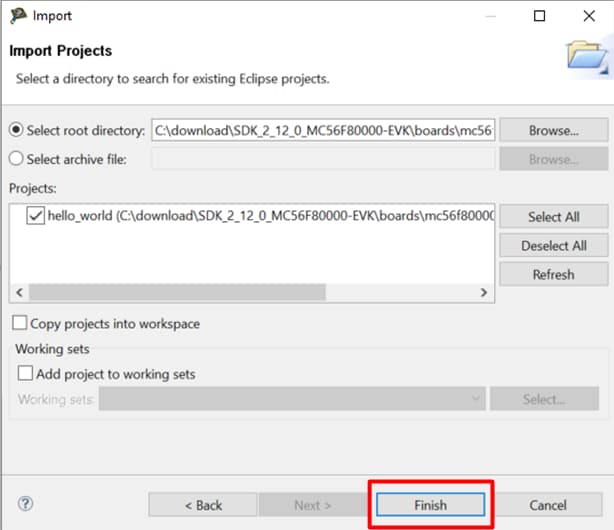
Navigate to the example projects downloaded,
<SDK_Directory>/boards/ mc56f80000evk/demo_apps/hello_world, select codewarrior and click OK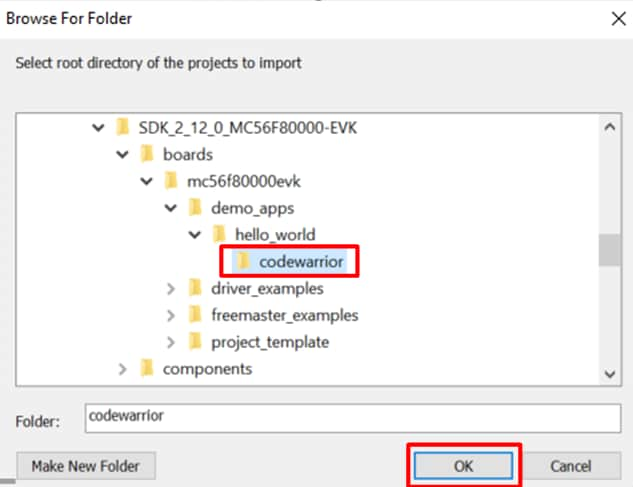
-
The selected project appears in the Projects list, click Finish
- Launch CodeWarrior 11.2, then go to file → Import
-
Build an example project
-
Now the project appears in the CodeWarrior Project view of the Workbench window. The project has four build configurations with different optimization configuration and memory model.
'flash_sdm_lpm_debugand'flash_ldm_lpm_debug'are configured as speed optimization level 1,'flash_sdm_lpm_release'and'flash_ldm_lpm_release'are configured as speed optimization level 4.'flash_sdm_lpm_debug'and'flash_sdm_lpm_release'are configured as small data and large program memory model,'flash_ldm_lpm_debug'and'flash_ldm_lpm_release'are configured as large data and large program memory model.Click on the configuration name and choose the desired build configuration.

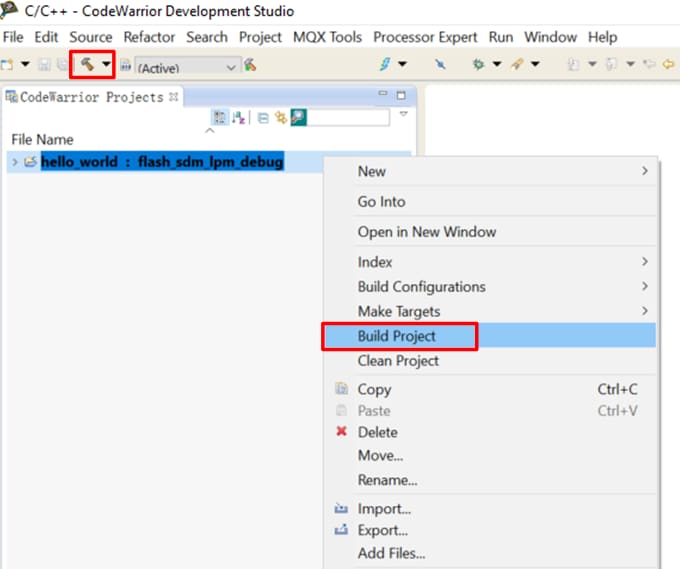
- Build the project by selecting the project to be complied and clicking the tool bar Build icon, or right clicking on the project and selecting Build Project
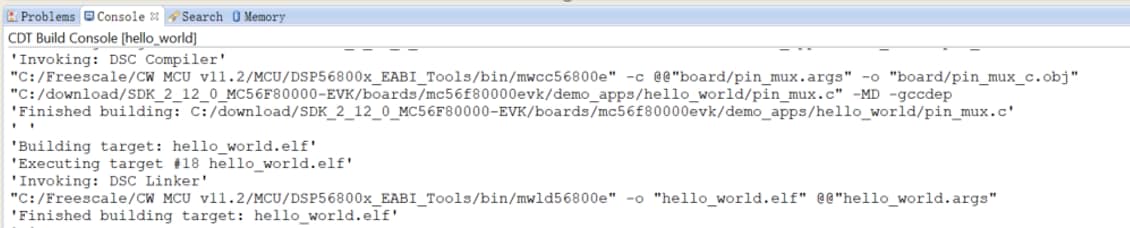
- You can see the status of the build in the Console tab
-
-
Run an example project
Now the project has been compiled, you can now download it to the board and run it. Make sure the MC56F80000-EVK is plugged in.
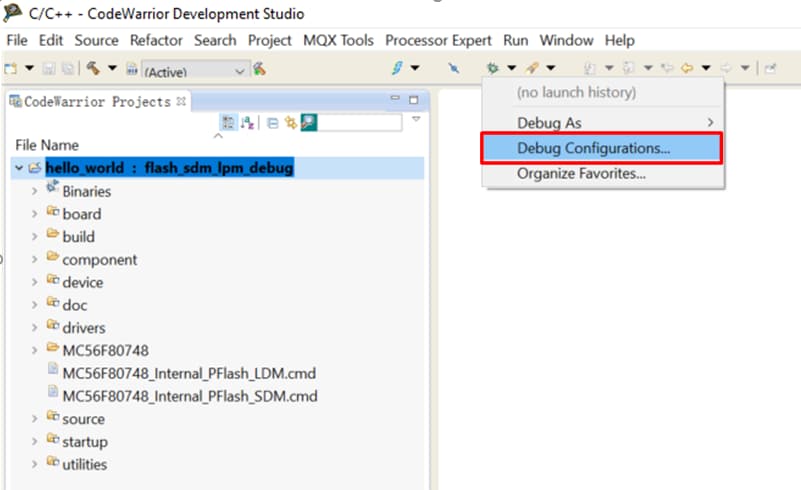
- Click the tool bar Debug icon, and select Debug Configurations
- The Debug configurations dialog box appears. expand the CodeWarrior tree control and select the build configuration. Then click Debug
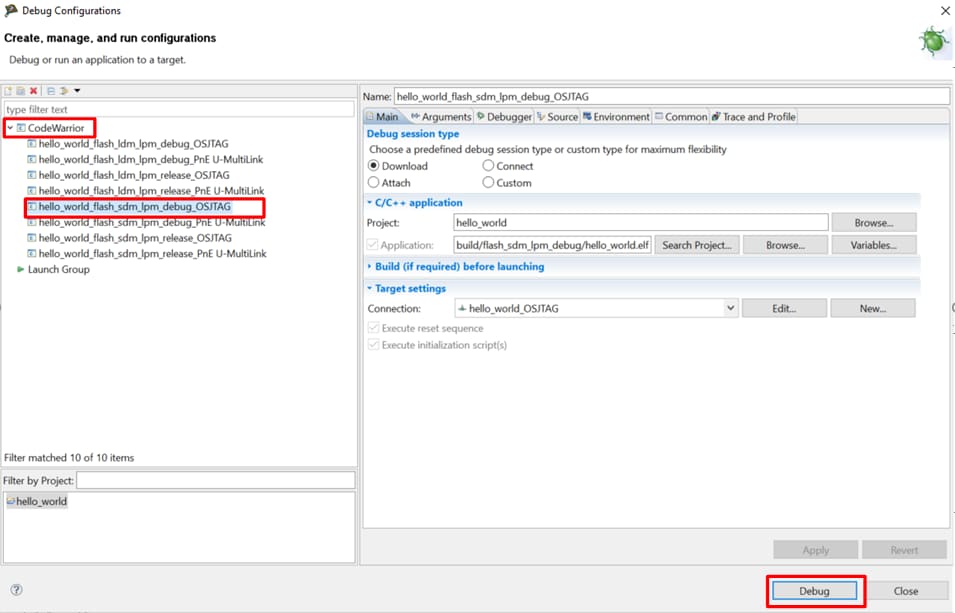
- The debugger downloads program to the board and Debug perspective appears. The execution halts at the first statement of main()

-
Open a terminal program and connect to the COM port the board enumerated as. Configure the terminal with these settings:
- 115200 baud rate
- 8 data bits
- No parity
- One stop bit
- No flow control
- Start the application by clicking the Resume button.

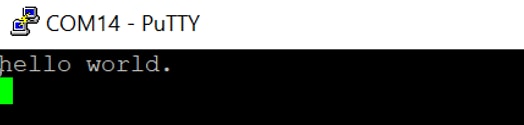
- The hello_world application is now running, and a banner is displayed on the terminal
- Use the controls in the menu bar to pause, step into and step over instructions, and then stop the debugging session by click on the Terminate icon

- Click the tool bar Debug icon, and select Debug Configurations
4. Create
Create an Application for the MC56F80000-EVK
4.1 New Project with CodeWarrior
When a bare-mental project is preferred, use the CodeWarrior new project wizard to create a new project. Now, let's use CodeWarrior to show how to create a bareboard project and edit on it.
When a bare-mental project is preferred, use the CodeWarrior new project wizard to create a new project. Now, let's use CodeWarrior to show how to create a bareboard project and edit on it.
Start the CodeWarrior IDE
-
Create new project
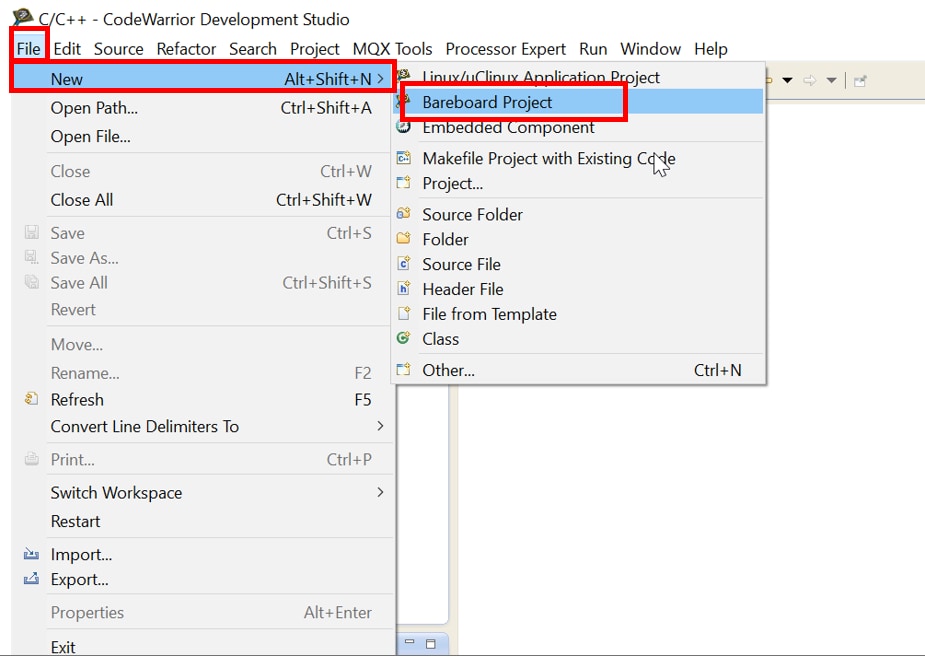
- Click File → New → Bareboard project, or click the tool bar New icon and select Bareboard project, then click Next
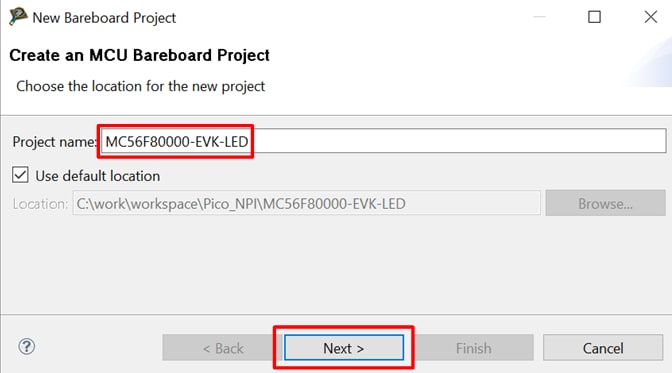
- Enter the desired project name in the Project name field. Select the Use default location checkbox by default, the generated project will stored at current workspace location. Then click Next
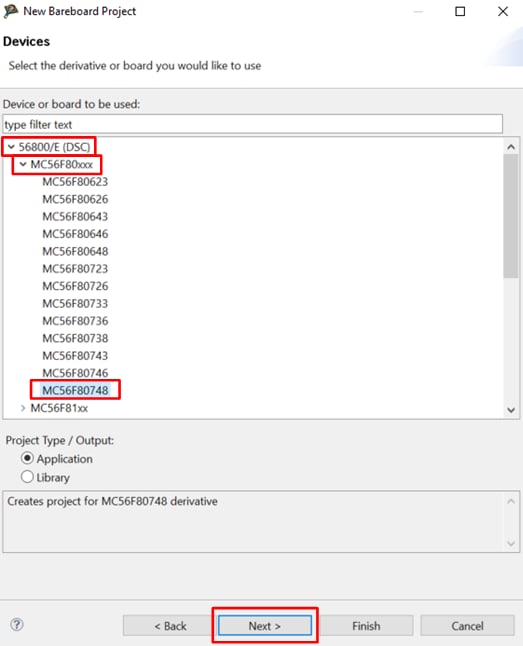
- In the device page, expand the tree control and select 56800/E (DSC) → MC56F80xxx → MC56F80748, then click Next
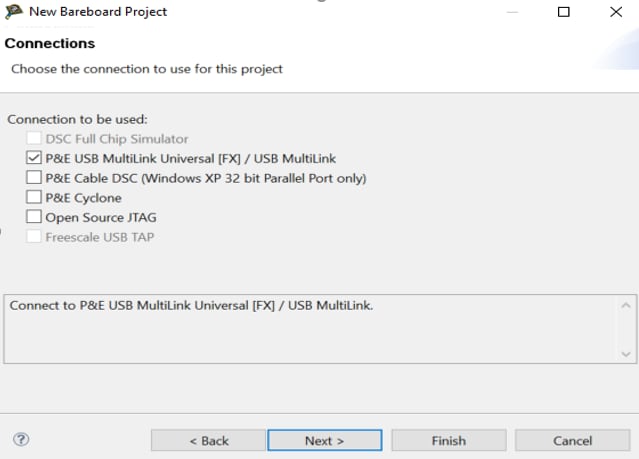
- In the Connections page, select the desired connections. If the on-board debugger is used, select P&E USB Multilink Universal [FX] / USB Multilink. Then click Next
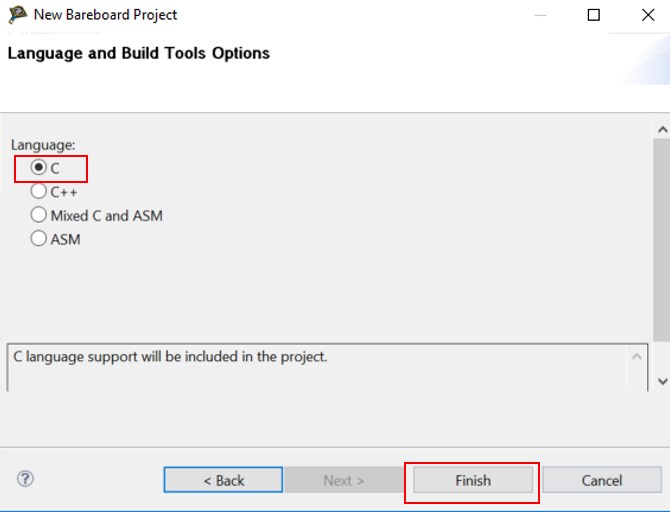
- In the Language page, select C language, then Click Finish, the IDE create the project
- Click File → New → Bareboard project, or click the tool bar New icon and select Bareboard project, then click Next
-
Modify the stationary and insert your own code
There are three files in the new project that are most in need of modification:
main.c,Flash_config.candCpu.c.- Cpu.c contains the routine executed before main. Expand the project folder and select
Project_Settings → Startup_Code → Cpu.c, open this file. 8MHz internal clock with PLL is used by default, changing CLOCK_CONFIG to choose other clock source
Flash_config.ccontains an array variable that configures Flash Configures Field (FCF)- In
main.c, delete the unwanted example codes, but keep below two lines
- Insert your own codes
- Cpu.c contains the routine executed before main. Expand the project folder and select
- Build, compile and run the project as described previously
4.2 Create a New Project with MCUXpresso Config Tool
Use the MCUXpresso Config Tool to create a new project based on the SDK.
The following steps will guide you through creating a project with MCUXpresso Config Tool.
MCUXpresso Config Tool
- Open the MCUXpresso Config Tool
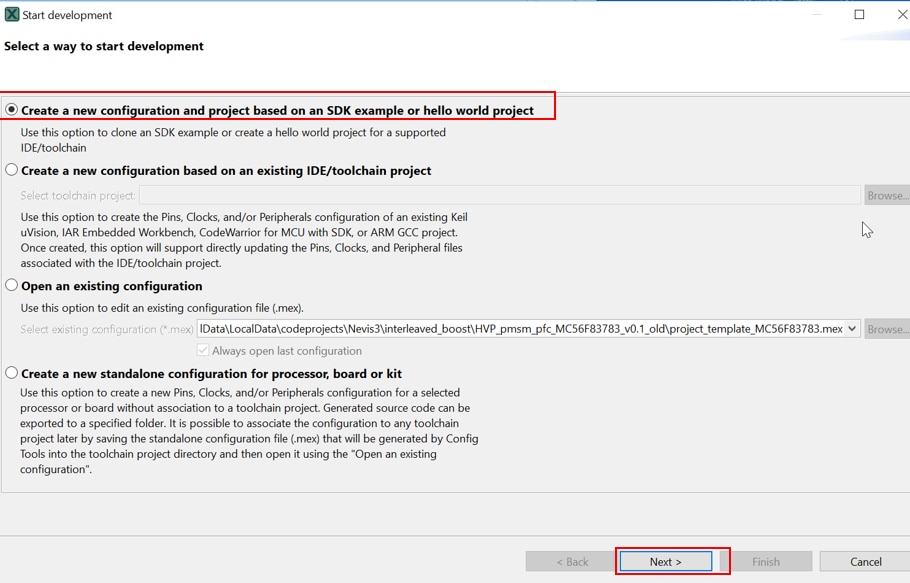
- Select the Create a new configuration and project based on an SDK example or hello world project radio button from the Start development window. Alternatively, you can select the option by choosing File → New from the Main Menu. Then click Next
- On the next screen, click Browse… to select the location of the MCUXpresso SDK that you had unzipped earlier, then select Create new project for device MC56F80748. You can then also specify where to store this project and the project name. Then click Finish

- Click Close and Update Code

- Click OK
- A new project is cloned and the Peripherals tool appears as default

- After configuration, open the project with CodeWarrior. Import, build, and run the project as done in the previous section

Use the Clocks Tool
Now, let's use the clocks tool that's part of the MCUXpresso Config Tool to change the clock settings.
-
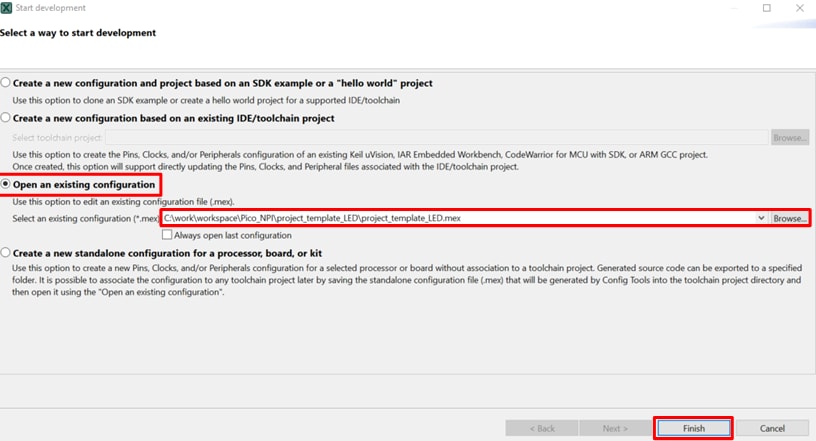
Open the MCUXpresso Config Tool with below two options:
- Double click the '
.mex' file in the project folder - Open the MCUXpresso Config Tool program, in the wizard that comes up, select the 'Open an existing configuration' radio button, and click Browse… to select the project that you want to open, then click Finish

- Double click the '
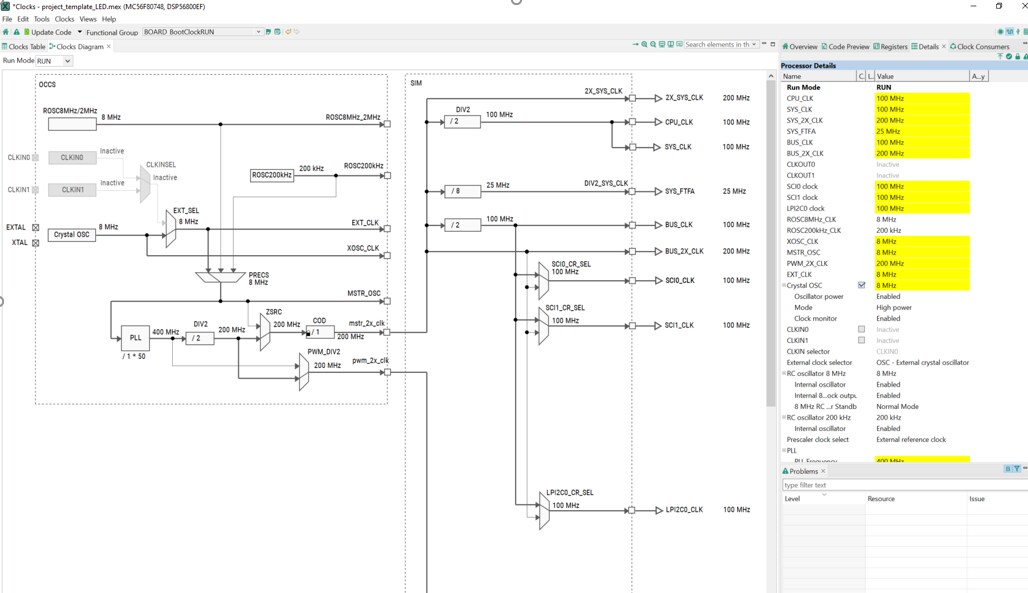
- Open the Clocks Tool by selecting Tools→clocks from the toolbar, or by selecting the Clocks button from the menu bar

- Use the clocks tool to modify the system clock. The template project configures the chip to use internal 8MHz OSC as the clock source, and enables PLL to generate the 100MHz BUS_CLK
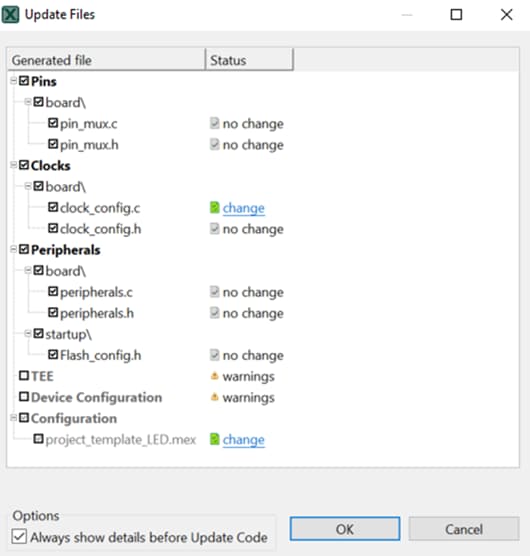
- After configuration, it's time to implement these changes into the project by exporting the new updated clock files that are generated by Clocks tool. Click on the Update Code in the menu bar

- The screen that pops up will show the files that are changing, and you can click on 'change' to see the difference between the current file and the new file generated. Then click OK to overwrite the new files into your project
Use the Pins Tool
Next use the Pins tool that is part of the MCUXpresso Config Tool to show how to add a new GPIO pin to your project to blink an LED
-
Open the MCUXpresso Config Tool:
- Double click the '
.mex' file in the project folder - Open the MCUXpresso Config Tool program, in the wizard that comes up, select the 'Open an existing configuration' radio button, and click Browse… to select the project that you want to open, then click Finish

- Double click the '
- Open the Pins Tool by selecting Tools→Pins from the toolbar, or by selecting the Pins button from the menu bar. The pins tool now display the pin configuration for the template project

-
Use the pins tool to modify the LED routed pin:
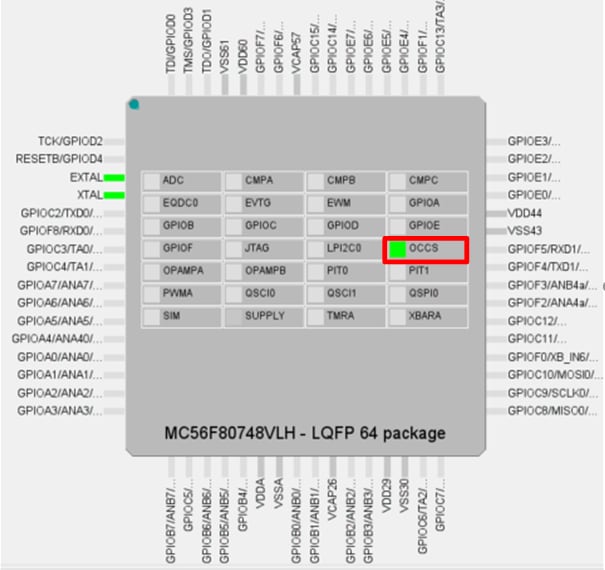
- In the current configuration, GPIOC0 and C1 are routed as EXTAL and XTAL(routed pins have a check in a green box next to the pin name, and the functions selected for each routed pin are shown)
- Disable OCCS routed pins. Click the green box next to OCCS, in the wizard that comes up, uncheck EXTAL and XTAL, or click the Unroute All. Then click Done. The pins will then be disabled and disappear from the Routed Pins list

-
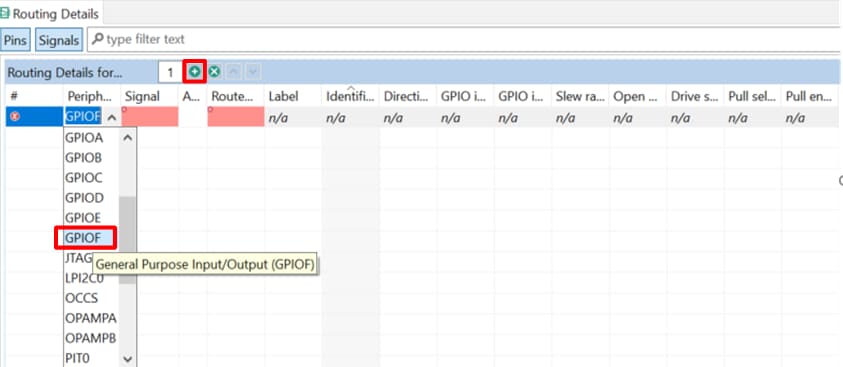
Route GPIOF6 as a GPIO for LED D5.
Option A: Find GPIOF in Peripherals signals window, then click the box next to the GPIOF. And select GPIO6 in the pop-up window, then click Done. The pin will then appear in the Routing details window.
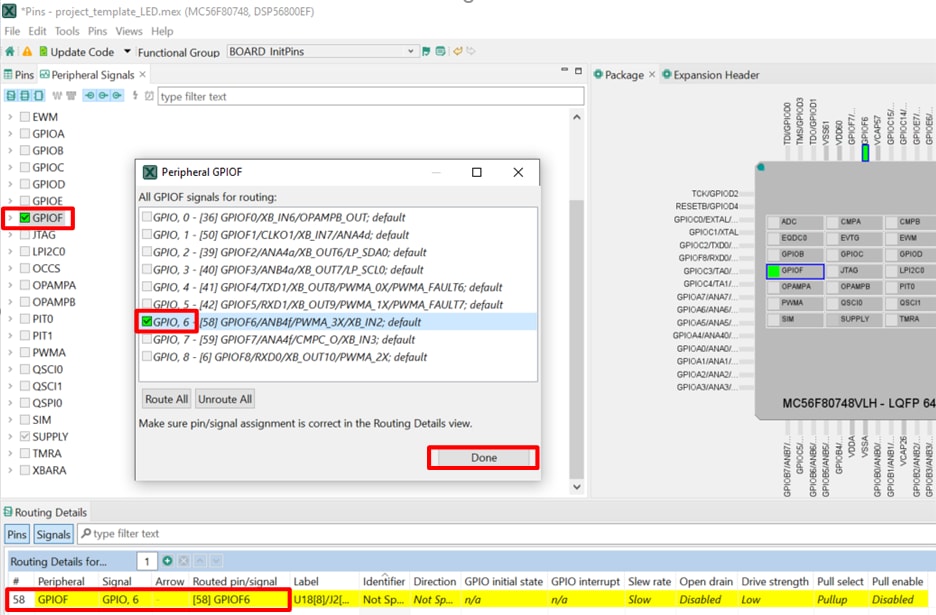
Option B: Add a new row directly in Routing details window, click the peripheral box and select GPIOF, then select GPIO,6 in the signal box.
- Configure GPIOF6 properties

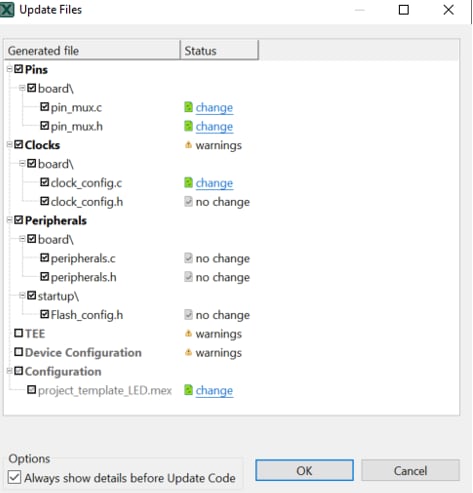
- Now it's time to implement these changes into the project by exporting the new updated files that are generated by the Pins tool. Click on the Update Code in the menu bar

- The screen that pops up will show the files that are changing, and you can click on 'change' to see the difference between the current file and the new file generated. Then click OK to overwrite the new files into your project
Use the Peripherals Tool
Next use the Peripherals tool that is part of the MCUXpresso Config Tool to show how to configure a PIT for LED blinking frequency control.
-
Open the MCUXpresso Config Tool:
- Double click the '
.mex' file in the project folder - Open the MCUXpresso Config Tool program, in the wizard that comes up, select the 'Open an existing configuration' radio button, and click Browse… to select the project that you want to open, then click Finish
- Double click the '
- Open the Peripherals Tool by selecting Tools→Peripherals from the toolbar, or by selecting the Peripherals button from the menu bar.

-
Use the peripherals tool to configure PIT0:
- Add a PIT by clicking the Add button and select PIT, then click OK

- Now PIT0 appears in the components window and it's opened. Change PIT0 configuration as the following picture, PIT0 roll-over interrupt is enabled for GPIOF6 flip

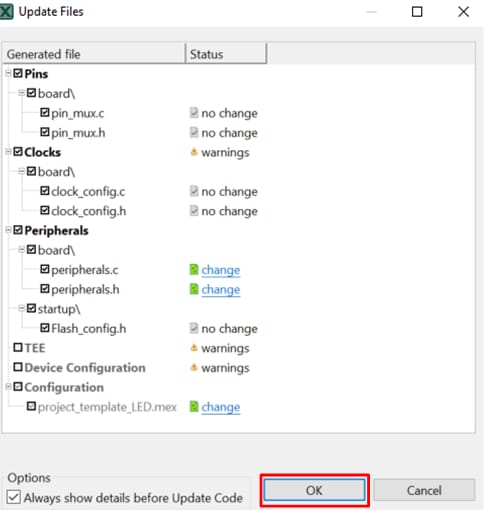
- Now it's time to implement these changes into the project by exporting the new updated files that are generated by the Peripherals tool. Click on the Update Code in the menu bar

- The screen that pops up will show the files that are changing, and you can click on 'change' to see the difference between the current file and the new file generated. Then click OK to overwrite the new files into your project
- Add a PIT by clicking the Add button and select PIT, then click OK
- Import the project into CodeWarrior IDE as done in the previous section
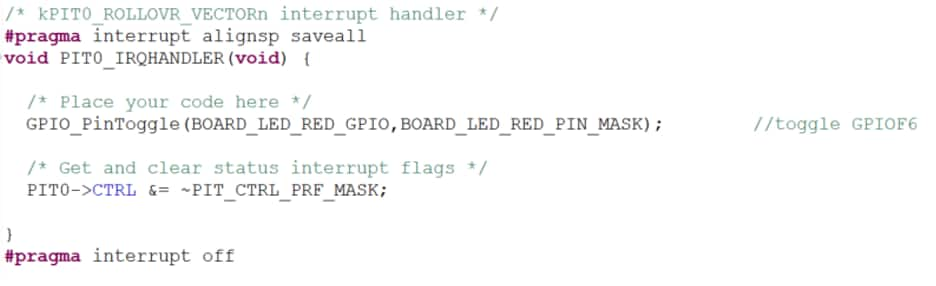
- Open main.c in the project folder and add the interrupt routine in it by selecting 'Copy to clipboard' and pasting

- Add the GPIOF6 flip code into PIT0 rollover interrupt
- Build and download the project as done in the previous section
- Run the application. You should now see the red LED is flashing
- Terminate the debug session. Push the reset button SW1, you should now see the red LED starts flashing
With the template modified, you will see the MC56F80000-EVK's red LED blinking.
Tera Term Tutorial
Tera Term Tutorial
Tera Term is a very popular open source terminal emulation application. This program can be used to display information sent from your NXP development platform's virtual serial port.
- Download Tera Term from SourceForge. After the download, run the installer and then return to this webpage to continue.
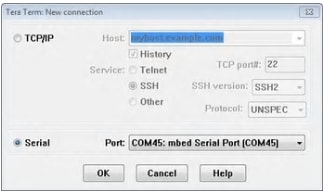
- Launch Tera Term. The first time it launches, it will show you the following dialog. Select the serial option. Assuming your board is plugged in, there should be a COM port automatically populated in the list.
- Configure the serial port settings (using the COM port number identified earlier) to 115200 baud rate, 8 data bits, no parity and 1 stop bit. To do this, go to Setup -> Serial Port and change the settings.
- Verify that the connection is open. If connected, Tera Term will show something like below in its title bar
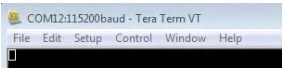
- You're ready to go
PuTTY Tutorial
PuTTY Tutorial
PuTTY is a popular terminal emulation application. This program can be used to display information sent from your NXP development platform's virtual serial port.
- Download PuTTY using the button below. After the download, run the installer and then return to this webpage to continue.
- PuTTY by either double-clicking on the
*.exefile you downloaded or from the Start menu, depending on the type of download you selected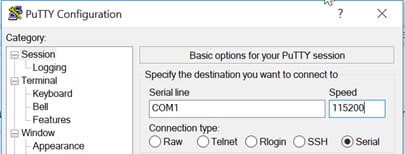
- Click Open to open the serial connection. Assuming the board is connected and you entered the correct COM port, the terminal window will open. If the configuration is not correct, PuTTY will alert you
- You're ready to go
Support
Forums
Explore beyond the MC56F80000-EVK by integrating other NXP solutions and software to your project and interact with our worldwide design community.
Motor Control
MC56F80000-EVK form-factor compatible with the LVPMSM and LVBLDC motor control platform, adds the motor control capabilities. Find out more at FRDM-MC-LVPMSM and FRDM-MC-LVBLDC.
DSC and MCUXpresso Communities
Connect with other engineers and get expert advice on designing with DSC and MCUXpresso Software and Tools. Join the community discussion in one of our two dedicated communities: