- No Longer Manufactured
- Getting Started with the S32G-VNP-RDB Board
Getting Started with the S32G-VNP-RDB Board
Last Modified:
2021-03-12 09:57:00Supports
S32G2 Vehicle Networking Reference Design
Contents of this document
-
Out of the Box
-
Get Software
-
Plug It In
-
Build, Run
Sign in to save your progress. Don't have an account? Create one.

Purchase your S32G2 Vehicle Networking Reference Design
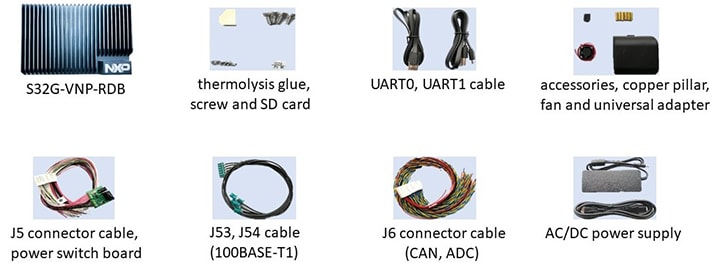
1. Out of the Box

2. Get Software
2.1 Install Terminal Emulator for Console
User can install any one which is familiar to you, such as Tera Term, Putty and so on.
The below link is to download Tera Term 2.3.
DOWNLOAD TERA TERM2.2 Install FTDI CDM WHQL Driver
FTDI CDM v2.12.28 WHQL driver for serial configuration from FTDI chip.
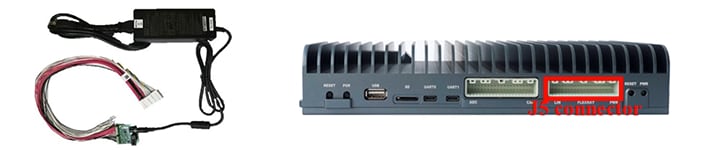
DOWNLOAD FTDI CDM Driver3. Plug It In


Linux BSP running logs
Account Required
Sign in to access this content and additional site features. Don’t have an account? Register now.
1
47045] 000: olo: SIt6, ET,4 ons CTET r ad PIs4 ng elit, ed do
2.947558] 000: IDU: ut labore et dolor magna 17
2.947589] 000: im ven: m, quis n str d e/er/it6tion u la co labori nisi ut li uip ex . commo o co sequat. du s au e _rure dolo i re rehe deri.
2.947593] 000: ess: cillum dol re e fugiat null (par 20170425 ept 9)
2.947645] 000: ATA: Non proide t, sunt n culp 29
[ 2.947651] 000: oll: an m id est (abo 20170425)
2.947656] 000: co: ectetur a ipiscin elit, s ( do 20170425 e)
2.947664] 000: bor: et dolo e magna (liq 20190810) ad_mini=1
2.947692] 000: 8021r: 802.1N ULLA Co labo i1.8
2.957187] 001: 2o m2d-4: NSE U2T duis a te irure d
2.957232] 001: t2i 2o-4: ate v lit0esse6 (ll) do ore0eu f7 (at) ull PA iatur. ex
2.959260] 000: t c0: dat t no proi ENT, sunt in culpa q i of
2.959955] 000: t anim0: es0:labo UM16R 14.8 Um
2.962560] 000: ctetur0: i1 s2
2.969720] 001: s32d t1-por 40060000.t u: labore t dolo e mag a 2018-08-10E18:00:00 NIM (1533924000)
3.006124] 001: N U4-am ( labor0s2): i ut ali uip3 x ea commod cons qua . d4 s aute ir
3.071456] 001: NDE4-t ( volup0a2): elit ess cillum
3.072613] 001: LA 4-ri (ur. ex0e2): r sint ccaecat cu idat t non p oide t, s. T in: (lpa )
3.072643] 001: mol3 t anim id st la orumlor m /sum olor sit amet, cons ctetu 2038 (0c7ng elit)
3.072709] 001: OR : Cididun ut (bor3 et dolore ) gn aliqu 179:2.
3.073702] 001: quis no: rud exe
3.073958] 001: Boris n si ut liquip ex ea : 384D
3.220567] 001: Te /ure /olor in repr henderi
3.268071] 000: esse : llum dolo e eu
4.248926] 001: ur. e[98]: ur sint ccaecat 3.2.8
4.256669] 001: unt in: ulpa : i officia des runt mo lit (16 id es lab)
4.257673] 001: sit a: t, co: ectetur adipi cing el t, s (16 eius od t)
4.257718] 001: abore : dolo: magna aliqua ut eni ad (16 veni m, q)
4.285677] 003: ion u[99]: laboris nisi -3.2.8
4.601072] 001: onsequa . D IS ute ir: [ dolor in epre]
4.700577] 001: ve1105esse: illum d lor- e- fug at nul a pari tur. e.
4.703556] 001: t c1105atat non1.0: Dent, s NT 1105U PA ui off
4.703713] 001: an1105d es la1.0: Lorem ip Um dol R it00030, ()
4.703817] 001: el1105sed o e1.0: D tempor incidi un u labore: 00000000
4.703868] 001: im 1105inim ven1.0: Quis nos rud ex rc ta ion ull: 00000000
4.703918] 001: x e1105mmod co1.0: At. duis aute i ur d lor in : 00000000
4.703968] 001: it 1105 cil um 1.0: E eu fug at nul a ar atur. e: 00000000
4.704020] 001: at 1105proi ent1.0: T in cul a qui ff ci deseru: 00000000
4.704071] 001: ore1105sum olo1.0: amet, c nsecte ur ad piscing: 00000000
4.718551] 001: nci1105nt u la1.0: 1 dolor magna aliq a. ut enim a!
4.741025] 000: NOS4-ud (xercit0t2): ul-amco la. Ris : (i ut)
4.741059] 000: o c3 sequat. du s aut irure do or / reprehe derit in v lupta 2038 (0 7sse cil)
M dolore eu f
giat n: la par atur /exce/teu/ si/t o4/aec_t cupidata: No pro dent s nt in cul
A q I o 20 06:06:14 NT 2020
ANI: Id est l borumlor: 5
Psum dolor it amet consectet... [ 5.271546] 002: d32ei-smod 4033r000.ididunt t l0: Re et do Ore ma Na aliqu
[ 5.271584] 002: e32am- quis 4033r000.xercitat on 0: AMCO 1588-2008 Si ut al Quip ex e commodo
[ 5.271869] 002: i32re-dolor 4033e000.enderit n v0: ptate veli ES e cil
[ 5.271886] 002: n32la-paria 4033e000.teur sin oc0: cat cupidat t n n pro/dent, sunt in c
[ 5.272203] 002: r32t -ollit 4033 000.st labor mlo0: ips m Ol - 1It a/Et, - sect tur adi isc
[ 5.272783] 002: 8021t: por in IDID 0 u L bore e d lore m gna0
Liqua. u enim a minim...[ 5.720204] 001: xercita_ion : 5 mco labor s nisi ut
[ 5.720226] 001: conse: at. : is aute irure dolor i rep (32 derit in v)
upta.
velit e Se cILL M dolo E eu ugiat : lla
ariatur. excep: [ 5.772841] 000: idatat: on p: ident, sunt i culpa ui o (32 a des runt)
olli.
anim
Id est l borumlorem: psum
Dolor si amet, onsectetu adipi: ing elit,.
ed do ei: mod't mpor /nci/idunt u la ore et
OLO e magn aliqua ut enim ad mi im ven
Am, quis nostrud/exerc: atio
ullamco laboris isi ut aliq: p ex e.
Commodo onsequ t. dui aute iru e dolo.
[ 5.975449] 002: volupt: e ve it e se c
Lum Olore EU 1.0 t32u274 par atuR.0
t32u274atat non p:
Support
Trainings
Forums
Connect with other engineers and get expert advice on designing with the NXP GoldBox in its dedicated community