Getting Started with the LPC845-BRK Breakout Board
Contents of this document
-
Plug It In
-
Get Software
-
Build, Run
-
Modify an SDK Example
Sign in to save your progress. Don't have an account? Create one.

Purchase your LPC845 Breakout Board
1. Plug It In
Let's take your LPC845 Breakout board for a test drive! You have the choice of watching the sequence in a short video or following the detailed actions listed below.
Get Started with the LPC845 Breakout Development Board - Demo
1.1 Attach the USB Cable
If you are using Windows 7 or 8 first you must install the VCOM device driver, that is included in this package. If you are using another operation system just Connect a micro USB cable from connector CN3 to a host computer or power supply to power up the board.
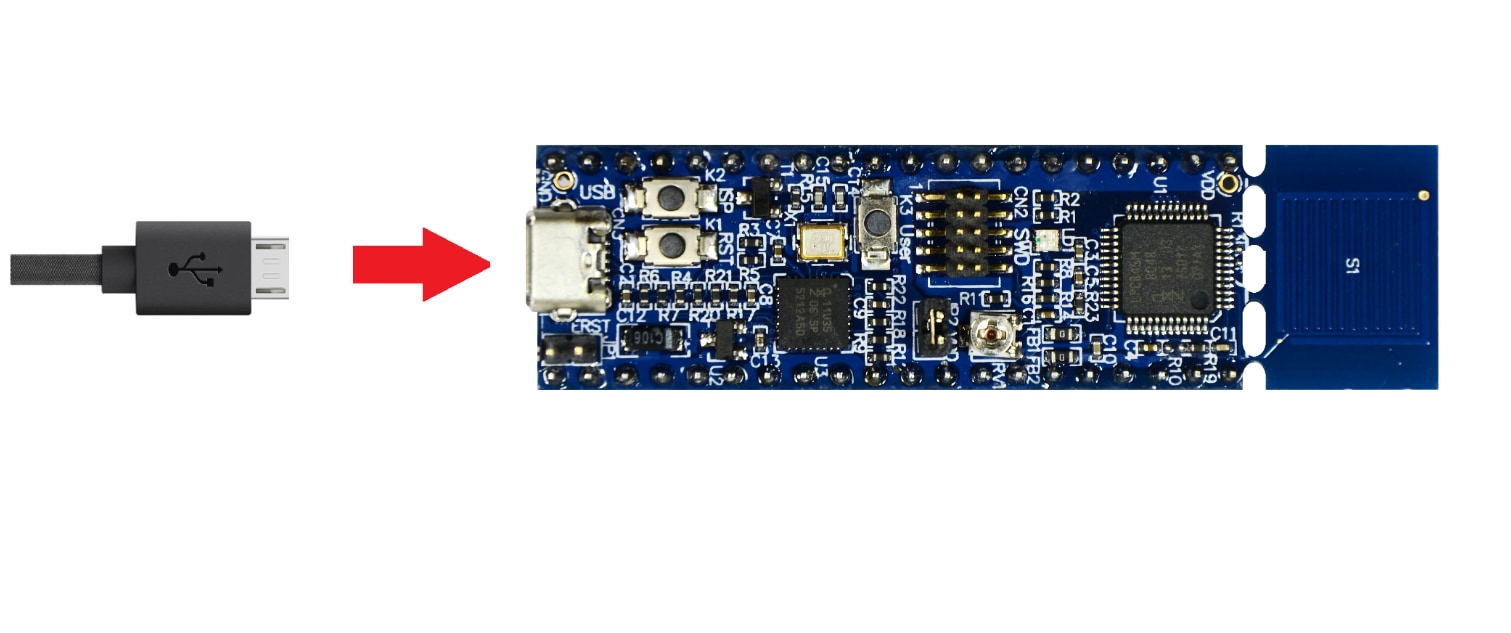
1.2 Run the Out-of-Box Demo
Then the board is first plugged in the host computer may take several seconds to enumerate the VCOM and debug probe for the first time. Once the board powers up, the green LED acts as a "breathing" LED, slowly turning on and off. When the touch pad is pressed the red LED turns on and the green one turns off. Finally, when the user button is pressed the blue LED will turn on for about half a second (the green LED isn’t affected by the User button). The Board will also output some diagnostic messages over the VCOM port (9600 baud, 8 data bits, 1 stop bit - see the next steps for more information on using these applications).
2. Get Software
Installing Software for LPC845 Breakout Board
2.1 Getting Started with the MCUXpresso SDK
The MCUXpresso Software Development Kit (SDK) is complimentary and includes full source code under a permissive open-source license for all hardware abstraction and peripheral driver software.
Click below to download a pre-configured Windows SDK release for the LPC845 MCU (we will be able to use that SDK for our Breakout Board, just with a few modifications), which includes IDE support for MCUXpresso, Keil MDK, Command-line GCC and IAR Embedded Workbench.
 Get MCUXpresso SDK
You can also use the online SDK Builder to create a custom SDK package for the LPC845.
2.2 Install Your Toolchain
NXP offers a complementary, GNU/Eclipse based toolchain called MCUXpresso IDE.
 Get MCUXpresso IDE
Want to use a different toolchain?
Need help choosingNo problem, The MCUXpresso SDK includes support for other tools such as IAR, Keil and command-line GCC.

2.3 MCUXpresso Config Tools
The MCUXpresso Config Tool is an integrated suite of configuration tools that guides users in creating new MCUXpresso SDK projects, and provides pin and clock tools to generate initialization C code for custom board support. It is fully integrated into MCUXpresso or you can download a seperate tool. Click the Get MCUXpresso Config Tools below to get the Config Tools installer.
 Get MCUXpresso Config Tools
To learn more about the basic interactions between the tools while working with either an imported MCUXpresso SDK example project or creating a new project within the IDE, watch this three-part video series.
Check out this document for more information on how to configure pins on this device.
2.4 Serial Terminal
Many of the MCUXpresso SDK examples applications output data over the MCU UART. Install and configure your preferred terminal software to 115200 baud rate, 8 data bits, no parity and 1 stop bit. To determine the port number of theLPC55S06-EVK 's virtual COM port, open the device manager and look under the "Ports" group.
Not sure how to use a terminal application? Try one of these tutorials: Tera Term Tutorial, PuTTY Tutorial.
In the next steps, we will show you how to use the recent versions of MCUXpressor IDE count with a terminal emulation application.
3. Build, Run
3.1 Running a Blinky Example Program
NXP provides an example package with interesting demo applications to take advantage of the peripherals that the board includes. The getting started video provides easy, step-by-step instructions on how to configure, build and debug the LED blinky example.
Use the guide below to learn how to open, build and debug an example application using the MCUXpresso IDE.
Use MCUXpresso IDE
- Build and Flash Cortex-M33 Application
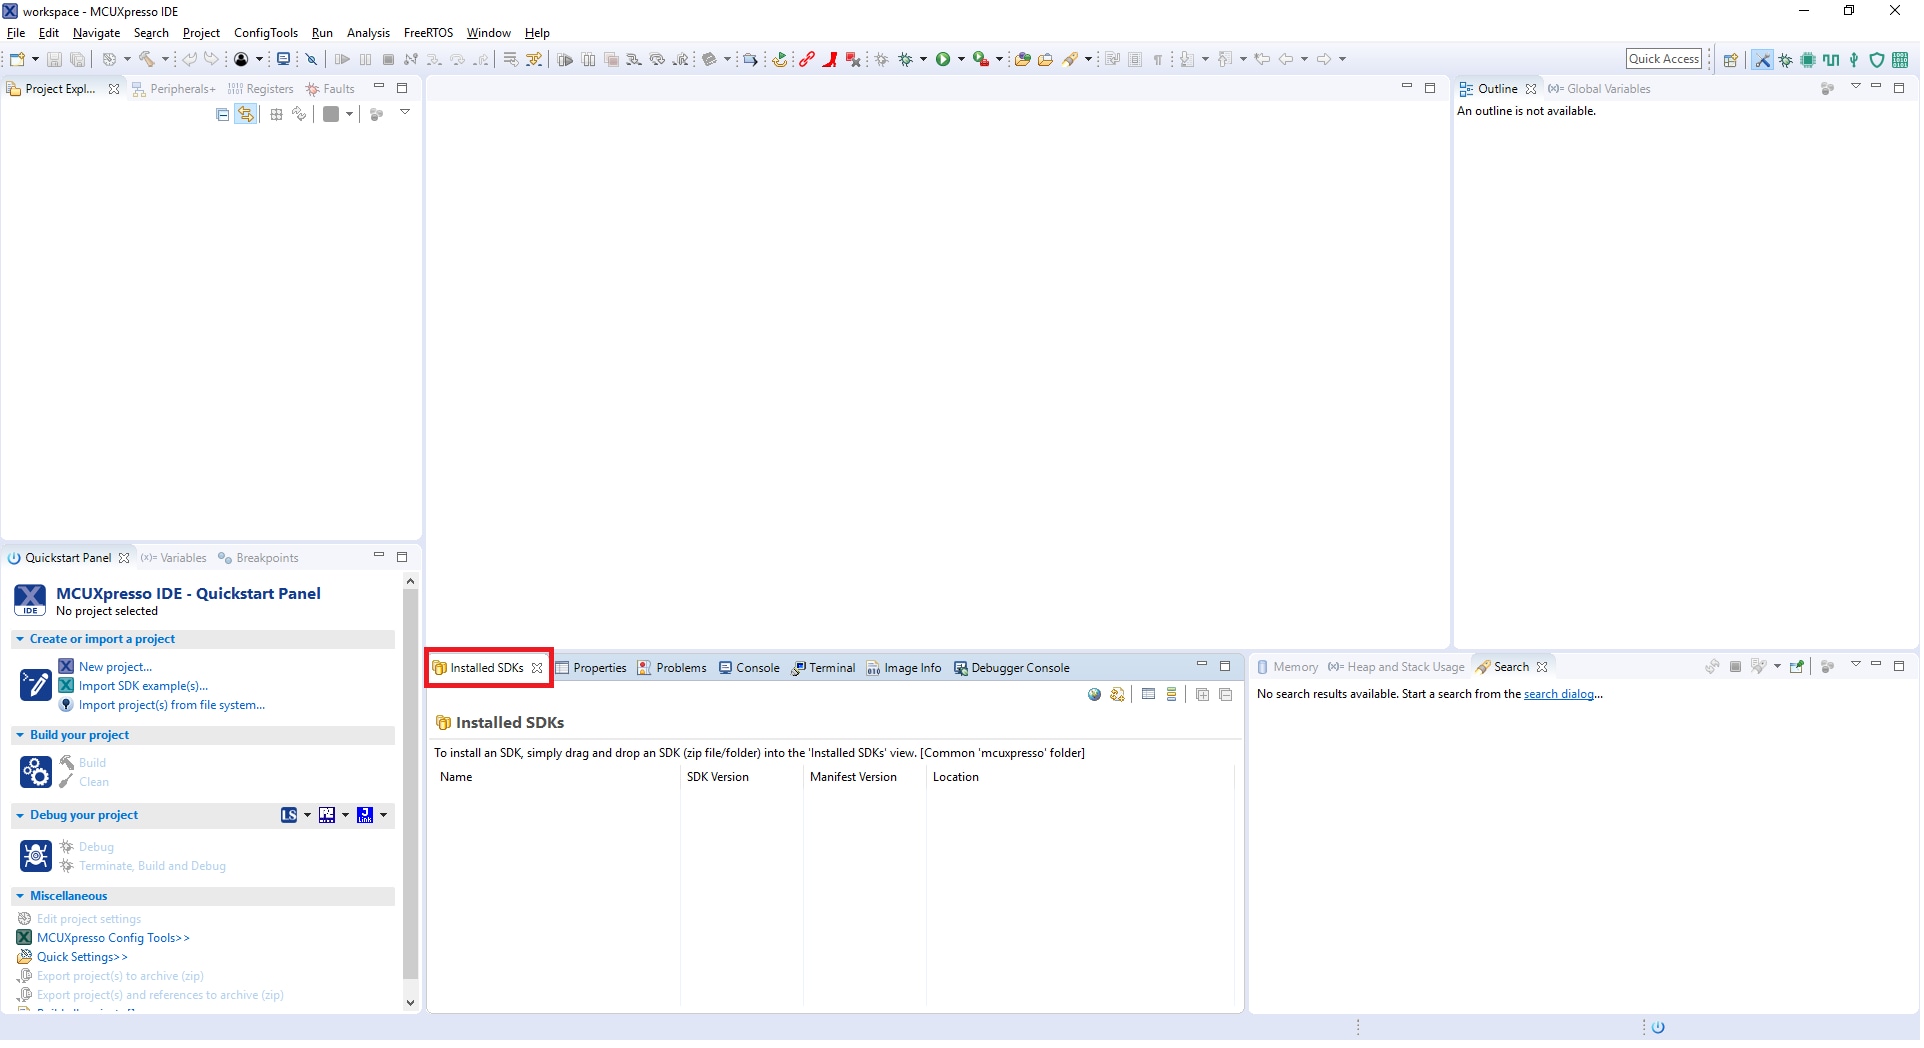
- Open the MCUXpresso IDE
- Switch to the Installed SDKs view within the MCUXpresso IDE window
- Drag and drop the LPC55S36 SDK (zipped) file into the Installed SDKs view
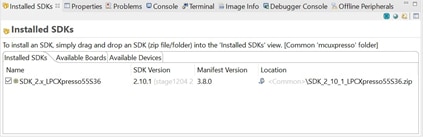
- You will get the following pop-up. Click on OK to continue the import:
- The installed SDK will appear in the Installed SDKs view as shown below:
- Then click on Import SDK example(s)...
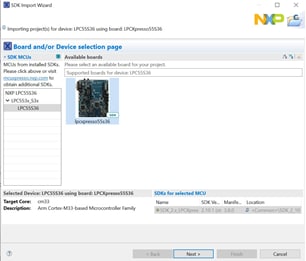
- Click on the LPCXpresso55S36 board to select that you want to import an example that can run on that board, and then click on Next
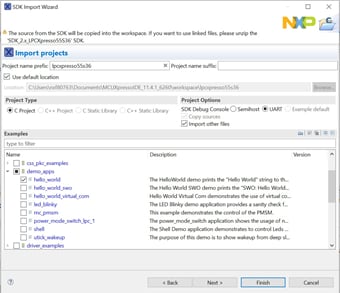
- Use the arrow button to expand the demo_apps category, and then click the checkbox next to hello_world to select that project. To use the UART for printing (instead of the default semihosting), select UART as the SDK Debug Console checkbox under the project options. Then, click on Finish
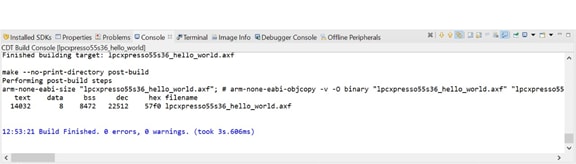
- Select the project and build it
- The project will build without problems
-
Connect the board to your computer with the micro USB to
J40‘LINK USB’ port - Download the application to your LCP55S36
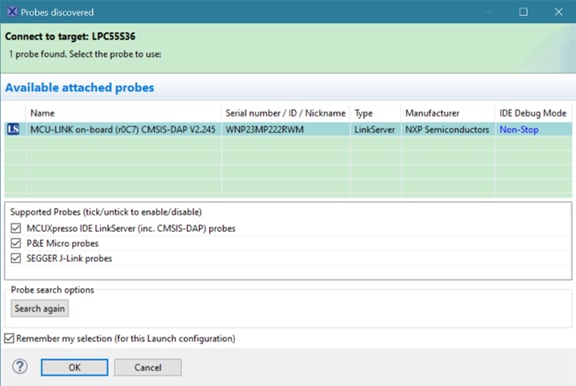
- Select the J-Link debug probe
- Run the application
The following steps will guide you through the hello_world demo application using MCUXpresso IDE for the Cortex-M33 application. The MCUXpresso IDE installation can be found at the section “2. Get Software” of this Getting Started guide.


Using a different toolchain?
This demo is also available for IAR and KEIL.
Use IAR EWARM
- Build an Example Application
- First, unzip the previously downloaded LPC55S36 SDK package
- Open the desired example application workspace. Most example application workspace files can be located using the following path:
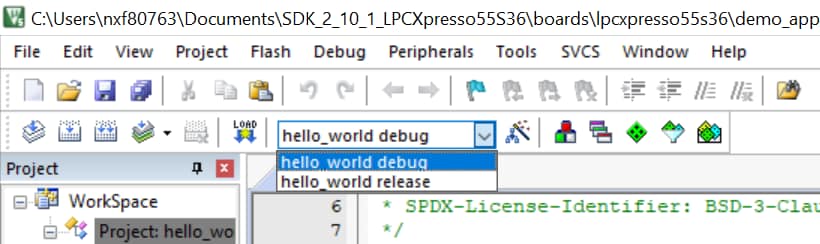
- Select the desired build target from the drop-down. For this example, select the “hello_world – Debug” target
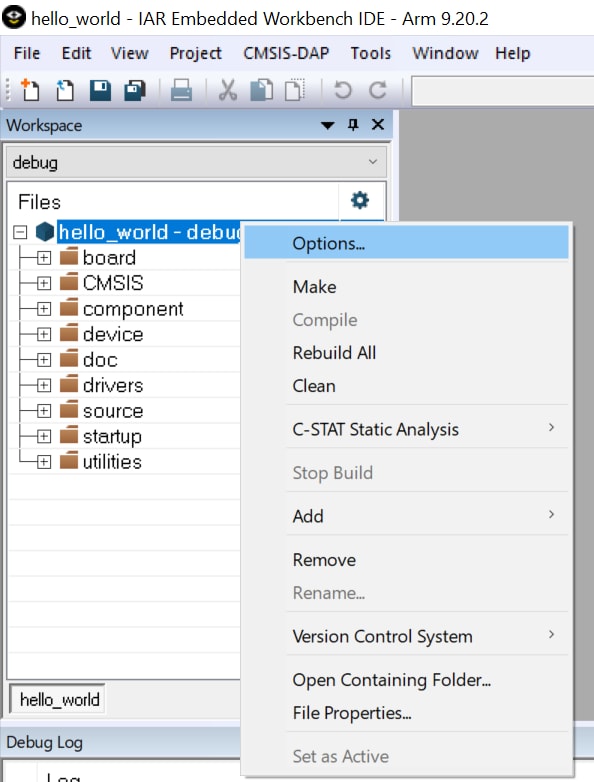
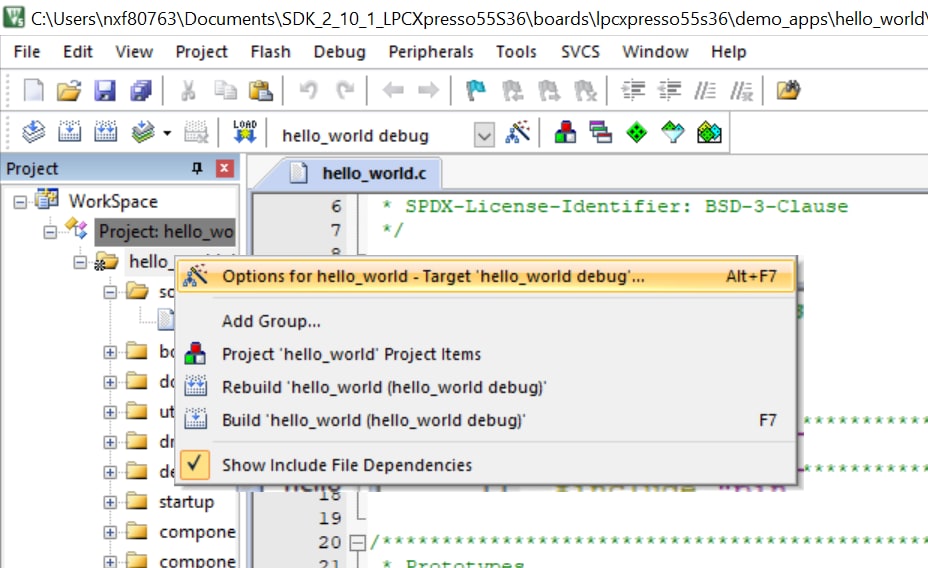
- Open the project properties by doing a right-click on the project and selecting Options
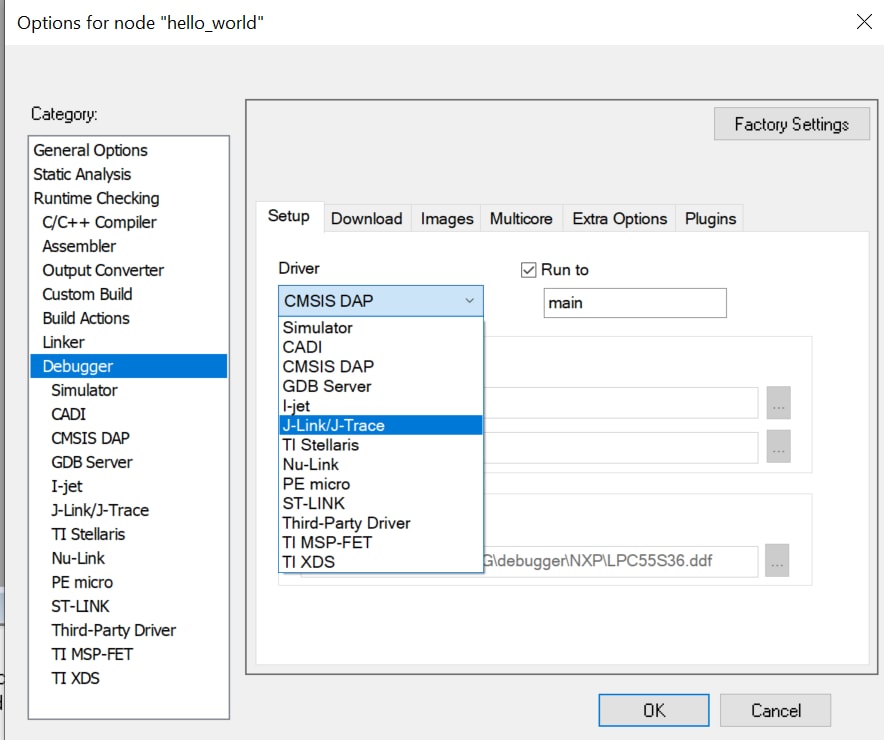
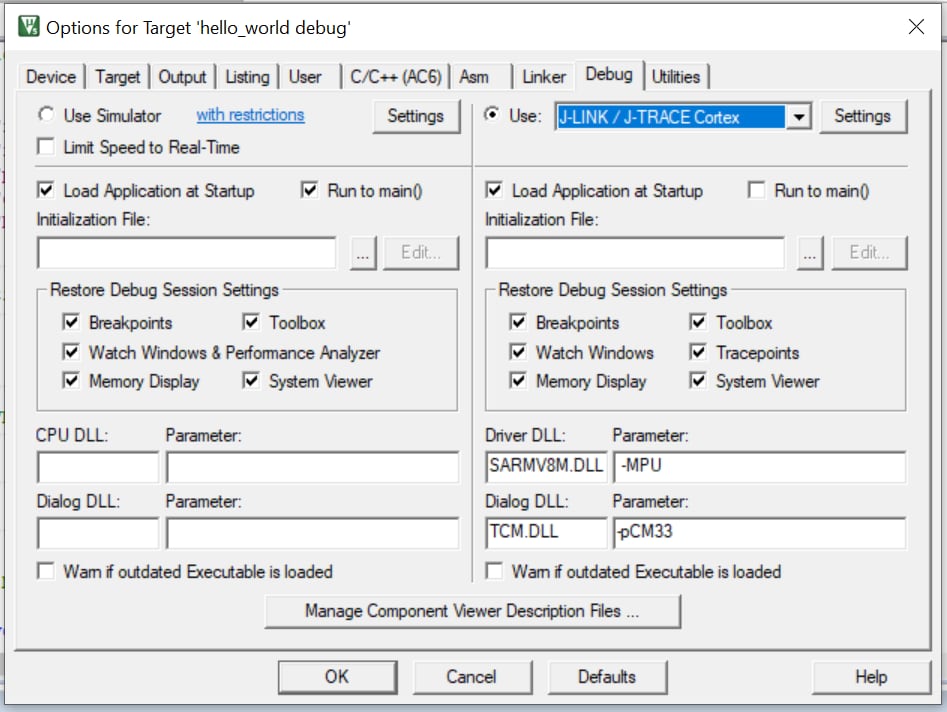
- Now go to the Debugger section and change the debugger driver to Jlink. Press the OK button
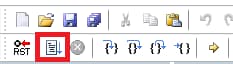
- To build the application, click the “Make” button, highlighted in red below
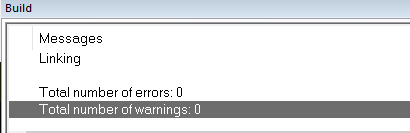
- The build will complete without errors
- Run an Example Application
-
Connect the development platform to your PC via USB cable to
J1“Link USB” - Click the "Download and Debug" button to download the application to the target
- The application is then downloaded to the target and automatically runs to the main() function
- Run the code by clicking the "Go" button to start the application
- The hello_world application is now running on the Cortex-M33
The following steps will guide you through opening the hello_world application. The instructions for compiling and debugging the Cortex M33 core are covered in the instructions below.
Please use IAR Embedded Workbench for Arm version 8.50.9 or above.
<install_dir>/boards/<sdk_board_name>/<example_type>/<application_name>/iar


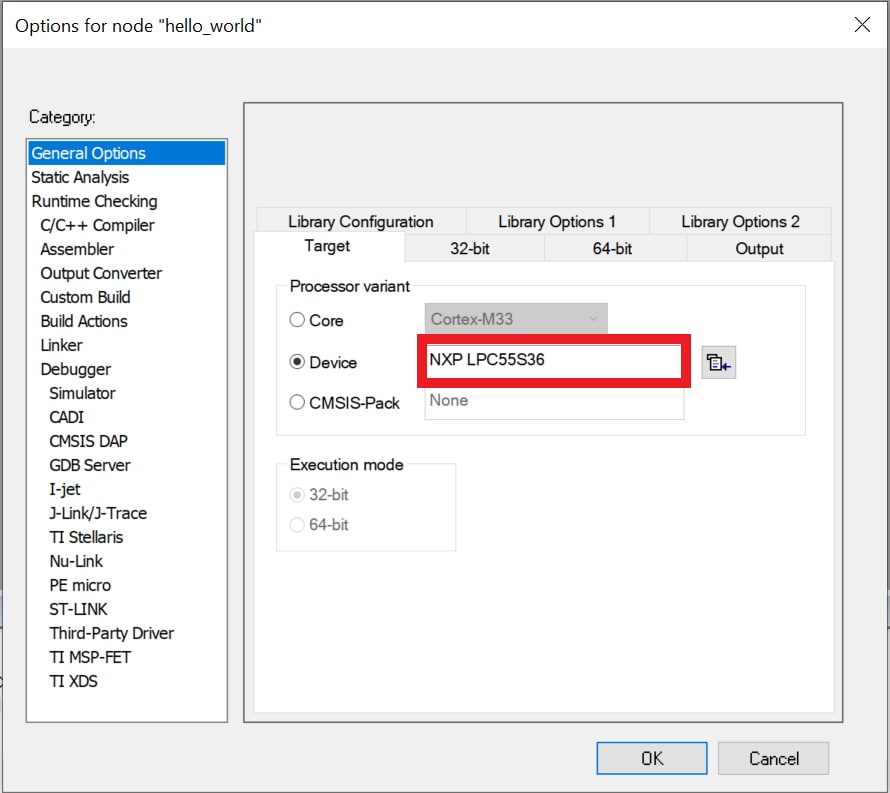
Note: In case of building errors, make sure that the correct Board is selected, right click in the project → Options → General Options → Target → Device, Select the NXP LPC55S36, this board is supported in IAR Embedded Workbench for Arm version 8.50.9 or Higher.
The MCU-LINK circuit on the board should have been updated to use the J-Link interface during Step 1.2 “Install Drivers” of the Getting Started website. See that section of the Getting Started website for more details on using LPCScrypt to update the debug firmware on the board to use the J-Link interface if this has not already been done


Use Keil MDK
- Install CMSIS device pack
- Open the MDK IDE, which is called µVision. Inside the IDE, select the "Pack Installer" icon
- In the Pack Installer window, search for ““LPC55S36” to bring up the LPC55xx family. Click on the LPC55S36 name, and then in the right-hand side you’ll see the NXP:LPC55S36_DFP pack. Click on the “Install” button next to the pack. This process requires an internet connection to successfully complete
- After the installation finishes, close the Pack Installer window and return to the µVision IDE
- Build the Example Application
- If not already done, open the desired demo application workspace in:
- Select debug configuration
- Do right click on the project and select the project options:
- Now, go to the Debug option and select J-LINK. Click on Ok button
- To build the demo project, select the "Rebuild" button, highlighted in red
- The build will complete without errors
- Run an Example Application
-
Connect the development platform to your PC via USB cable to
J1“Debug Link”. Ensure the DFULink jumper (JP6) is removed when powering the board to boot the debug probe from internal flash
- Open the terminal application on the PC (such as PuTTY or Tera Term) and connect to the debug COM port you determined earlier. Configure the terminal with these settings:
- 115200 baud rate
- No parity
- 8 data bits
- 1 stop bit
-
After the application is properly built, click the "Download" button to download the application to the target

-
Click on “Start/Stop Debug Session” to open the debug view

-
Run the code by clicking the "Run" button to start the application
- hello_world application is now running!
After the MDK tools are installed, Cortex® Microcontroller Software Interface Standard (CMSIS) device packs must be installed to fully support the device from a debug perspective. These packs include things such as memory map information, register definitions and flash programming algorithms. Follow these steps to install the appropriate CMSIS pack.
Please use MDK-Arm Microcontroller Development Kit (Keil)® version 5.33 or above.

The following steps will guide you through opening the hello_world application. These steps may change slightly for other example applications as some of these applications may have additional layers of folders in their path.
<install_dir>/boards/<sdk_board_name>/<example_type>/<application_name>/mdk
The workspace file is named <application_name>.uvmpw, so for this specific example, the actual path is:
<SDK_2_10_1_LPCXpresso55S36.zip/boards/lpcxpresso55s36/demo_app/cm33/mdk /hello_word.uvmpw

The LPC55S36 board comes loaded with the CMSIS-DAP debug interface from the factory. If you have changed the debug LPC-LINK2 application on your board, check the LPCScrypt tutorial described in the past section.
Use MCUXpresso IDE
- Build and Flash Cortex-M33 Application
- Open the MCUXpresso IDE
- Switch to the Installed SDKs view within the MCUXpresso IDE window
- Drag and drop the LPC55S36 SDK (zipped) file into the Installed SDKs view
- You will get the following pop-up. Click on OK to continue the import:
- The installed SDK will appear in the Installed SDKs view as shown below:
- Then click on Import SDK example(s)...
- Click on the LPCXpresso55S36 board to select that you want to import an example that can run on that board, and then click on Next
- Use the arrow button to expand the demo_apps category, and then click the checkbox next to hello_world to select that project. To use the UART for printing (instead of the default semihosting), select UART as the SDK Debug Console checkbox under the project options. Then, click on Finish
- Select the project and build it
- The project will build without problems
-
Connect the board to your computer with the micro USB to
J40‘LINK USB’ port - Download the application to your LCP55S36
- Select the J-Link debug probe
- Run the application
The following steps will guide you through the hello_world demo application using MCUXpresso IDE for the Cortex-M33 application. The MCUXpresso IDE installation can be found at the section “2. Get Software” of this Getting Started guide.
Use IAR EWARM
- Build an Example Application
- First, unzip the previously downloaded LPC55S36 SDK package
- Open the desired example application workspace. Most example application workspace files can be located using the following path:
- Select the desired build target from the drop-down. For this example, select the “hello_world – Debug” target
- Open the project properties by doing a right-click on the project and selecting Options
- Now go to the Debugger section and change the debugger driver to Jlink. Press the OK button
- To build the application, click the “Make” button, highlighted in red below
- The build will complete without errors
- Run an Example Application
-
Connect the development platform to your PC via USB cable to
J1“Link USB” - Click the "Download and Debug" button to download the application to the target
- The application is then downloaded to the target and automatically runs to the main() function
- Run the code by clicking the "Go" button to start the application
- The hello_world application is now running on the Cortex-M33
The following steps will guide you through opening the hello_world application. The instructions for compiling and debugging the Cortex M33 core are covered in the instructions below.
Please use IAR Embedded Workbench for Arm version 8.50.9 or above.
<install_dir>/boards/<sdk_board_name>/<example_type>/<application_name>/iar
Note: In case of building errors, make sure that the correct Board is selected, right click in the project → Options → General Options → Target → Device, Select the NXP LPC55S36, this board is supported in IAR Embedded Workbench for Arm version 8.50.9 or Higher.
The MCU-LINK circuit on the board should have been updated to use the J-Link interface during Step 1.2 “Install Drivers” of the Getting Started website. See that section of the Getting Started website for more details on using LPCScrypt to update the debug firmware on the board to use the J-Link interface if this has not already been done
Use Keil MDK
- Install CMSIS device pack
- Open the MDK IDE, which is called µVision. Inside the IDE, select the "Pack Installer" icon
- In the Pack Installer window, search for ““LPC55S36” to bring up the LPC55xx family. Click on the LPC55S36 name, and then in the right-hand side you’ll see the NXP:LPC55S36_DFP pack. Click on the “Install” button next to the pack. This process requires an internet connection to successfully complete
- After the installation finishes, close the Pack Installer window and return to the µVision IDE
- Build the Example Application
- If not already done, open the desired demo application workspace in:
- Select debug configuration
- Do right click on the project and select the project options:
- Now, go to the Debug option and select J-LINK. Click on Ok button
- To build the demo project, select the "Rebuild" button, highlighted in red
- The build will complete without errors
- Run an Example Application
-
Connect the development platform to your PC via USB cable to
J1“Debug Link”. Ensure the DFULink jumper (JP6) is removed when powering the board to boot the debug probe from internal flash
- Open the terminal application on the PC (such as PuTTY or Tera Term) and connect to the debug COM port you determined earlier. Configure the terminal with these settings:
- 115200 baud rate
- No parity
- 8 data bits
- 1 stop bit
-
After the application is properly built, click the "Download" button to download the application to the target
-
Click on “Start/Stop Debug Session” to open the debug view
-
Run the code by clicking the "Run" button to start the application
- hello_world application is now running!
After the MDK tools are installed, Cortex® Microcontroller Software Interface Standard (CMSIS) device packs must be installed to fully support the device from a debug perspective. These packs include things such as memory map information, register definitions and flash programming algorithms. Follow these steps to install the appropriate CMSIS pack.
Please use MDK-Arm Microcontroller Development Kit (Keil)® version 5.33 or above.
The following steps will guide you through opening the hello_world application. These steps may change slightly for other example applications as some of these applications may have additional layers of folders in their path.
<install_dir>/boards/<sdk_board_name>/<example_type>/<application_name>/mdk
The workspace file is named <application_name>.uvmpw, so for this specific example, the actual path is:
<SDK_2_10_1_LPCXpresso55S36.zip/boards/lpcxpresso55s36/demo_app/cm33/mdk /hello_word.uvmpw
The LPC55S36 board comes loaded with the CMSIS-DAP debug interface from the factory. If you have changed the debug LPC-LINK2 application on your board, check the LPCScrypt tutorial described in the past section.
4.Modify an SDK Example
4.1 Clone an Example Project from MCUXpresso SDK
Option A: Use the MCUXpresso IDE to clone an example project.
Use MCUXpresso IDE
- Build an Example Application
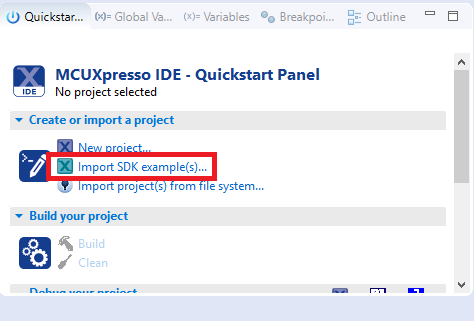
- Find the Quickstart Panel in the lower left-hand corner
- Then click on Import SDK examples(s)…
- Click on the LPCXpresso55s36 board to select that you want to import an example that can run on that board, and then click on Next
- Use the arrow button to expand the driver_examples category, then expand the sctimer examples, click on the checkbox next to sctimer_pwm_with_dutycycle_change to select it. To use the UART for printing (instead of the default semihosting), Select UART as the SDK Debug Console checkbox under the project options. Then, click on Finish
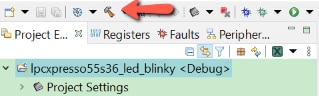
- Click on the “lpcxpresso55s36_led_blinky” project in the Project Explorer View and build, compile, and run the demo as described previously
-
You should see the RED LED blinking
Note: On “Use Pin Tool” tutorial you will learn how to change the LED output pin of the board.
- Terminate the debug session
The following steps will guide you through the manipulation of the general-purpose outputs. The example sets up a led_blinky, which blinks the RED LED periodically.


Use MCUXpresso IDE
- Build an Example Application
- Find the Quickstart Panel in the lower left-hand corner
- Then click on Import SDK examples(s)…
- Click on the LPCXpresso55s36 board to select that you want to import an example that can run on that board, and then click on Next
- Use the arrow button to expand the driver_examples category, then expand the sctimer examples, click on the checkbox next to sctimer_pwm_with_dutycycle_change to select it. To use the UART for printing (instead of the default semihosting), Select UART as the SDK Debug Console checkbox under the project options. Then, click on Finish
- Click on the “lpcxpresso55s36_led_blinky” project in the Project Explorer View and build, compile, and run the demo as described previously
-
You should see the RED LED blinking
Note: On “Use Pin Tool” tutorial you will learn how to change the LED output pin of the board.
- Terminate the debug session
The following steps will guide you through the manipulation of the general-purpose outputs. The example sets up a led_blinky, which blinks the RED LED periodically.
Option B: Use the MCUXpresso Config Tool to clone an existing MCUXpresso SDK example for use with third-party IDEs.
Use MCUXpresso Config Tool
- Open the MCUXpresso Config Tool
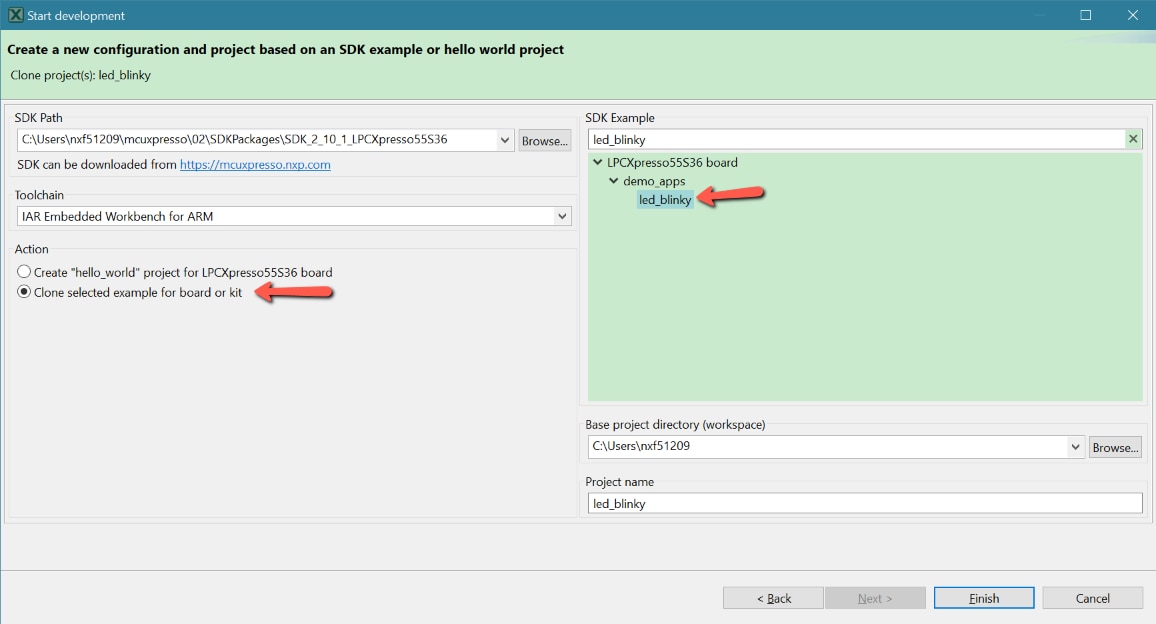
- In the wizard that comes up, select the “Create a new configuration based on an SDK example or hello word project” radio button and click on Next
- On the next screen, select the location of the MCUXpresso SDK that you had unzipped earlier. Then select the IDE that is being used. Note that only IDEs that were selected in the online SDK builder when the SDK was built will be available and click on clone select example
- After cloning go to the directory you selected and open the project for your IDE. Import, compile and run the project as done in previous sections
-
You should see the RED LED blinking
Note: On “Use Pin Tool” tutorial you will learn how to change the LED output pin of the board.
- Terminate the debug session

Then select the project to clone. For this example, we want to use the gpio led output project. You can filter for this by typing “led_blinky” in the filter box and then selecting the “led_blinky” example project. You can then also specify where to clone the project and the name. Then click on Finish
Use MCUXpresso Config Tool
- Open the MCUXpresso Config Tool
- In the wizard that comes up, select the “Create a new configuration based on an SDK example or hello word project” radio button and click on Next
- On the next screen, select the location of the MCUXpresso SDK that you had unzipped earlier. Then select the IDE that is being used. Note that only IDEs that were selected in the online SDK builder when the SDK was built will be available and click on clone select example
- After cloning go to the directory you selected and open the project for your IDE. Import, compile and run the project as done in previous sections
-
You should see the RED LED blinking
Note: On “Use Pin Tool” tutorial you will learn how to change the LED output pin of the board.
- Terminate the debug session
Then select the project to clone. For this example, we want to use the gpio led output project. You can filter for this by typing “led_blinky” in the filter box and then selecting the “led_blinky” example project. You can then also specify where to clone the project and the name. Then click on Finish
4.2 Apply Board Support Configuration
NXP provides a leader .mex file configuration that includes the initialization of the peripherals that show in the package (SPI, I2C, UART, ADC, etc), Could take advantages of this and apply this configuration to an SDK project to run it in the LPC845 Breakout Board.
This example is a good oportunitie to use the MCUXpresso Terminal application, see how to configure in the tutorial below.
MCUXPRESSO TERMINAL
MCUXpresso IDE Terminal Tutorial
The most recent versions of MCUXpresso IDE count with a terminal emulation application. This tool can be used to display information sent from your NXP development platform's virtual serial port.
- Open the MCUXpresso IDE
- Launch the MCUXpresso IDE terminal by clicking on the “Open a Terminal” button on the top of the IDE or press “Ctrl + Alt + Shift + T.”
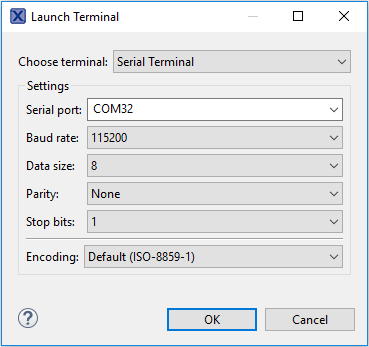
- Select Serial Terminal
- Configure the serial port settings (using the LPCXpresso COM port number) to 115200 baud rate, 8 data bits, no parity and 1 stop bit, then press “OK” button.
- Verify that the connection is open. If connected, MCUXpresso IDE will look like the figure below at the Terminal view.
- You're ready to go


MCUXPRESSO TERMINAL
MCUXpresso IDE Terminal Tutorial
The most recent versions of MCUXpresso IDE count with a terminal emulation application. This tool can be used to display information sent from your NXP development platform's virtual serial port.
- Open the MCUXpresso IDE
- Launch the MCUXpresso IDE terminal by clicking on the “Open a Terminal” button on the top of the IDE or press “Ctrl + Alt + Shift + T.”
- Select Serial Terminal
- Configure the serial port settings (using the LPCXpresso COM port number) to 115200 baud rate, 8 data bits, no parity and 1 stop bit, then press “OK” button.
- Verify that the connection is open. If connected, MCUXpresso IDE will look like the figure below at the Terminal view.
- You're ready to go
Option A: Use MCUXpresso IDE to apply a customized board configuration, build and debug an existing project.
Use MCUXpresso IDE
Apply Board Support Configuration to an Existing Example Project
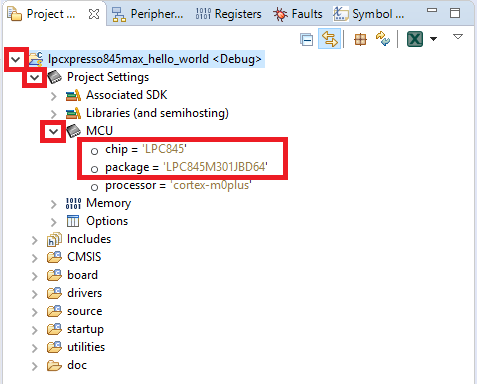
1. Convert IDE project to correct Package (Note, the IDE doesn’t really care, this just helps avoid other conflicts).
- Expand lpcxpresso845max_hello_world >> Project Setting >> MCU, note chip a package values.
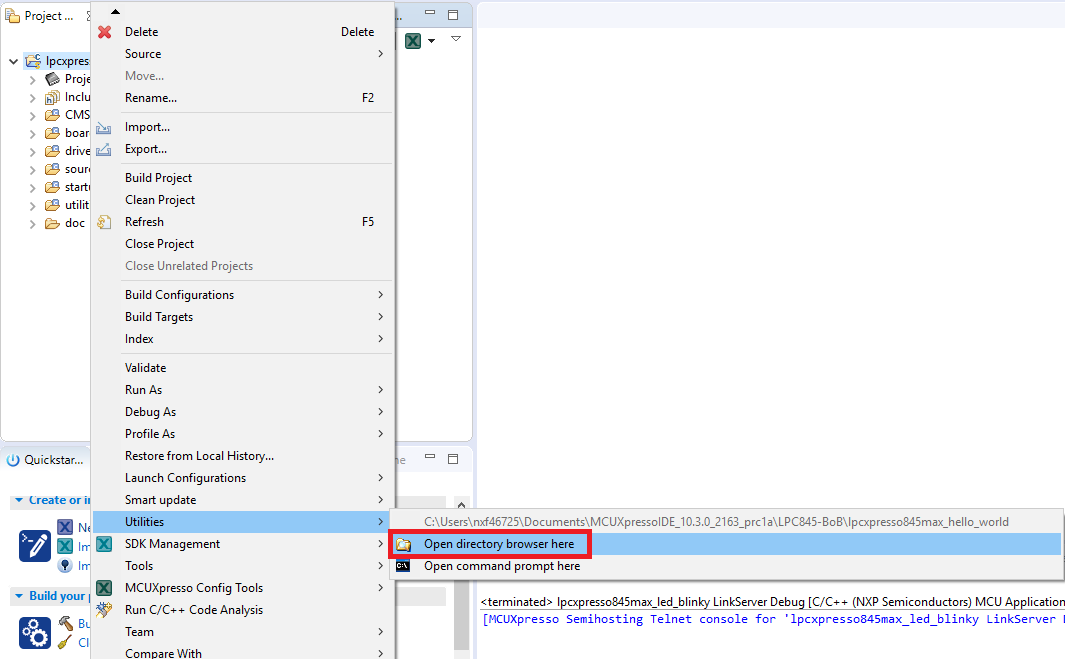
- Right-click “lpcxpresso845max_hello_world” project and select Utilities >> Open directory browser here.
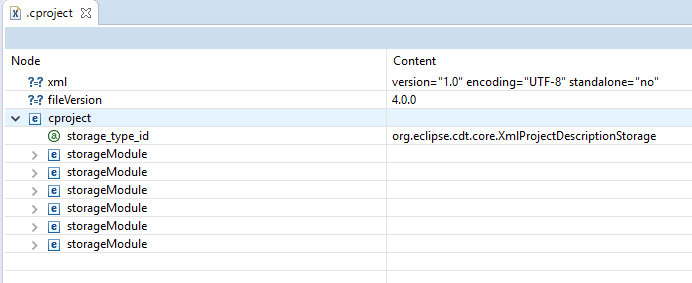
- Drag-and-Drop. cproject file into the IDE text editor (to use the build-in XML editor)
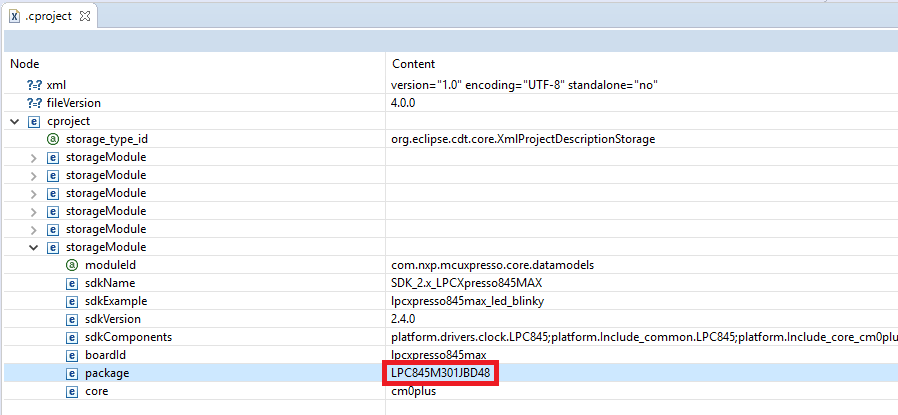
- Locate the package variable (should be in the “storageModule” from the bottom but if is not there search in all the others storageModule).
- Edit package to: LPC845M301JBD48 and save the .cproject file
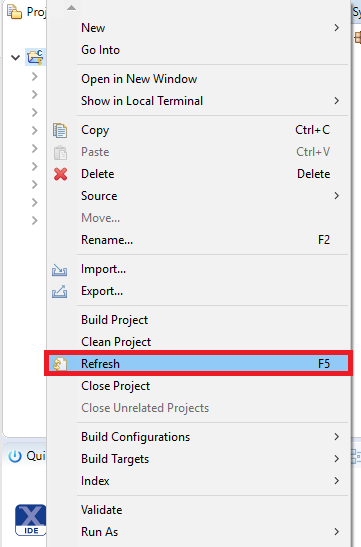
- Right-click “lpcxpesso845max_hello_world” project and select refresh (F5).

2. Convert the SDK drivers to use the correct header declarations.
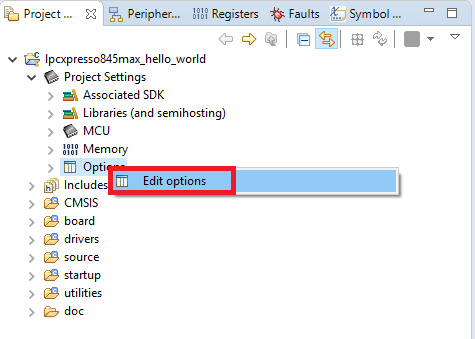
- Expand lpcxpresso835max_hello_world >> Project Settings >> Options. Right-click in Options and select “Edit Options.
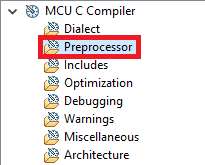
- Select MCU C Compiler >> Preprocessor Folder.
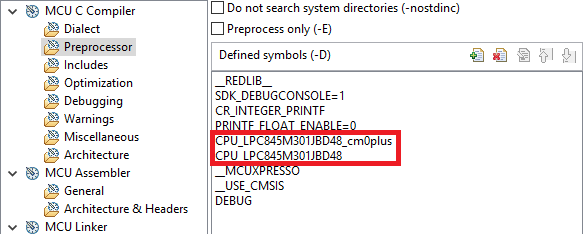
- Change both instances of LPC845M301JBD64 to LPC845M301JBD48.
- Click on “Apply and Close”
3. Enable Config Tools and apply the previously create configuration to this new project.
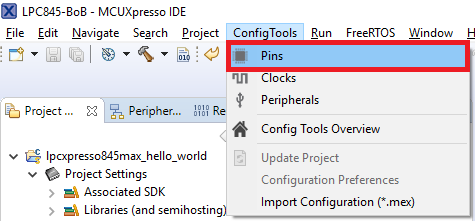
- Use the project Explore menu bar to launch Config Tools and Open Pins.
- Ensure the correct project is from the drop-down menu in the tool bar.
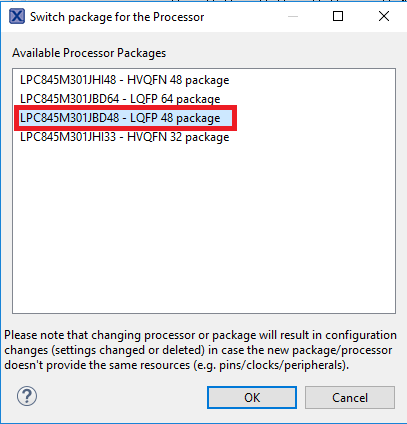
- Click on the Switch Package button is on the toolbar in the top right corner of the package window.
- In the Pop-up Window Select LPC845M301JBD48- LQFP 48 package and click on OK.
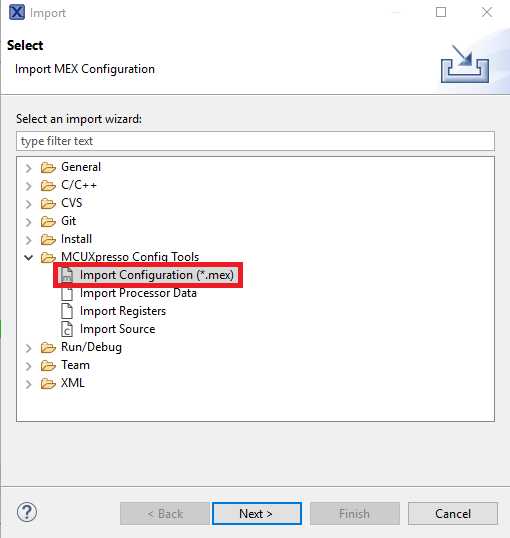
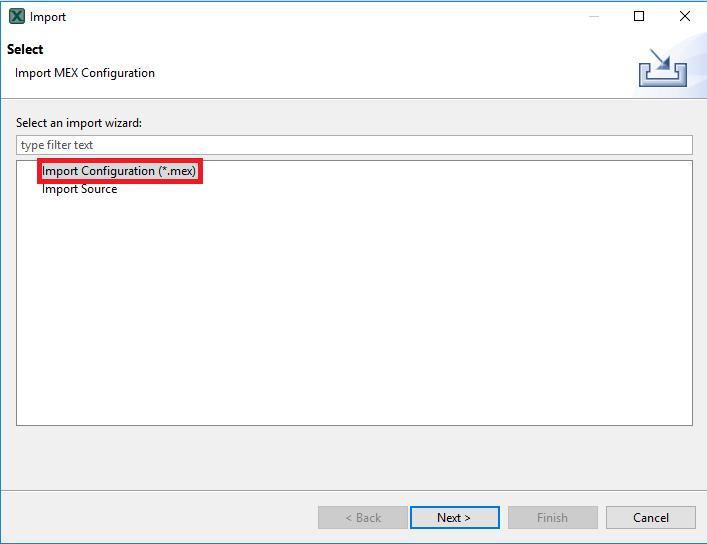
- Now we are going to import the .mex file that we download before. Go to File >> Import.
- Inside the MCUXpresso Config Tools Folder Select “Import Configuration(*.mex)” and click on Next.
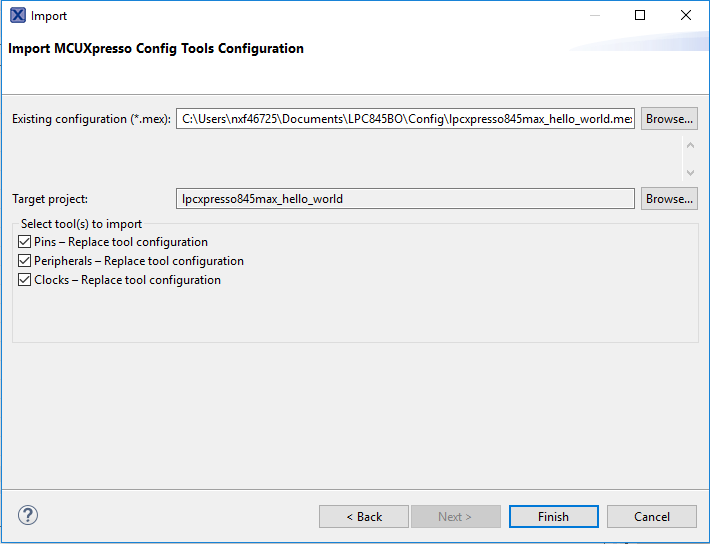
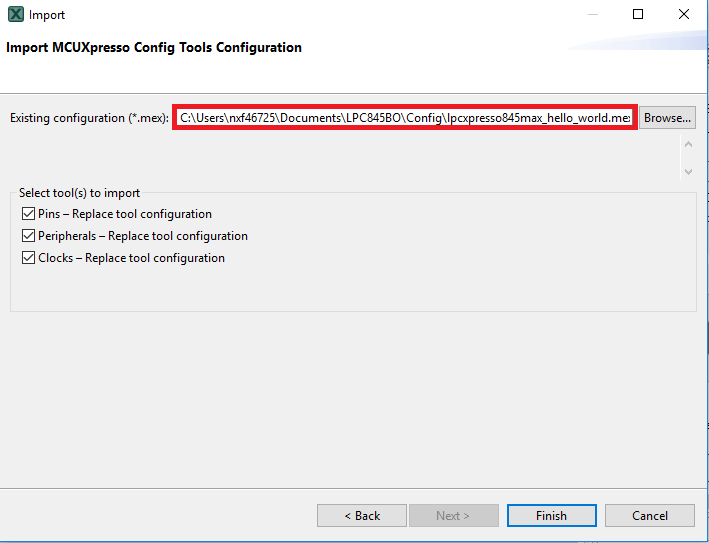
- Select the. mex file downloaded previously as the Existing configuration, and the name of the current project as Target Project and click on Finish
- Observe the pins that are activated and notice that the configuration is the same as in the previous case. Open the Clock Tool to see that the System clock has also been update to 30 MHz.
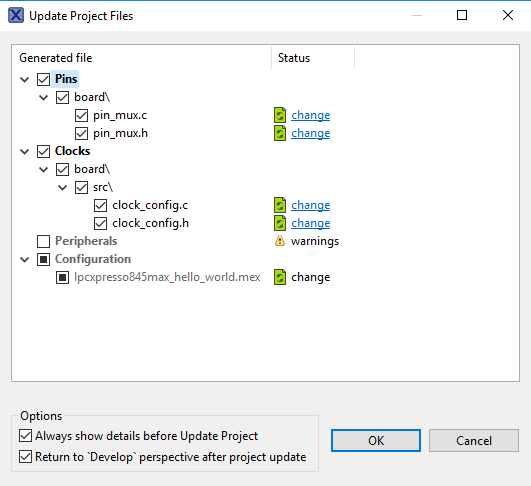
- Now it’s time to implement these changes into the GPIO project by exporting the new updated pin_mux.c and pin_mux.h files that are generated by the Pins tool. Click on Update Project in the menu bar.
- The screen that pops up will show the files that are changing, and you can click on “diff” to see the difference between the current file and the new file generated by the Pins tool. Click on “OK” to overwrite the new files into your project.
- Now inside the IDE, open the hello_world.c file.
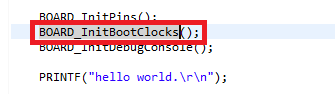
- Replace the BOARD_BootClockFRO30M function for BOARD_InitBootClocks.
-
Open a terminal program and connect to the COM port the board enumerated as. Configure the terminal with these settings:
- 115200 baud rate
- No parity
- 8 data bits
- 1 stop bit
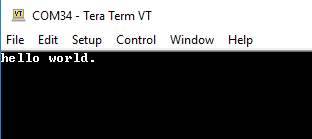
- Build and Run the application like in the previous step. The hello_world application is now running, and a banner is displayed on the terminal. If this is not the case, check your terminal settings and connections.
- Terminate the debug session.


Use MCUXpresso Config Tool
Apply Board Support Configuration to an Existing Example Project
1. Convert IDE project to correct Package (Note, the IDE doesn’t really care, this just helps avoid other conflicts).
- Expand lpcxpresso845max_hello_world >> Project Setting >> MCU, note chip a package values.
- Right-click “lpcxpresso845max_hello_world” project and select Utilities >> Open directory browser here.
- Drag-and-Drop. cproject file into the IDE text editor (to use the build-in XML editor)
- Locate the package variable (should be in the “storageModule” from the bottom but if is not there search in all the others storageModule).
- Edit package to: LPC845M301JBD48 and save the .cproject file
- Right-click “lpcxpesso845max_hello_world” project and select refresh (F5).
2. Convert the SDK drivers to use the correct header declarations.
- Expand lpcxpresso835max_hello_world >> Project Settings >> Options. Right-click in Options and select “Edit Options.
- Select MCU C Compiler >> Preprocessor Folder.
- Change both instances of LPC845M301JBD64 to LPC845M301JBD48.
- Click on “Apply and Close”
3. Enable Config Tools and apply the previously create configuration to this new project.
- Use the project Explore menu bar to launch Config Tools and Open Pins.
- Ensure the correct project is from the drop-down menu in the tool bar.
- Click on the Switch Package button is on the toolbar in the top right corner of the package window.
- In the Pop-up Window Select LPC845M301JBD48- LQFP 48 package and click on OK.
- Now we are going to import the .mex file that we download before. Go to File >> Import.
- Inside the MCUXpresso Config Tools Folder Select “Import Configuration(*.mex)” and click on Next.
- Select the. mex file downloaded previously as the Existing configuration, and the name of the current project as Target Project and click on Finish
- Observe the pins that are activated and notice that the configuration is the same as in the previous case. Open the Clock Tool to see that the System clock has also been update to 30 MHz.
- Now it’s time to implement these changes into the GPIO project by exporting the new updated pin_mux.c and pin_mux.h files that are generated by the Pins tool. Click on Update Project in the menu bar.
- The screen that pops up will show the files that are changing, and you can click on “diff” to see the difference between the current file and the new file generated by the Pins tool. Click on “OK” to overwrite the new files into your project.
- Now inside the IDE, open the hello_world.c file.
- Replace the BOARD_BootClockFRO30M function for BOARD_InitBootClocks.
-
Open a terminal program and connect to the COM port the board enumerated as. Configure the terminal with these settings:
- 115200 baud rate
- No parity
- 8 data bits
- 1 stop bit
- Build and Run the application like in the previous step. The hello_world application is now running, and a banner is displayed on the terminal. If this is not the case, check your terminal settings and connections.
- Terminate the debug session.
Option B: Use MCUXpresso Config tool to apply a customized board configuration, build and debug an existing project.
Use MCUXpresso Config Tool
- Open the MCUXpresso Config Tool
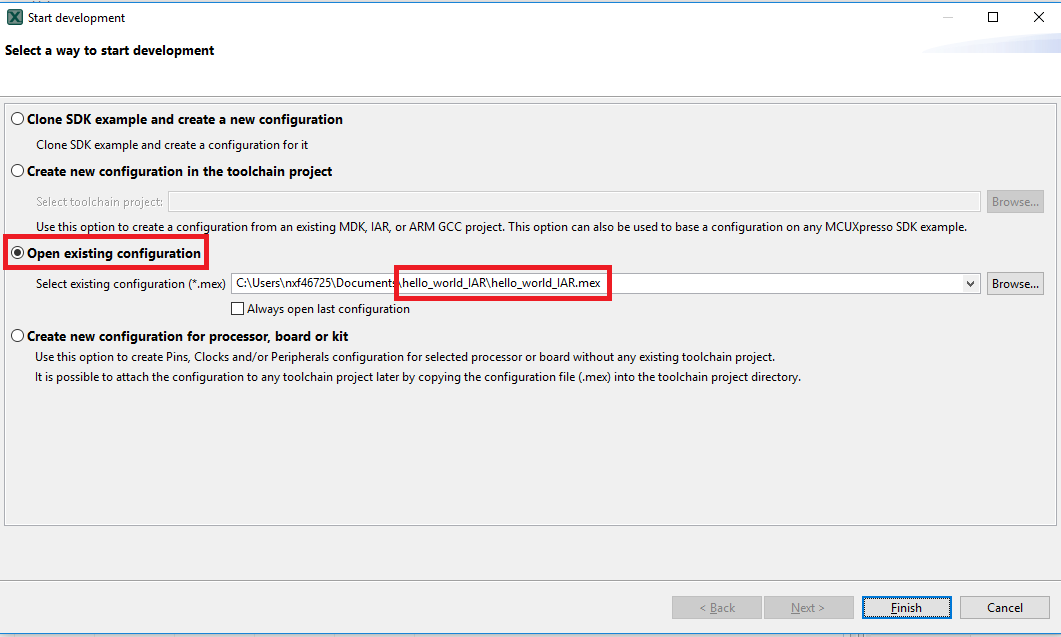
- In the wizard that comes up, select the “Open existing configuration” radio button, then select the project that you had clone and click on Next. *Note: Previously, you had to clone a SDK project like in the past step, in case that you didn’t had, choose the option Clone SDK example and create a new configuration.
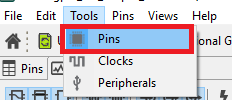
- Open the pins tool by selecting Tools->Pins from the toolbar
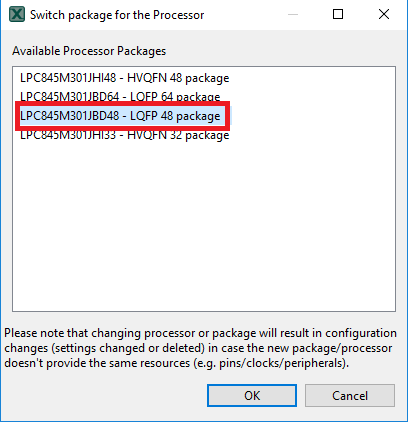
- Click on the Switch Package button is on the toolbar in the top right corner of the package window.
- In the Pop-up Window Select LPC845M301JBD48- LQFP 48 package and click on OK.
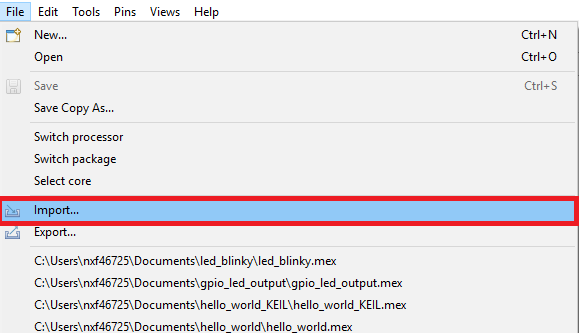
- Now we are going to import the .mex file downloaded in the past step. Go to File >> Import.
- Select “Import Configuration(*.mex)” and click on Next.
- Select the .mex file downloaded previously as the Existing configuration and click on Finish.
- Observe the pins that are activated and notice that the configuration is the same as in the previous case. Open the Clock Tool to see that the System clock has also been update to 30 MHz
- Now it’s time to implement these changes into the GPIO project by exporting the new updated pin_mux.c and pin_mux.h files that are generated by the Pins tool. Click on Update Project in the menu bar.
- The screen that pops up will show the files that are changing, and you can click on “diff” to see the difference between the current file and the new file generated by the Pins tool. Click on “OK” to overwrite the new files into your project.
- Now open the project, build and run like in the previous section.


Use MCUXpresso Config Tool
- Open the MCUXpresso Config Tool
- In the wizard that comes up, select the “Open existing configuration” radio button, then select the project that you had clone and click on Next. *Note: Previously, you had to clone a SDK project like in the past step, in case that you didn’t had, choose the option Clone SDK example and create a new configuration.
- Open the pins tool by selecting Tools->Pins from the toolbar
- Click on the Switch Package button is on the toolbar in the top right corner of the package window.
- In the Pop-up Window Select LPC845M301JBD48- LQFP 48 package and click on OK.
- Now we are going to import the .mex file downloaded in the past step. Go to File >> Import.
- Select “Import Configuration(*.mex)” and click on Next.
- Select the .mex file downloaded previously as the Existing configuration and click on Finish.
- Observe the pins that are activated and notice that the configuration is the same as in the previous case. Open the Clock Tool to see that the System clock has also been update to 30 MHz
- Now it’s time to implement these changes into the GPIO project by exporting the new updated pin_mux.c and pin_mux.h files that are generated by the Pins tool. Click on Update Project in the menu bar.
- The screen that pops up will show the files that are changing, and you can click on “diff” to see the difference between the current file and the new file generated by the Pins tool. Click on “OK” to overwrite the new files into your project.
- Now open the project, build and run like in the previous section.
Touch and Sensing
Touch and Sensing
NXP provides software libraries and tools to complement our IEC 61000-4-6 certified and low-cost capacitive touch solutions for the LPC8xx MCUs, empowering you to move rapidly and smoothly from initial prototyping to full product development.
| Document | Description |
|---|---|
| AN12178 A Simple Way of Using CapTouch on LPC800 MCUs | Using the CapTouch module on LPCxx MCUs to support the low-cost and hardware resource-limited platform. |
| AN12083 Capacitive Touch software and sensitivity test results on LPC800 CAPTouch Module | Software enables the Capacitive Touch application on the LPC8xx family, with filters and algorithms for the touch key detection. Tests illustrate the sensitivity performance of the Capacitive Touch application. |
| Capacitive Touch Sensor Design | How to design the Capacitive Touch Sensor for the LPC845 Cap Touch Interface. |
MCUXpresso SDK Example
Several examples, demos and drivers are available within the SDK to help you get started. A common example related to touch sensing is listed below.
- Touch Examples
-
The LPC845_BoB_CAPTocuh application shows how to interface with the on-board cap touch button using SDK drivers.
-
Path:
<SDK_PATH>/boards/lpc845breakout/touch_examples
Display and Graphics
Display and Graphics
| Document | Description |
|---|---|
| OLED Display Application Example using LPC845 Breakout Board and SPI | How to use the LPC845BRK with an OLED display based on the SSD1306 controller and using SDK drivers for SPI. |
Motor Control
Motor Control
Motor control is a complicated and advanced topic, with a wide range of intricacies and pitfalls that depend on the number of motors, motor type and sensored or sensorless motor drivers.
NXP has a number of ready-to-use motor control algorithms (middleware), and the best way to get started is with the FreeMaster examples included in the MCUXpresso SDK. These examples utilize the FreeMASTER Run-Time Debugging Tool, a user-friendly real-time debug monitor and data visualization tool that enables runtime configuration and tuning of embedded software applications.
FreeMASTER supports non-intrusive monitoring of variables on a running system and can display multiple variables on oscilloscope-like displays as standard widgets (gauges, sliders and more) or as data in text form, offering simple-to-use data recorders. It can link with HTML, MATLAB® or Excel to other scriptable frameworks or even popular visual programming tools like Node-RED.
| Document | Description |
|---|---|
| FreeMASTER How To | A starting guide for engineers using FreeMASTER tool. |
| FreeMASTER 3.0 Installation Guide | This article will walk you through the installation process of FreeMASTER 3.0. |
| FreeMASTER Four-Part Webinar Series | On-demand training provides an overview of the FreeMASTER software, its features, capabilities, available examples, application use cases and how to easily get started. |
MCUXpresso SDK Examples
Several examples, demos and drivers are available within the SDK to help you get started. Some common examples related to motor control are listed below.
- Driver Examples
-
Multiple PWM outputs are demonstrated through Sctimer and Ctimer.
Path:
<SDK_PATH>/boards/lpc845breakout/driver_examples_ctimerPath:
<SDK_PATH>/boards/lpc845breakout/driver_examples_sctimer - FreeMASTER Examples
-
Watch variables and graphs over various interface options.
Path:
<SDK_PATH>/boards/lpc845breakout/freemaster_examples
Device Management and Secure OTA
Device Management and Secure OTA
| Document | Description |
|---|---|
| AN12393 LPC845 I2C Secondary Bootloader | This document discusses the system setup where the host processor can program the LPC845 via I2C interface assisted by the SBL code. |
| AN12407 LPC845 SPI Secondary Bootloader | This document discusses the system setup where the host processor can program the LPC845 via SPI interface assisted by the SBL code. |
PuTTY Tutorial
PuTTY Tutorial
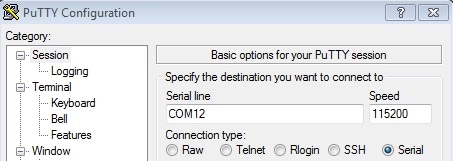
PuTTY is a popular terminal emulation application. This program can be used to display information sent from your NXP development platform's virtual serial port.
- Download PuTTY using the button below. After the download, run the installer and then return to this webpage to continue.
- Launch PuTTY by either double clicking on the *.exe file you downloaded or from the Start menu, depending on the type of download you selected.
- Configure In the window that launches, select the Serial radio button and enter the COM port number that you determined earlier. Also enter the baud rate, in this case 115200.
- Click Open to open the serial connection. Assuming the board is connected and you entered the correct COM port, the terminal window will open. If the configuration is not correct, PuTTY will alert you.
- You're ready to go
Tera Term Tutorial
Tera Term Tutorial
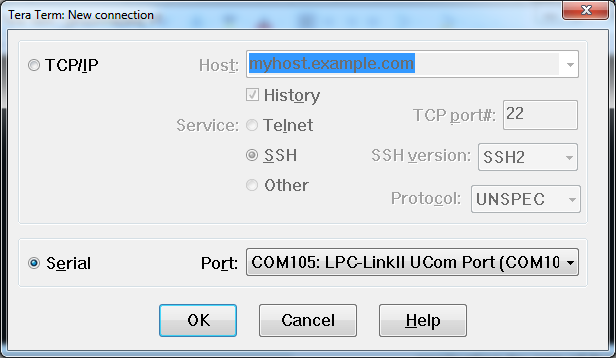
Tera Term is a very popular open source terminal emulation application. This program can be used to display information sent from your NXP development platform's virtual serial port.
- Download Tera Term from SourceForge. After the download, run the installer and then return to this webpage to continue.
- Launch Tera Term. The first time it launches, it will show you the following dialog. Select the serial option. Assuming your board is plugged in, there should be a COM port automatically populated in the list.
- Configure the serial port settings (using the COM port number identified earlier) to 115200 baud rate, 8 data bits, no parity and 1 stop bit. To do this, go to Setup → Serial Port and change the settings.
- Verify that the connection is open. If connected, Tera Term will show something like below in its title bar.
- You're ready to go

Support
Training
| Training | Description |
|---|---|
| LPC800 Training | Full list of on-demand training, how-to videos and webinars from NXP about this product. |
| Using the MCUXpresso Pins Tool in a FreeRTOS project | How to configure pin routing in a FreeRTOS project using the Freedom-K66F board. |
Forums
Connect with other engineers and get expert advice on designing with the LPC80x family on one of our community sites.
- LPC Microcontrollers Knowledge Base
- LPC Microcontrollers
- LPC FAQs
- General Purpose Microcontrollers
- MCUXpresso
Debugger Firmware Update
- First download the driver from here.
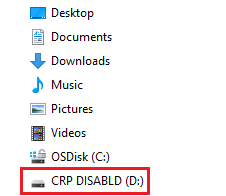
- Hold down the reset button and keep it held down while applying power to the board. Release reset. Using File Explorer (or equivalent on Mac/Linux platforms), look at the available drives on your system. A device called CRP_DISABLED will appear.
- Delete the firmware.bin file on the CRP_DISABLED drive.
- Drag and drop the firmware.bin file you downloaded from nxp.com on to the CRP_DISABLED drive.
- Repower the board.
- The board should now enumerate on your system - allow 20-30 seconds for this to complete.

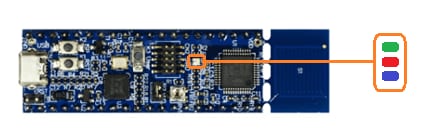
Demo not working?
Did your board come in a box that looks like this?

No problem! Your board simply came in the old packaging and has a different out-of-box demo loaded into the flash memory.
You should be seeing the RGB LED toggling between each of the three colors; red, blue and green. It's OK to move onto the next step when you're ready.
Still not working?
Try proceeding to the next steps to get other example applications running on your board. If you still have problems, try contacting us through the NXP Community.
Running a demo using Arm
1. Set Up Toolchain
This section contains the steps to install the necessary components required to build and run a KSDK demo application with the Arm GCC toolchain, as supported by the Kinetis SDK. There are many ways to use Arm GCC tools, but this example focuses on a Windows environment. Though not discussed here, GCC tools can also be used with both Linux OS and Mac OSX.
Install GCC Arm Embedded Toolchain
Download and run the installer from launchpad.net/gcc-arm-embedded. This is the actual toolchain (i.e., compiler, linker, etc.). The GCC toolchain should correspond to the latest supported version, as described in the Kinetis SDK Release Notes.
Install MinGW
The Minimalist GNU for Windows (MinGW) development tools provide a set of tools that are not dependent on third party C-Runtime DLLs (such as Cygwin). The build environment used by the KSDK does not utilize the MinGW build tools, but does leverage the base install of both MinGW and MSYS. MSYS provides a basic shell with a Unix-like interface and tools.
-
Download the latest MinGW mingw-get-setup installer from sourceforge.net/projects/mingw/files/Installer/.
-
Run the installer. The recommended installation path is C:\MinGW, however, you may install to any location.
-
Ensure that the "mingw32-base" and "msys-base" are selected under Basic Setup.

-
Click "Apply Changes" in the "Installation" menu and follow the remaining instructions to complete the installation.
-
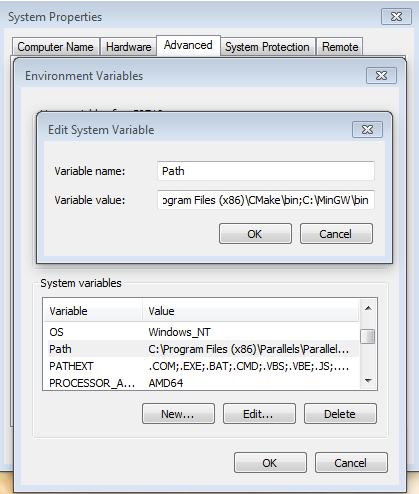
Add the appropriate item to the Windows operating system Path environment variable. It can be found under Control Panel -> System and Security -> System -> Advanced System Settings in the "Environment Variables..." section. The path is:
\bin Assuming the default installation path, C:\MinGW, an example is shown below. If the path is not set correctly, the toolchain does not work.
NOTE
If you have "C:\MinGW\msys\x.x\bin" in your PATH variable (as required by KSDK 1.0.0), remove it to ensure that the new GCC build system works correctly.
-
Download CMake 3.0.x from www.cmake.org/cmake/resources/software.html.
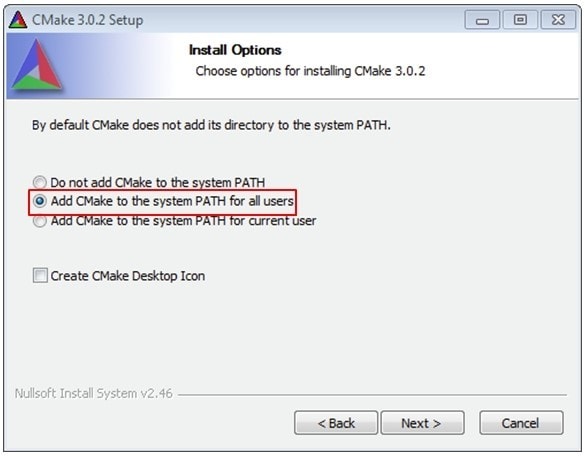
-
Install CMake, ensuring that the option "Add CMake to system PATH" is selected when installing. It's up to the user to select whether it's installed into the PATH for all users or just the current user. In this example, the assumption is that it's installed for all users.
-
Follow the remaining instructions of the installer.
-
You may need to reboot your system for the PATH changes to take effect.
NOTE
The installation path cannot contain any spaces.
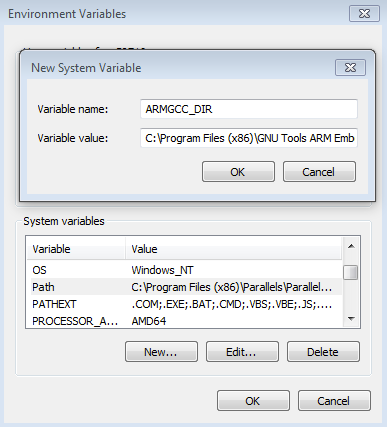
Add a New Environment Variable for ARMGCC_DIR
Create a new system environment variable and name it ARMGCC_DIR. The value of this variable should point to the Arm GCC Embedded tool chain installation path, which, for this example, is:
C:\Program Files (x86)\GNU Tools Arm Embedded\4.9 2015q3
Reference the installation folder of the GNU Arm GCC Embedded tools for the exact path name of your installation.
Install CMake
2. Build an Example Application
To build an example application, follow these steps.
-
1. If not already running, open a GCC Arm Embedded tool chain command window. To launch the window, from the Windows operating system Start menu, go to “Programs -> GNU Tools Arm Embedded
” and select “GCC Command Prompt”. 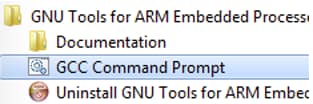
-
Change the directory to the example application project directory, which has a path like this:
/boards/ / / /armgcc For this guide, the exact path is:
/boards/frdmk64f/demo_apps/hello_world/armgcc -
Type “build_debug.bat” on the command line or double click on the "build_debug.bat" file in Windows operating system Explorer to perform the build. The output is shown in this figure:

3. Run an Example Application
The GCC tools require a J-Link debug interface. To update the OpenSDA firmware on your board to the latest J-Link app, visit www.nxp.com/opensda. After installing the J-Link OpenSDA application, download the J-Link driver and software package from www.segger.com/downloads.html.
-
Connect the development platform to your PC via USB cable between the "SDAUSB" USB port on the board and the PC USB connector.
-
Open the terminal application on the PC (such as PuTTY or TeraTerm) and connect to the debug COM port you determined earlier. Configure the terminal with these settings:
- 15200 baud rate
- No parity
- 8 data bits
- 1 stop bit
-
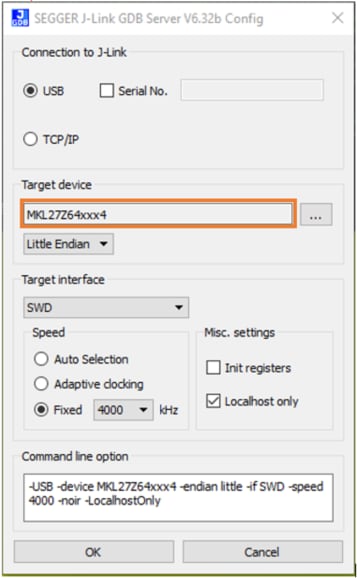
Open the J-Link GDB Server application. Assuming the J-Link software is installed, the application can be launched by going to the Windows operating system Start menu and selecting "Programs -> SEGGER -> J-Link
J-Link GDB Server". -
Modify the settings as shown below. The target device selection chosen for this example is the “MK64FN1M0xxx12” and use the SWD interface.

-
After it is connected, the screen should resemble this figure:

-
If not already running, open a GCC Arm Embedded tool chain command window. To launch the window, from the Windows operating system Start menu, go to "Programs -> GNU Tools Arm Embedded
" and select "GCC Command Prompt". 
-
Change to the directory that contains the demo application output. The output can be found in using one of these paths, depending on the build target selected:
/boards/ / / /armgcc/debug /boards/ / / /armgcc/release For this guide, the path is:
/boards/frdmk64f/demo_apps/hello_world/armgcc/debug -
Run the command "arm-none-eabi-gdb.exe
.elf". For this example, it is "arm-none-eabi-gdb.exe hello_world.elf". 
-
Run these commands:
- "target remote localhost:2331"
- "monitor reset"
- "monitor halt"
- "load"
- "monitor reset"
-
The application is now downloaded and halted at the reset vector. Execute the "monitor go" command to start the example application.
The hello_world application is now running and a banner is displayed in the terminal window.

Use the Clocks Tool
- Open MCUXpresso Config Tools.
-
Open the Clocks tool from the toolbar: Tools->Clocks.

-
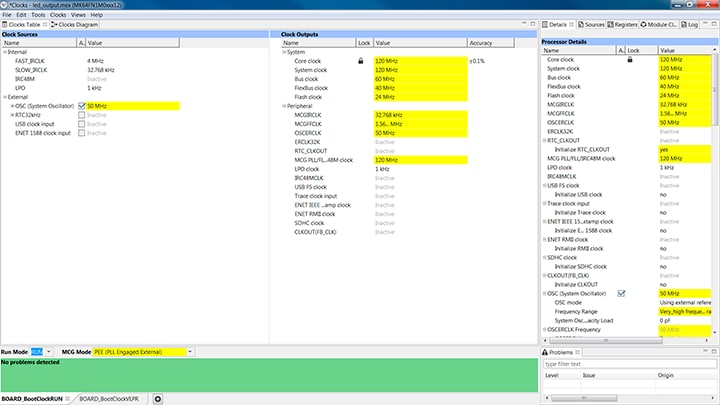
The clock configuration for the “led_output” project will appear in the clocks tool:
-
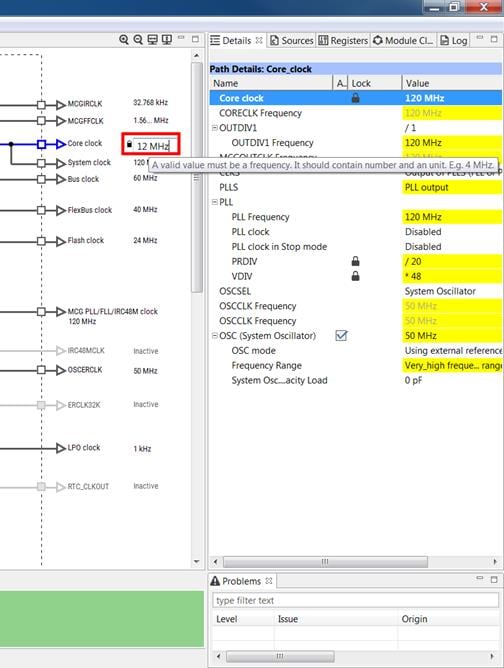
Switch to the Clocks Diagram view by clicking the tab in the upper left corner, and ensure that the BOARD_BootClockRUN clock mode is being displayed by clicking the tab in the lower left corner.

-
Change the core clock frequency by clicking in the Core Clock field and typing “12 MHz”. You’ll see all the associated clock frequencies automatically change as well then.
-
Now open the “Sources” tab and export the clock_config.c and clock_config.h files.

-
Select the directory to export the clock_config.c and clock_config.h files. In this example export to the “board” folder in the led_output project in the workspace.
(i.e. C:\MCUXpressoIDE_Lab\frdmk64f_driver_examples_gpio_led_output\board). Select Finish.

-
Press Yes to replace the existing clock_config.c and clock_config.h files.

-
Now open the led project in your IDE, and build, download, and run the project as you did before.

- The blue LED should now be blinking at a much slower rate