Getting Started with IMX8MMINI-IARD Interposer Board
Contents of this document
-
Out of the Box
-
Get Hardware
-
Configure the Hardware
Sign in to save your progress. Don't have an account? Create one.

Purchase your i.MX8M Mini EVK Interposer for Arduino Shield
1. Out of the Box
The NXP analog product development boards provide an easy-to-use platform for evaluating NXP products. The boards support a range of analog, mixed-signal and power solutions. They incorporate monolithic integrated circuits and system-in-package devices that use proven high-volume technology. NXP products offer longer battery life, a smaller form factor, reduced component counts, lower cost, and improved performance in powering state-of-the-art systems.
This page will guide you through the process of setting up and using the IMX8MMINIIARD interposer board.
1.1 Kit Contents and Packing List
The IMX8MMINI-IARD contents include:
- Assembled and tested interposer board in an anti-static bag
- Quick Start Guide
CAUTION
This product has not undergone formal EMC assessment. It is the responsibility of the user to ensure that any finished assembly complies with applicable regulations on EMC interference. EMC testing, and other testing requirements for CE is the responsibility of the user.
2. Get Hardware
2.1 Board Features
- Operates in conjunction with i.MX 8M Mini LPDDR4 EVK board
-
Direct connection (as mezzanine card to i.MX Mini LPDDR4 EVK –
J1003) - Direct connection with Arduino cards and devices
2.2 Board Description
The IMX8MMINI-IARD interposer board is designed to be used along with an i.MX8M Mini LPDDR4 EVK board. The i.MX 8M Mini LPDDR4 EVK is an evaluation board used mainly to test and operate the i.MX Mini Applications Processor, designed and manufactured by NXP Semiconductors.
Among the several peripherals, the EVK contains a
general-purpose expansion connector, allowing flexible
interconnections between EVK and other devices. However, the EVK
board does not contain an Arduino port. The IMX8MMINI-IARD
interposer board is intended to bridge this gap. Connecting the
interposer board to expansion connector J1003, the i.MX 8M Mini
LPDDR4 EVK allows for direct connection with Arduino compatible
boards and devices.
2.3 Board Components
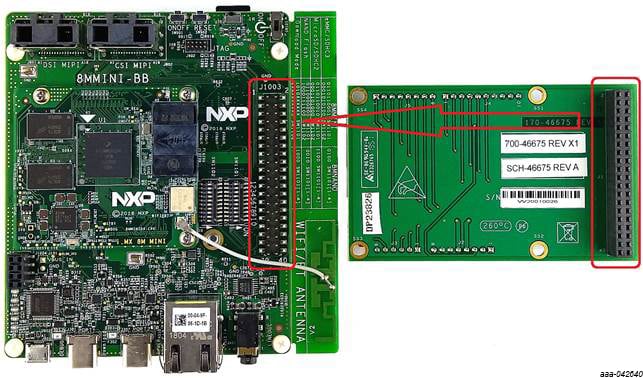
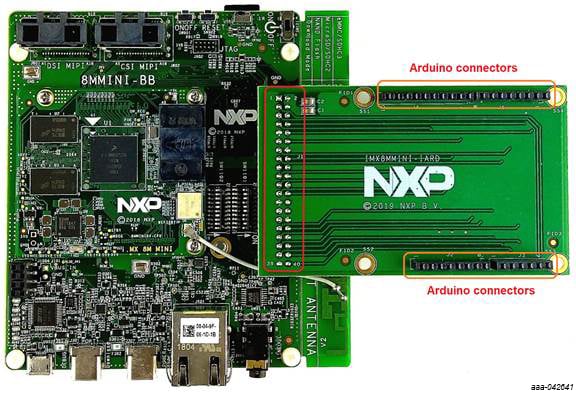
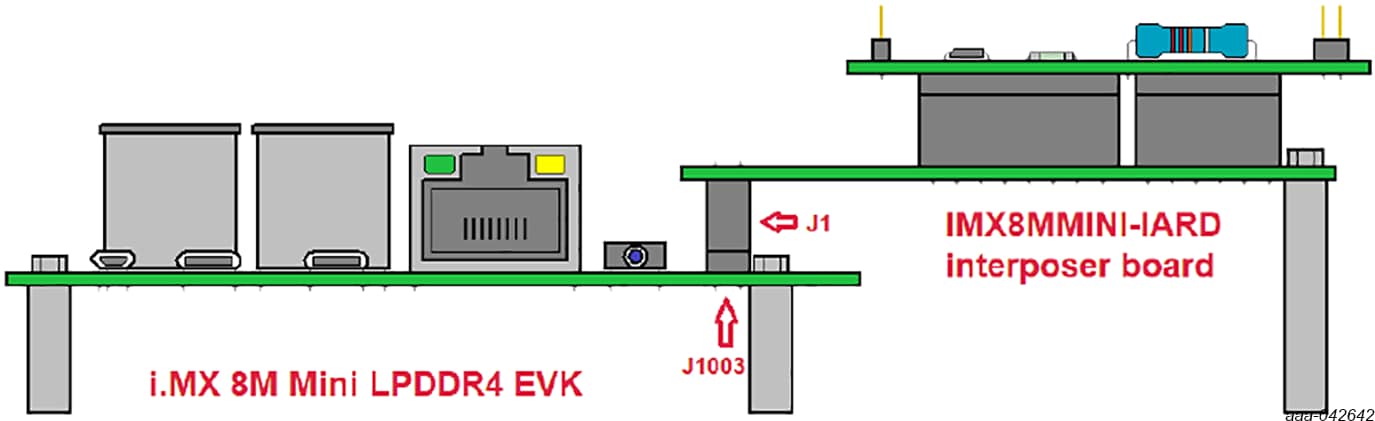
The interposer board can be attached to the EVK by plugging the
J1 connector (located on the bottom side of the interposer
board) into J1003 expansion connector (located on the top side
of the EVK), as illustrated in
Figure 1 and Figure 2.
The assembly allows the user to connect any daughter card or external device equipped with an Arduino interface to the i.MX 8M Mini LPDDR4 evaluation board.