Getting Started with the FreeMASTER Sensor Tool
Contents of this document
-
Plug It In
-
Get Software
-
Build, Run
-
Create
Sign in to save your progress. Don't have an account? Create one.

Purchase your FreeMASTER Sensor Tool
1. Plug It In
1.1 Select a Sensor Demonstration Kit
- Go to Sensor Evaluation Boards and select the desired Demonstration Kit
- Take FRDM-K22F-A8974 Demonstration Kit as an example
1.2 Plug it in
Connect the Sensor Demonstration Kit to the PC via the USB cable between the OpenSDA USB port on the board and the USB connector on the PC.
1.3 Board Settings
All the supported sensor demonstration kits should work “Out of Box” with the FreeMASTER Sensor Tool. These sensor kits do not require any hardware configuration changes. Refer to “Hardware Configuration” subsection of FreeMASTER Sensor Tool GUI to get more details on default jumper settings on the sensor kit.
1.4 OpenSDA
NXP Freedom MCU boards are supplied with OpenSDA firmware preloaded.
For a smooth ‘Out of Box’ experience with FreeMASTER Sensor Tool, make sure that the latest version of the default OpenSDA boot loader and Firmware application is on the supported Freedom development board. This allows debugging, flash programming and serial communication over a USB cable.
Obtain the latest OpenSDA drivers for FRDM boards from the link below.
OpenSDA Update to the FRDM boards
Locate the section "Download – OpenSDA Bootloader and Application" and select your FRDM Board from the dropdown list. Strictly follow the provided instructions to program the board.
For Windows 10 systems, the older versions of the OpenSDA drivers could get corrupted when the board is plugged on a Windows 10 machine. As a result, many boards might get not detected as an MSD or a COM port on Win 10. The latest versions of the OpenSDA software are compatible with Windows 10 and can be obtained from the link above. The current FRDM-K64F, FRDM-K22F and FRDM-KL27Z boards come with an older version of OpenSDA drivers from the factory and require a mandatory OpenSDA update.
1.5 PC Configuration
The output data from the provided example applications is provided over the MCU UART. This requires that the driver for the board’s virtual COM port is installed on the PC. The board MUST be plugged into the PC before the driver installer is run.
If you have not installed already an Arm IDE toolchain, download and Install the Windows drivers corresponding to the default OpenSDA Application selected above:
Once the Windows Serial Port Drivers are installed on the PC, determine the port number of the board’s virtual COM port by opening the device manager and looking under the "Ports" group.
The demonstration kit is now ready to communicate with the PC.
2. Get Software
2.1 Download and Install FreeMASTER
The FreeMASTER application is distributed as a standalone, single-file, self-extracting, executable file. Download the latest FreeMASTER Tool – Windows Installer file from FreeMASTER Tool page, install the tool and proceed according to the onscreen instructions.
2.2 Download and Install FreeMASTER Sensor Tool
The FreeMASTER sensor tool provides the following:
- Sensors FreeMASTER embedded application: an ISSDK-based sensor embedded application, integrated with FreeMASTER drivers, using a proprietary communication protocol to communicate to FreeMASTER host side.
- Sensors FreeMASTER Host GUI: FreeMASTER based host GUI application enabling direct read/write access mapping to sensor registers and variables along with control page and register page implementation.
Perform following steps to download and install FreeMASTER sensor tool:
Run the installer and follow any onscreen instructions. By default, the installer app installs the package into c:\nxp\FreeMASTER_Sensor Tool folder and refer to it as "FreeMASTER Sensor Tool directory"
3. Build, Run
3.1 Download sensor demo firmware
This section refers to FRDM-K22F-A8974 (FXLS8974CF Demo) for execution steps. For other supported sensor demos, apply similar steps.
Go to “<FreeMASTER sensor tool directory>/sensors/fxls8974cf” folder.
Drag and drop “frdmk22f_a89xx_i2c_project.bin” firmware into “FRDM-K22F” virtual mass drive on your Windows PC. When the file copy operation completes, unplug and replug the board into your Windows PC.
3.2 Run out-of-box sensor demo
- Launch FreeMASTER Windows application.
- Click on “Connection Wizard” and click “Next>”.
- Select “Use direct connection to on board USB port” and click “Next>”
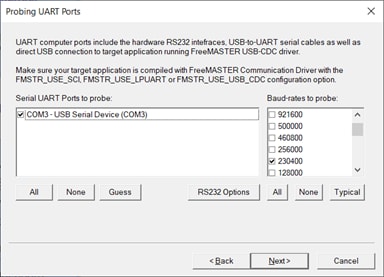
- The FreeMASTER tool detects the COM port with the configured baud-rate automatically. Confirm the COM port and baud-rate, click “Next>”.
- FreeMASTER detects the board connection and will ask to confirm the detected settings. Confirm by selecting “Yes” and click “Finish”.
- FreeMASTER opens an option to “Open an Existing Project”. Select the option.
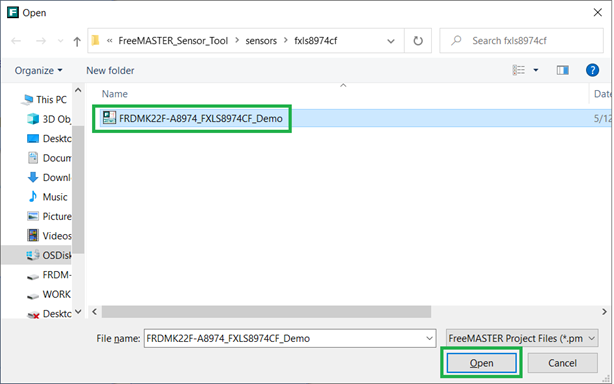
- Browse to “<FreeMASTER sensor tool directory>/sensors/fxls8974cf” folder and select “FRDMK22F-A8974_FXLS8974CF_Demo.pmpx” sensor demo project. Click “Open”.
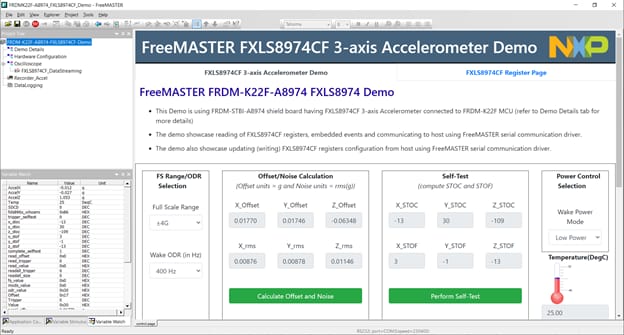
- FreeMASTER launches the FXLS8974CF sensor demo and opens the control page where user can see sensor power control selections, FS/ODR selections, Offset/Noise measurement selection, along with time-series charts for accelerometer samples.
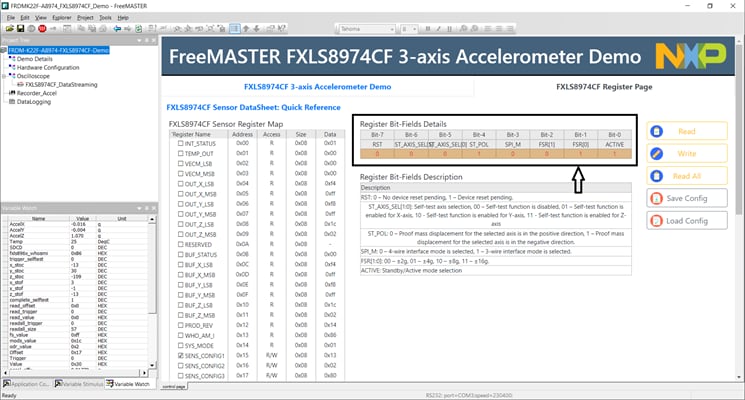
- Click “FXLS8974CF Register Page” tab to access the FXLS8974CF register set. Click “Read All” to view instantaneous values of the FXLS8974CF sensor registers in real time.
- Users can select specific registers and perform single register read or write actions in real time. For a chosen sensor register with read/write access, users can toggle bitfields to change the register value and click “Write” to perform register write operation and/or perform register read by clicking “Read”.


4. Create
4.1 Download FreeMASTER sensor embedded projects
- Build and download FRDM-K22F-A8974 SDK from MCUXpresso SDK builder
- Download and Install MCUXpresso IDE on your windows development PC
- Install the downloaded FRDM-K22F-A8974 SDK package into MCUXpresso IDE (Simply drag and drop the zipped SDK package as it is to the “Installed SDKs” view)
- Download FreeMASTER_Sensor_FW_Projects.zip from FreeMASTER Sensor download tab, refer to it as "<FreeMASTER Sensor Projects directory>"
4.2 Create a custom target embedded application
Import the “frdmk22f_a89xx_i2c_project” available under "<FreeMASTER Sensor Projects directory> to start with the template project.
Identify the target output variables to control, monitor and visualize using the FreeMASTER Sensor Tool host application.
Create a TSA (Target Side Addressable) translation table using FreeMASTER macros and add user identified output variables into TSA.
Rebuild your embedded project and program the FRDM-K22F-A8974 evaluation kit.
4.3 Create a custom host GUI application
Create custom sensor host GUI application using out-of-the-box demo template.
Launch the FreeMASTER Windows application and connect the FRDM-K22F-A8974 evaluation kit to your development PC via the USB cable between the OpenSDA USB port on the board and the USB connector on the PC.
Run the connection wizard on the FreeMASTER application. The connection wizard detects the COM port and starts an empty project.
Add TSA mapped variables into the FreeMASTER “Variable Watch” window.
- Double-click in the “Variable Watch” window, select the variable address (TSA mapped variable in your embedded application) and assign a variable name for it
- Check the variable type and size
- Make the sampling period as “fastest”
- Change the variable unit field, for example, G for acceleration output

Right-click on your project name and select “Create Oscilloscope” to add one or more oscilloscopes to your project and add watch variables (for example, Accel X):
- Add a name for your project oscilloscope in the “Main Settings”
- Go to “Variables” tab and add variable (AccelX)
- Click “OK” to be able to visualize added watch variable in oscilloscope

Create the GUI control page using FreeMASTER json-rpc APIs for reading/writing mapped variables.
Use the available, out-of-the-box example HTML control page template (index.html available under “<FreeMASTER sensor tool directory>/sensors/fxls8974cf” folder) as a reference to add custom widgets such as drop-down, display boxes, buttons and charts.
Save the the GUI project (*pmpx).
After performing these steps, the sensor host application is ready for use.
Get Help
Training
Want to learn more about using the FreeMASTER Sensor tool? Check out our selection of training offerings ranging from online mini tech sessions to hands-on deep-dive training for help.