Getting Started with the UCANS32K146 | NXP Semiconductors

Getting Started with the UCANS32K146

Last Modified: 2020-06-26 05:54:26Supports S32K146 UAVCAN V1 and MAVCAN Development System

Contents of this document

  • 1

    Get Software
  • 2

    Plug It In
  • 3

    Load and Run

1. Get Software

1.1 Get your Integrated Development Environment (IDE)

UCANS32K146 performs better when using S32 Design Studio for Arm® IDE

Download S32 Design Studio for Arm

1.2 Get the CAN FD ECHO EXAMPLE Files

Test a 4 Mbit/s frame transfer demo between a pair of UCANS32K146 boards.

Get the CAN FD echo example

2. Plug It In

Get to know your UCANS32K146 board:

UCANS32K146-GS-FRONT

UCANS32K146-GS-FRONT

UCANS32K146-GS-BACK

UCANS32K146-GS-BACK

2.1 Plug the CAN Connectors

Connect two boards with termination resistors CAN-TERM in the CAN0B socket of both boards, and a CAN cable between CAN0A of each one.

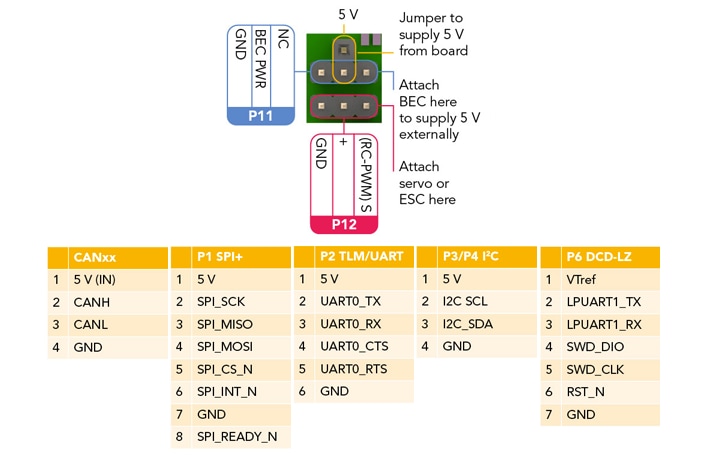
2.2 Plug the Power Supply

Connect a 5 V supply to the dedicated power pin headers of the board or optionally via the CAN connectors.

UCANS32K146_GS-POWER

UCANS32K146_GS-POWER

3. Load and Run

3.1 Load Example in S32 Design Studio for Arm® IDE

Click File > Import, and select “Projects from Git”; then click on “Clone URI”.

Paste the repository link and continue.

3.2 Build, Flash, and Run

Choose the “NODE_A” build configuration in S32DS and flash a board, then select “NODE_B” and flash the remaining one.

A green LED will start blinking each time 2000 have been transferred successfully.