Getting Started with the LPCXpresso845-MAX Evaluation Board
Contents of this document
-
Plug It In
-
Get Software
-
Build, Run
Sign in to save your progress. Don't have an account? Create one.

Purchase your LPCXpresso845-MAX Board for LPC84x MCU family
1. Plug It In
Let's take your LPCXpresso845-MAX board for a test drive! You have the choice of watching the sequence in a short video orfollowing the detailed actions list below.
1.2 Install drivers and update debug probe firmware
Before using your board, it is recommended that you download update the firmware for the LPC11U35 debug probe on the board. Start by downloading the firmware and driver package and from here.
If using Windows 7 or 8, run the device driver installation executable file that is included in this package.
Install JP1 then plug in the board:
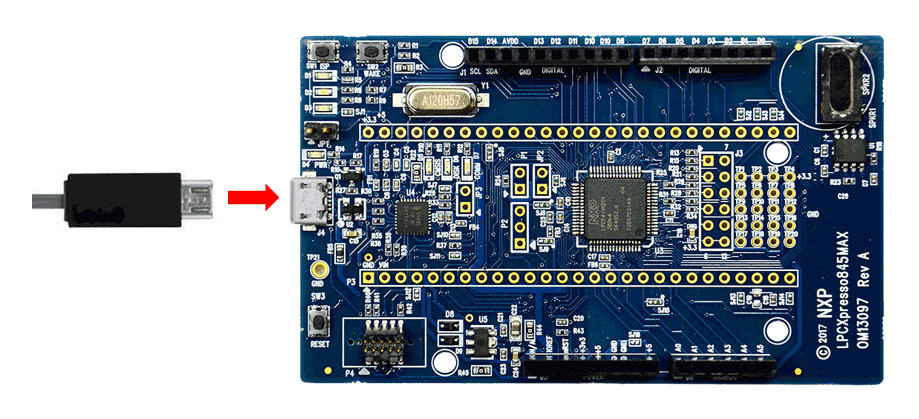
You will see a device called CRP_DISABLED appear in your computer file manager. Go to this drive and delete the file “firmware.bin” from that drive. Drag and drop the firmware.bin file from the firmware and driver package you just downloaded onto the CRP_DISABLED drive. Remove JP1 then disconnect and reconnect the USB cable, then wait a few seconds for the new device driver to install.
You will notice that once you power the board, blue user LED at the top left of the board will flash. This is a basic program that comes pre-programmed on the LPC845 device to show it is working.
2. Get Software
2.1 Jump Start Your Design with the Code Bundles
LPC8xx Family Code Bundles are easy to understand drivers and examples, with full source code provided.
Get Code Bundle Go to Software Tab
2.2 Install your toolchain
NXP offers a free, GNU/Eclipse based toolchain called MCUXpresso IDE.

Want to use a different toolchain?
No problem! The MCUXpresso SDK includes support for other tools such as IAR and Keil .

2.3 Serial terminal
Some Code Bundle UART examples set up for IAR and Keil tools use the MCU UART for print output, and this is also an option for the MCUXpresso IDE. If you are not sure how to use a terminal application try one of these tutorials:
Not sure how to use a terminal application? Try one of these tutorials:
3. Build, Run
3.1 Build, Run
Note that MCUXpresso IDE has built-in knowledge of the LPC84x part family, so does not require any SDK installation steps. Follow the steps below to build and run a simple example from the LPC84x Code Bundles provided by NXP. Code Bundles for the LPC8xx family are included in the MCUXpresso IDE installation. These can also be downloaded from nxp.com (in case of any updates between IDE releases). (Note that MCUXpresso IDE has a link to the Code Bundle Page in the Help → Additional Resources menu).
Open a new workspace in the IDE.
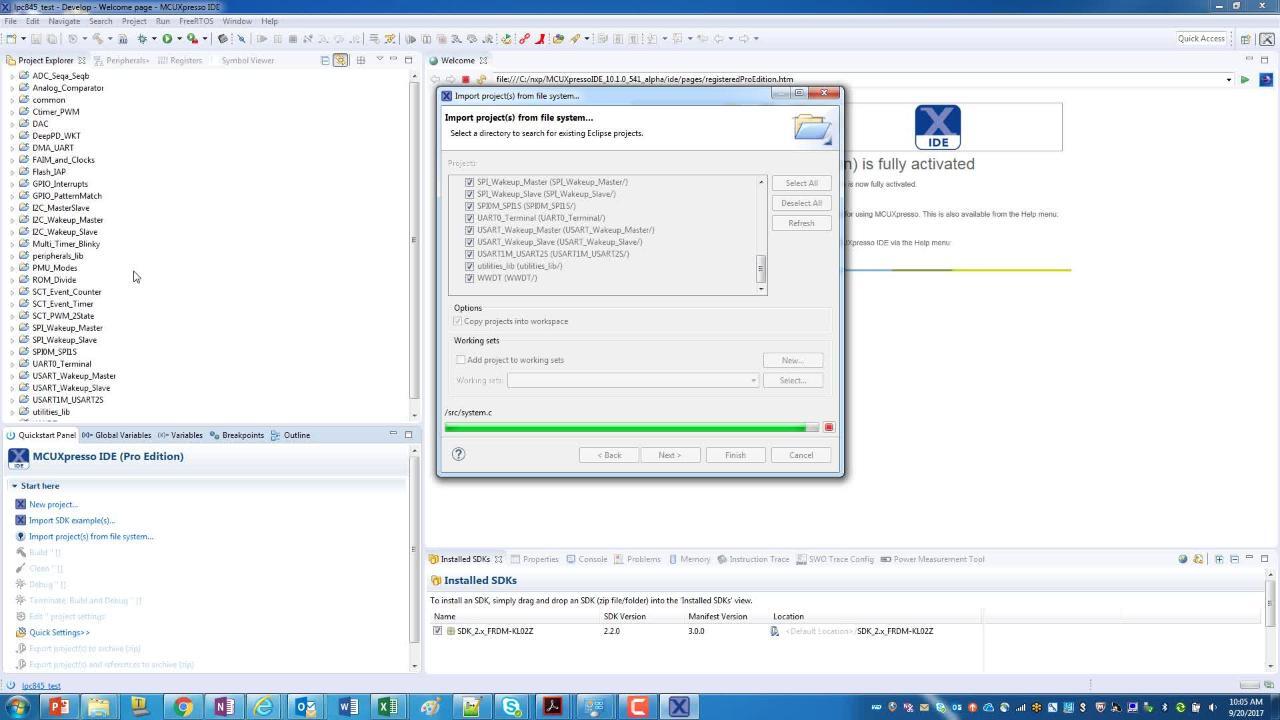
In the Quickstart panel of the IDE, click in “Import project(s) from the file system”.
In the “Import project(s) from file system...” dialog box that opens, click “Browse...” in the Project Archive (from zip) section, and select the LPC84x Code Bundle zip file from the Code Bundles directory in the MCUXpresso IDE installation (or select a version downloaded from nxp.com, as described in Step 1 above.) Click “Next >” on the “Import project(s) from file system...” dialog to continue.
You will see several projects listed in the Code Bundle; click “Finish” to import them all.
The dialog box will close, and you will see the imported projects in the Project tab at the upper left window of the IDE. Click on Example_Multi_Timer_Blinky to select it, then select Build from the Quickstart panel. You will see the build processing in the Console window to the right of the Quickstart panel. The projects are set up to include dependency checking, so the build process will automatically build the utility and peripheral libraries as well as the example program.
Ensuring the LPCXpresso845MAX is connected to the host computer, click Debug in the Quickstart panel. The IDE will search for available debug probes. Select the debug probe that appears for your board, then click OK. Note that the IDE will remember your selection for the next time you debug this project, so will not prompt for this again, unless it cannot find the board.
The code will execute to main. Press F8 to resume and run the program. You will now see the User LEDs light, each color in turn.
Tera Term Tutorial
Tera Term Tutorial
Tera Term is a very popular open source terminal emulation application. This program can be used to display information sent from your NXP development platform's virtual serial port.
- Download Tera Term from SourceForge. After the download, run the installer and then return to this webpage to continue
- Launch Tera Term. The first time it launches, it will show you the following dialog. Select the serial option. Assuming your board is plugged in, there should be a COM port automatically populated in the list
- Configure the serial port settings (using the COM port number identified earlier) to
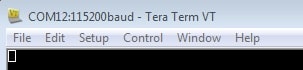
115200baud rate, 8 data bits, no parity and 1 stop bit. To do this, go to Setup → Serial Port and change the settings - Verify that the connection is open. If connected, Tera Term will show something like below in its title bar
- You're ready to go

Putty Tutorial
Putty Tutorial
PuTTY is a popular terminal emulation application. This program can be used to display information sent from your NXP development platform's virtual serial port.
- Download PuTTY using the button below. After the download, run the installer and then return to this webpage to continue
- Launch PuTTY by either double clicking on the
*.exefile you downloaded or from the Start menu, depending on the type of download you selected - Configure In the window that launches, select the Serial radio button and enter the COM port number that you determined earlier. Also enter the baud rate, in this case
115200 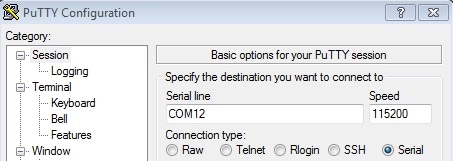 Click Open to open the serial connection. Assuming the board is connected and you entered the correct COM port, the terminal window will open. If the configuration is not correct, PuTTY will alert you
- You're ready to go
Wired Communications
Wired Communications
| Documents and Videos | Description |
|---|---|
| AN12726 Using SCT to Simulate UART | SCT is very flexible and can be used to simulate a UART in cases where all UARTs are used for external communication leaving none left over for other applications like debugging. |
Wireless Connectivity
Wireless Connectivity
| Documents and Videos | Description |
|---|---|
| Using NFC Reader Library with LPC845 | How to use the NFC Reader Library with LPC845 using the Basic Discovery Loop example. |
Power Management
Power management includes device-specific techniques and information on power management and low-power optimization.
MCUXpresso SDK Examples
Several examples, demos and drivers are available within the SDK to help you get started. A common example related to power management is listed below.
Power Mode Switch LPC
Shows the usage of normal power mode control APIs for entering the four kinds of low power mode: Sleep mode, Deep Sleep mode, Power Down mode and Deep Power Down mode.
Path:
<SDK_PATH>/boards/lpc845max/demoapps/power_mode_switch_lpc
Touch and Sensing
NXP provides software libraries and tools to complement our IEC 61000-4-6 certified and low-cost capacitive touch solutions for the LPC8xx MCUs, empowering you to move rapidly and smoothly from initial prototyping to full product development.
| Documents and Videos | Description |
|---|---|
| AN12178 A Simple Way of Using CapTouch on LPC800 MCUs | Using the CapTouch module on LPC8xx MCUs to support the low-cost and hardware resource-limited platform. |
| AN12083 Capacitive Touch software and sensitivity test results on LPC800 CAPTouch Module | Software enables the Capacitive Touch application on the LPC8xx family, with filters and algorithms for the touch key detection. Tests illustrate the sensitivity performance of the Capacitive Touch application. |
| Capacitive Touch Sensor Design | How to design the Capacitive Touch Sensor for the LPC845 Cap Touch Interface. |
Tools and References
OM40004 Capacitive Touch Development Kit Enables easy evaluation of the capacitive touch features of the LPC84x family of devices. The Kit can be used with a range of development tools, including the MCUXpresso IDE, IAR EWARM and Keil MDK.
Example Code Bundles for OM40004 Touch Development Kit
Display and Graphics
Display and Graphics
| Documents and Videos | Description |
|---|---|
| OLED Display Application Example using LPC845 Breakout Board and SPI | How to use the LPC845BRK with an OLED display based on the SSD1306 controller and using SDK drivers for SPI. |
Motor Control
Motor control is a complicated and advanced topic, with a wide range of intricacies and pitfalls that depend on the number of motors, motor type and sensored or sensorless motor drivers.
NXP has a number of ready-to-use motor control algorithms (middleware), and the best way to get started is with the FreeMaster examples included in the MCUXpresso SDK. These examples utilize the FreeMASTER Run-Time Debugging Tool, a user-friendly real-time debug monitor and data visualization tool that enables runtime configuration and tuning of embedded software applications.
FreeMASTER supports non-intrusive monitoring of variables on a running system and can display multiple variables on oscilloscope-like displays as standard widgets (gauges, sliders and more) or as data in text form, offering simple-to-use data recorders. It can link with HTML, MATLAB® or Excel to other scriptable frameworks or even popular visual programming tools like Node-RED .
| Documents and Videos | Description |
|---|---|
| FreeMASTER How To | A starting guide for engineers using FreeMASTER tool. |
| FreeMASTER 3.0 Installation Guide | This article will walk you through the installation process of FreeMASTER 3.0. |
| FreeMASTER Four-Part Webinar Series | On-demand training provides an overview of the FreeMASTER software, its features, capabilities, available examples, application use cases and how to easily get started. |
| AN12602 BLDC with Hall Effect Sensors Using SCT on LPC84x | How to implement the six-step commutation or brushless DC motor control on the LPC84x family of MCUs. |
MCUXpresso SDK Examples
Several examples, demos and drivers are available within the SDK to help you get started. Some common examples related to security are listed below.
Driver Examples
Multiple PWM outputs are demonstrated through Sctimer and Ctimer.
Path:
<SDK_PATH>/boards/lpc845max/driver_examples_ctimer
Path:
<SDK_PATH>/boards/lpc845max/driver_examples_sctimer
FreeMASTER Examples
Watch variables and graphs over various interface options.
Path:
<SDK_PATH>/boards/lpc845max/freemaster_examples
FreeMASTER Communication Driver User's Guide
Describes the embedded-side software driver which implements a serial interface between the application and the host PC and covers the native Serial UART communication and CAN communication for the applicable devices.
Path:
<SDK_PATH>/middleware/freemaster/doc/user_guide
Device Management and Secure OTA
Device Management and Secure OTA
| Documents and Videos | Description |
|---|---|
| AN12393 LPC845 I2C Secondary Bootloader | This document discusses the system setup where the host processor can program the LPC845 via I2C interface assisted by the SBL code. |
| AN12407 LPC845 SPI Secondary Bootloader | This document discusses the system setup where the host processor can program the LPC845 via SPI interface assisted by the SBL code. |
Support
Training
To learn what to do next, find your issue below. If you still need help, contact NXP Support.
| Training | Description |
|---|---|
| LPC800 Training | Full list of on-demand training, how-to videos and webinars from NXP about this product. |
| LPC80x Series Introduction Part III | Get started fast with this comprehensive enablement offering for LPC800 MCUs. |
| Using the MCUXpresso Pins Tool in a FreeRTOS project | How to configure pin routing in a FreeRTOS project using the Freedom-K66F board. |